background image

En 

ENGLISH 


10 


a) 

Do not allow any loose portion of the polishing bonnet or its attachment strings to spin freely. Tuck 

away or trim any loose attachment strings. 

Loose and spinning attachment strings can entangle your fingers 

or snag on the workpiece. 

3.7     Safety Warnings Specific for Wire Brushing Operations:


a) 

Be  aware  that  wire  bristles  are  thrown  by  the  brush  even  during  ordinary  operation.  Do  not 

overstress the wires by applying excessive load to the brush. 

The wire bristles can easily penetrate light 

clothing and/or skin. 
b) 

If the use of a guard is recommended for wire  brushing,  do  not  allow  any  interference  of  the  wire 

wheel or brush with the guard. 

Wire wheel or brush may expand in diameter due to work load and centrifugal 

forces.


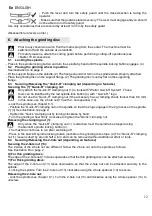
3.8     Additional Safety Instructions: WARNING  


– Always wear protective goggles. 


Use only accessories that are covered by at least 3.4 mm by the safety guard. 
Use elastic cushioning layers if they have been supplied with the grinding media and 
if required. 
Observe  the  specifications  of  the  tool  or  accessory  manufacturer!  Protect  the  discs 

from grease or impacts! 
Grinding discs must be stored and handled with care in accordance with the manufacturer's instructions. 
Never use cutting discs for roughing work! Do not apply pressure to the side of the cutting discs. 
The workpiece must lay flat and be secured against slipping, e.g. using clamps. Large workpieces must be 
sufficiently supported. 
If accessories with threaded inserts are used, the end of the spindle may not touch the base of the hole on 
the grinding tool. Make sure that the thread in the accessory is long enough to accommodate the full length of 
the spindle. The thread in the accessory must match the thread on the spindle.  
Use of a fixed extractor system is recommended. Always install an RCD  with a max. trip current of 30 mA 
upstream. If the angle grinder is shut down via the RCD, it must be checked and cleaned.  

Damaged, eccentric or vibrating tools must not be used. 
Avoid damage to gas or water pipes, electrical cables and load-bearing walls (static). 
Pull the plug out of the socket before making any adjustments, converting or servicing the machine. 
When the safety clutch responds, switch off the machine immediately! 
A damaged or cracked side handle must be replaced. Never operate a machine with a defective side handle. 
A damaged or cracked safety guard must be replaced. Never operate a machine with a defective safety guard. 
Secure small workpieces. For example, clamp in a vice. 


Additional Warnings:

California Prop 65 08_2018 

Some dust created by power sanding, sawing, grinding, drilling, and other construction activities 
contains chemicals known to cause cancer, birth defects or other reproductive harm. Some 
examples of these chemicals are: 

• 

Lead from lead-based paints, 

• 

Crystalline silica from bricks and cement and other masonry products, and 

• 

Arsenic and chromium from chemicallytreated lumber. 

Your risk from these exposures varies, depending on how often you do this type of work. To reduce your 
exposure to these chemicals: work in a well ventilated area, and work with approved safety equipment, such 
as those dust masks that are specially designed to filter out microscopic particles.


Summary of Contents for 30-A 150

Page 1: ... www walter com MINI 4 5 6161K 30 A 161 MINI PS 4 5 6163B 30 A 163 MINI PLUS 5 6255J 30 A 255 SUPER 5 6150I 30 A 150 SUPER 5 PS 6153C 30 A 153 PRO 5 6157A 30 A 157 BIG 6 6260J 30 A 260 BIG 6 PS 6263B 30 A 263 IRONMAN IRONMAN PS QUICK STEP FINISHER 6560A 6563A 6275B 30 A 560 30 A 563 30 A 275 170275220 0818 ...

Page 2: ...2 ...

Page 3: ...3 ...

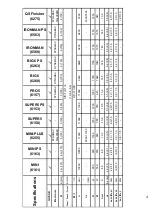
Page 4: ...5 14 5 14 5 14 5 13 5 m lbs kg 4 6 2 1 4 6 2 1 5 5 2 5 5 3 2 4 5 3 2 4 5 5 2 5 5 5 2 5 6 2 2 8 5 5 2 5 6 2 2 8 5 5 2 5 a h SG K h SG m s 2 4 9 1 5 4 9 1 5 4 0 1 5 6 0 1 5 4 9 1 5 4 0 1 5 4 0 1 5 4 5 1 5 4 9 1 5 6 0 1 5 4 7 1 5 a h D S K h D S m s 2 2 5 1 5 2 5 1 5 3 0 1 5 2 5 1 5 2 5 1 5 3 0 1 5 3 0 1 5 4 2 1 5 4 0 1 5 4 9 1 5 2 5 1 5 a h P K h P m s 2 3 6 1 5 2 5 1 5 QS Finisher 6275 2000 7600 5 ...

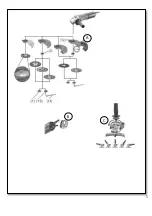
Page 5: ...5 B C A ...

Page 6: ...ow the warnings and instructions may result in electric shock fire and or serious injury Save all warnings and instructions for future reference The term power tool in the warnings refers to your mains operated corded power tool or battery operated cordless power tool 2 1 Work area safety a Keep work area clean and well lit Cluttered or dark areas invite accidents b Do not operate power tools in e...

Page 7: ... your application The correct power tool will do the job better and safer at the rate for which it was designed b Do not use the power tool if the switch does not turn it on and off Any power tool that cannot be controlled with the switch is dangerous and must be repaired c Disconnect the plug from the power source and or the battery pack from the power tool before making any adjustments changing ...

Page 8: ... Keep bystanders a safe distance away from work area Anyone entering the work area must wear personal protective equipment Fragments of workpiece or of a broken accessory may fly away and cause injury beyond immediate area of operation j Hold the power tool by insulated gripping surfaces only when performing an operation where the cutting accessory may contact hidden wiring or its own cord Cutting...

Page 9: ... reducing the possibility of wheel breakage Flanges for cut off wheels may be different from grinding wheel flanges f Do not use worn down wheels from larger power tools Wheels intended for larger power tools are not suitable for the higher speed of a smaller tool and may burst 3 4 Additional Safety Warnings Specific for Abrasive Cutting Off Operations a Do not jam the cut off wheel or apply exces...

Page 10: ...indle may not touch the base of the hole on the grinding tool Make sure that the thread in the accessory is long enough to accommodate the full length of the spindle The thread in the accessory must match the thread on the spindle Use of a fixed extractor system is recommended Always install an RCD with a max trip current of 30 mA upstream If the angle grinder is shut down via the RCD it must be c...

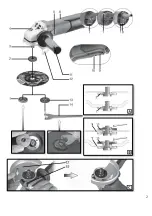
Page 11: ...3 2 hole nut 14 2 hole spanner 15 Lever for safety guard attachment depending on equipment not in scope of delivery 5 Commissioning Before plugging in check to see that the rated mains voltage and mains frequency as stated on the rating label match with your power supply Always install an RCD GFCI with a max trip current of 30 mA upstream 5 1 Attaching the side handle Always work with the addition...

Page 12: ...f the accessory has a clamping shank thicker than 6 8 mm In this case use the 2 hole nut 13 with 2 hole spanner 14 Lock the spindle see chapter 6 1 Position the Quick R clamping nut on the spindle so that the 2 lugs engage in the 2 grooves on the spindle 1 3 See illustration on page 2 Tighten the Quick clamping nut by turning clockwise by hand Turn the grinding wheel firmly clockwise to tighten th...

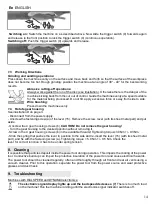
Page 13: ...e machine with both hands using the handles provided stand securely and concentrate Avoid the machine swirling up or taking in dust and chips After switching off the machine only place it down when the motor has come to a standstill Machines with slide switch Switching on Push the sliding switch forward 5 For continuous activation now tilt downwards until it engages Switching off Press the rear en...

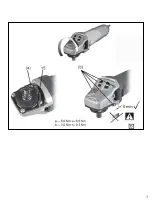
Page 14: ...its sheet metal part and put aside Unscrew the 4 gear housing screws b CAUTION Do not remove the gear housing Turn the gear housing to the desired position without removing it Screw in the 4 gear housing screws b in the available threads Tightening torque 3 0Nm 0 3Nm Slide the spring that pushes the lever in position to the side and re insert the lever 15 with its sheet metal part and fix with the...

Page 15: ...ion lead Contact your local Walter representative if you have Walter power tools requiring repairs For addresses see www walter com You can download a list of spare parts from www walter com 12 Environmental Protection The generated grinding dust may contain harmful substances Dispose appropriately Observe national regulations on environmentally compatible disposal and on the recycling of disused ...

Page 16: ...of purchase to the nearest WALTER Factory or Authorized Service Center If an examination shows that the malfunction was caused by defective material or faulty workmanship WALTER will repair or at our option replace without charge This warranty does not apply when normal maintenance is required repairs or replacements have been made or were attempted by anyone other than WALTER authorized service p...

Page 17: ...ts fait référence à votre outil électrique alimenté par le secteur avec cordon d alimentation ou votre outil fonctionnant sur batterie sans cordon d alimentation 2 1 Sécurité de la zone de travail a Conserver la zone de travail propre et bien éclairée Les zones en désordre ou sombres sont propices aux accidents b Ne pas faire fonctionner les outils électriques en atmosphère explosive par exemple e...

Page 18: ...pas forcer l outil Utiliser l outil adapté à votre application L outil adapté réalisera mieux le travail et de manière plus sûre au régime pour lequel il a été construit b Ne pas utiliser l outil si l interrupteur ne permet pas de passer de l état de marche à arrêt et vice versa Tout outil qui ne peut pas être commandé par l interrupteur est dangereux et il faut le réparer c Débrancher la fiche de...

Page 19: ...res endommagés seront normalement détruits pendant cette période d essai h Porter un équipement de protection individuelle En fonction de l application utiliser un écran facial des lunettes de sécurité ou des verres de sécurité Le cas échéant utiliser un masque antipoussières des protections auditives des gants et un tablier capables d arrêter les petits fragments abrasifs ou des pièces à usiner L...

Page 20: ...b Les meules coudées doivent être fixées de façon à ce que la surface de rectification se trouve sous le bord du capot de protection Une meule incorrectement fixée qui dépasse du bord du capot de protection ne peut pas être protégée de façon adaptée c Le garde de protection doit être solidement fixé à l outil électrique et réglé à des fins de sécurité maximale de sorte que l opérateur soit exposé ...

Page 21: ... puisse fonctionner adéquatement sans nuire à la rotation de l outil installé L outil ex la brosse métallique peut se dilater en diamètre en raison de la charge de travail et des forces centrifuges 3 8 Autres consignes de sécurité AVERTISSEMENT Portez toujours des lunettes de protection Utiliser exclusivement des outils accessoires qui sont au minimum en retrait de 3 4 mm par rapport au garde de p...

Page 22: ...bien ventilé et utilisez des équipements de protection agréés tels que les masques de protection contre la poussière qui sont conçus spécialement pour filtrer les particules microscopiques Symboles sur l outil Construction de classe II V volts A ampères Hz hertz W watts Ø diamètre max de l outil de travail min révolutions par minute rpm révolutions par minute courant alternatif courant alternatif ...

Page 23: ... la broche immobile Dans le cadre de travaux avec des meules à tronçonner utiliser le garde de protection de meulage pour des raisons de sécurité voir chapitre 10 Accessoires 6 1 Verrouillage de l arbre Enfoncez le bouton de blocage de l arbre d entraînement 4 et 3 tournez la broche à la main jusqu à ce que le bouton de blocage entre dans un orifice prévu à cet effet 6 2 Placement de la meule Voir...

Page 24: ...onner à dégrossir meule boisseau meule à tronçonner en diamant vitesse élevée Brosse vitesse moyenne Disque à sabler vitesse faible à moyenne Note Pour toute opération de polissage nous recommandons notre polisseuse QUICK STEP FINISHER ou QUICK STEP BIG BUFF III 7 2 Marche arrêt Toujours guider la machine des deux mains Mettez la machine sous tension avant de positionner la machine sur la pièce à ...

Page 25: ...l appuyer ni l osciller Travaux avec les brosses métalliques Exercer une pression mesurée sur la machine 7 4 Tourner le carter de réducteur Voir page 3 illustration D Retirer la prise d alimentation Dévisser la vis de fixation a du levier 15 Retirer la vis le levier avec sa pièce en tôle et les mettre de côté Dévisser les 4 vis du carter de réducteur b ATTENTION Ne pas retirer le carter de réducte...

Page 26: ... de pénétrer dans le carter du moteur Retirer et nettoyer régulièrement C Arceau multiposition pour poignée supplémentaire Permet de nombreuses positions de préhension Gamme d accessoires complète voir www walter com ou le catalogue d accessoires 11 Réparations Les travaux de réparation sur les outils électriques ne peuvent être effectués que par un spécialiste Si le câble de raccordement de l app...

Page 27: ...s POLITIQUE DE GARANTIE Toutes les machines et accessoires WALTER sont vérifiés et inspectés avant chaque xpédition et sont garanties exempts de toute défectuosité de matériel ou de fabrication Si une machine fait défaut dans les deux ans suivant l achat initial elle doit être retournée port payé avec preuve d achat à un Centre de Service Autorisé WALTER Si une vérification révèle une défectuosité...

Page 28: ... por acumulador 2 1 Puesto de trabajo a Mantenga limipo y bien iluminado su puesto de trabajo El desorden y una iluminación deficiente en las áreas de trabajo pueden provocar accidentes b No utilice la herramienta eléctrica en un entorno con peligro de explosión en el que se encuentren combustibles líquidos gases o producen chispas que pueden llegar a inflamarlos materiales en polvo o vapores c Ma...

Page 29: ... con las piezas en movimiento g Siempre que sea posible utilizar equipos de aspiración o captación de polvo asegúrese que éstos estén montados y que sean utilizados correctamente La utilización de un equipo de aspiración de polvo puede reducir los riesgos de aspirar polvo nocivo para la salud 2 4 Trato y uso cuidadoso de herramientas eléctricas a No sobrecargue el aparato Use la herra mienta previ...

Page 30: ...e que la herramienta eléctrica o la de inserción caigan al suelo compruebe si se ha dañado o bien utilice una herramienta de inserción sin dañar Una vez haya comprobado el estado de la herramienta y la haya colocado tanto usted como las personas que se encuentran en las proximidades deben colocarse fuera del nivel de la herramienta en movimiento póngala en funcionamiento durante un minuto con el n...

Page 31: ... su mano c Evite colocar su cuerpo en la zona en la que se colocaría la herramienta eléctrica en caso de contragolpe El contragolpe propulsa la herramienta eléctrica en la dirección contraria a la del movimiento del disco de amolar en el punto de bloqueo d Trabaje con especial cuidado en el área de esquinas bordes afilados etc Evite que las herramientas de inserción reboten en la pieza de trabajo ...

Page 32: ...ciales para el pulido No dejar piezas sueltas en la cubierta de pulido en particular las cuerdas de fijación Guarde o corte las cuerdas de fijación Las cuerdas de fijación sueltas o giratorias pueden lesionar los dedos o enredarse en la herramienta 3 7 Indicaciones de seguridad especiales para los trabajos con cepillo de alambre a Tenga presente que los cepillos de alambre pierden fragmentos de al...

Page 33: ...uctos de mampostería y Arsénico y cromo procedentes de madera de construcción tratada químicamente El riesgo para usted por estas exposiciones varía dependiendo de qué tan a menudo haga este tipo de trabajo Para reducir su exposición a estas sustancias químicas trabaje en un área bien ventilada y trabaje con equipo de seguridad aprobado como por ejemplo las mascaras antipolvo que están diseñadas e...

Page 34: ...de corriente residual FI RCD GFCI con una corriente de desconexión máxima de 30 mA 5 1 Montaje de la empuñadura adicional Utilice siempre una empuñadura adicional 11 para trabajar Enrosque la empuñadura adicional en el lado izquierdo o derecho de la herramienta 5 2 Montaje de la cubierta protectora Por motivos de seguridad utilice únicamente la cubierta protectora prevista para el cuerpo de lijado...

Page 35: ...erramienta continúa por inercia Poco antes de detenerse el disco de amolar pulse el botón de bloqueo del husillo Quick R 4 La tuerca tensora Quick R 1 se suelta automáticamente después de media vuelta aproximadamente y se puede desatornillar sin hacer esfuerzo adicional ni necesidad de herramienta 6 4 Sujeción aflojamiento de la tuerca de dos agujeros en función del equipamiento Sujeción de la tue...

Page 36: ...o hasta que encaje Desconexión presione sobre el extremo posterior del relé neumático 5 y suéltelo Máquinas con interruptor de paleta con función de hombre muerto Conexión desplace el bloqueo de conexión 10 en dirección a la flecha y mantener pulsado el interruptor 9 Desconexión suelte el interruptor 9 Herramientas con la denominación IRONMAN Conexión instantánea con función de hombre muerto Conex...

Page 37: ...rica Por ello es importante aspirar regularmente y con esmero todas las ranuras de ventilación delanteras y traseras Desconectar antes la herramienta eléctrica de la corriente y protegerse con gafas de protección y mascarilla antipolvo 9 Localización de averías Herramientas con sistema electrónico DIALSPEED El indicador de señal del sistema electrónico 7 se ilumina y se reduce el número de revoluc...

Page 38: ...ronzado Grosor máximo autorizado de la herramienta de inserción M Rosca del husillo l Longitud del husillo de lijado n Número de revoluciones de marcha en vacío máximo nV Número de revoluciones de marcha en vacío ajustable P1 Potencia de entrada nominal P2 Potencia suministrada I120 V Corriente a 120 V m Peso sin cable de red Máquinas conladesignaciónIRONMAN Losfallosde energíade alta frecuencia p...

Page 39: ...llas autorizadas por WALTER para el servicio de las mismas y no cubre daños causados por accidentes modificaciones uso de accesorios inapropiados abuso o mal uso que también incluye sobrecargar la herramienta por encima de su capacidad especificada de operación así como su uso continuo después de una falla parcial Ninguna otra garantía escrita o verbal es autorizada En ningún caso podrá ser WALTER...

Page 40: ...40 ...

Page 41: ...e Claire Québec Canada H9R 1C1 Tél 514 630 2800 Sans frais 1 888 592 5837 Téléc 514 630 2825 OFICINA CENTRAL 5977 Trans Canada Highway West Pointe Claire Quebec Canada H9R 1C1 Tel 514 630 2800 Gratis 1 888 592 5837 Fax 514 630 2825 ESCRITÓRIO CENTRAL 5977 Trans Canada Highway West Pointe Claire Quebec Canada H9R 1C1 Tel 514 630 2800 Grátis 1 888 592 5837 Fax 514 630 2825 www walter com ...

Reviews: