background image

45

46

7.9 Setting the sync speed mode

In <Gr> mode, flash shutter speed can be set to first curtain sync, second cur

-

tain sync, or high-speed sync. 

Briefly  press  the  [SYNC/CH]  button;  first  curtain,  second  curtain,  and  high-

speed sync are selectable in sequence.

When mount Walimex pro Operator TTL T-N transmitter on Nikon camera, 

it automatic recognizes and reflects camera’s shutter sync speed. You only 

need to adjust shutter sync speed on camera.
Take Nikon D90 as an example, when the camera‘s shutter sync speed is 

faster than 1/200 s; Walimex pro Operator TTL T-N transmitter shows high-

speed synchronization icon on screen.
When Nikon D90’s shutter speed of the camera is equal to or slower than 

1/200 s, Walimex pro Operator TTL T-N transmitter automatically displays the 

front or rear curtain sync mode according to the settings on the camera.
Different series of Nikon cameras have different shutter speed cutoff value. 

Walimex pro Operator TTL T-N transmitter will automatically identify the shutter 

speed cutoff value based on the camera‘s own settings, and shows correspon-

ding sync speed icon.

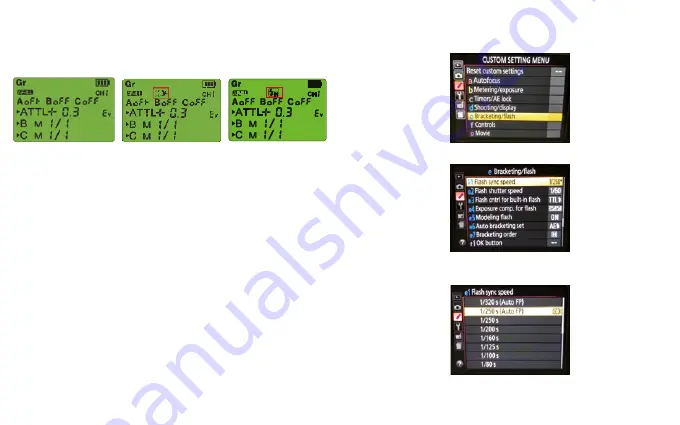
Choose AUTO FP on camera to use high speed sync 

Only when shutter sync speed on Nikon camera is set to “1/250 (AUTO FP)” 

or “1/320 (Auto FP)” or  “AUTO FP”, high speed sync of transmitter will be 

effective.
Please refer to following steps to realize “high speed sync”.
1.  Slip the transmitter’s mounting foot fully into the camera’s hot shoe. Rotate 

locking ring clockwise, to attach transmitter on camera firmly.  

2.  Turn on Camera. Choose “M” manual mode” or “S” shutter priority mode by 

turning the mode dial. 

3.  Press the [MENU] button on camera, choose [CUSTOM SETTING MUEU], 

and select [Bracketing/flash].

4.  Select [Flash sync speed] .

5.   Select Flash sync speed 1/250 (AUTO FP) or 1/320 (Auto FP), or turn on 

[Auto FP] .

The setting screen varies depending on the camera.

Summary of Contents for Operator TTL T-N

Page 1: ...ernsteuerung Remote control Operator TTL T N 2 4GHz EN Made in China ES Fabricado en China IT Fabbricato in Cina WALSER GmbH Co KG Senefelderstrasse 23 86368 Gersthofen Germany info walser de www wals...

Page 2: ...9 1 Reinigung 25 9 2 Auswechseln der Batterien 25 10 Technische Daten 26 11 Kompatible Kameramodelle 26 1 Understanding these instructions for use correctly 28 1 1 Markings on the device 28 1 2 Identi...

Page 3: ...t ndnis dieser Gebrauchsanleitung 1 1 Kennzeichen und Symbole am Ger t Dieses Zeichen bedeutet dass Ihr Ger t die Sicherheitsanfor derungen aller geltenden EU Richtlinien erf llt Umweltschonende Entso...

Page 4: ...ung durch Kurzschluss Durch defekte Kabel und Feuchtigkeit oder N sse kann es zum Kurz schluss kommen Bei einem Kurzschluss kann es passieren dass sich die Leiter erw rmen und dadurch ihre Isolierung...

Page 5: ...g 10 LCD Display 11 AF Fokussierungslichtstrahl 12 Batteriefach 13 Feststellschraube 14 Blitzschuh Kameraanschluss 5 2 LCD Display GR Blitzgruppe HINWEIS 1 Auf dem LCD Display werden nur die Einstellu...

Page 6: ...g Frequenz Anzahl der Blitze nacheinander ausw hlen SYNC CH Kurzer Tastendruck im Modus Gr Blitzsynchronisationsmodus ausw hlen Anzeigereihenfolge 1 Synchronisation erster Verschlussvor hang kein Sign...

Page 7: ...o Operator TTL T N 6 2 Verwendung des Funksenders Drahtlos steuerbare Studioblitzger te Walimex pro Mover 400 TTL Serie VC Excellence Serie VC Excellence Plus Serie VE Excellence Serie Newcomer Befest...

Page 8: ...Walimex pro Operator TTL T N verf gt ber 8 Kan le und 30 Funk IDs Unter Verwendung des gleichen Kanals k nnen Sie mit dem Walimex pro Operator TTL T N Blitze gleichzeitig und unabh ngig voneinander i...

Page 9: ...F Einstellen des Modus Gr Dr cken Sie die Taste MODE und halten Sie sie 3 s lang gedr ckt stellen Sie f r den Funksender den Betriebsmodus Gr ein Ausw hlen der Blitzgruppe Dr cken Sie kurz die Taste G...

Page 10: ...e Kanal eingestellt ist 7 8 Modus Multi Stroboskop Funktion Um ideale Ergebnisse zu erzielen sollten Sie im Stroboskopmodus nur mit einem Blitz arbeiten Einstellen des Modus Multi Dr cken Sie die Tast...

Page 11: ...an einer Nikon Kamera ange bracht wird erkennt er automatisch die Ausl sesynchronisationsgeschwindig keit der Kamera Sie m ssen die Ausl sesynchronisationsgeschwindigkeit nur an der Kamera einstellen...

Page 12: ...cken Sie kurz die Taste MODEL AF auf dem LCD Display wird nur der Einstelllampen Wert f r Gruppe A angezeigt Stellen Sie den gew nschten Einstelllampen Ausgang 1 2 3 4 5 6 OFF mit Hilfe des Einstellra...

Page 13: ...en von Kanal ID und Gruppe Ladestatus der Batterie am Sender zu niedrig Tauschen Sie die Batterien aus siehe dazu die Anwei sungen zum Einlegen der Batterien 9 Wartung 9 1 Reinigung VORSICHT Stromschl...

Page 14: ...und 1 128 in Schritten von 1 3 EV Stroboskop Funktion bis zu 20 Blitze bis zu einer Frequenz von 30Hz Ausgabe eines AF Fokus sierungslichtstrahls Ja Aktualisierung der Firmware Ja Spannungsquelle Zwei...

Page 15: ...he device This symbol indicates that your device meets the safety requirements of all applicable EU directives Waste disposal and protection of the environment Electric and electronic appliances as we...

Page 16: ...for use 3 Unpacking and checking the device 1 Carefully unpack the scope of delivery 2 Check whether the scope of delivery is complete Operator TTL T N Batteries not included 3 Check whether the scop...

Page 17: ...Battery compartment 13 Locking screw 14 Hot shoe camera connection 5 2 LCD screen GR Group Flash NOTICE 1 The LCD screen only shows settings of present application 2 When press button or rotate dial t...

Page 18: ...Long press Set up channel MODEL AF Short press Set output power of modelling lamp of A B C group Long press Turn on off AF Assist beam POWER Switch to right side Switch on power Switch to left side S...

Page 19: ...smitter attached to the camera master unit can directly adjust flashes slave unit via wireless control Parameters set on the radio transmitter will be synchronously reflected on the flash that is bein...

Page 20: ...1 x M and OFF are shown in sequence Set Channel ID and Group ID Set Channel ID and Group ID 7 5 Setting the channel ID and group The Walimex pro Operator TTL T N transmitter has 8 channels and 30 rad...

Page 21: ...variable in 1 3 precise increments This mode is only applicable for flashes with i TTL feature Flash output power Flash Exposure Compensation 7 7 3 When using M mode manually set the flash output powe...

Page 22: ...the MODE but ton the triangle points to M 1 x Flash output power is selectable from 1 4 to 1 128 Rotate the dial to set the power Set up flash frequency for selected group Briefly press the MODE butto...

Page 23: ...the settings on the camera Different series of Nikon cameras have different shutter speed cutoff value Walimex pro Operator TTL T N transmitter will automatically identify the shutter speed cutoff va...

Page 24: ...tness of the modelling lamp the lamp is dimmable in six stages Briefly press the MODEL AF button to set up the modelling lamp for group A B and C in sequence 1 Set modelling lamp for group A Briefly p...

Page 25: ...ls Exposure control system i TTL autoflash manual flash stroboscopic flash Channel Ch 1 8 Wireless radio ID 1 30 Slave unit control Each channel controls 3 groups of slave units separately A B C Trans...

Page 26: ...51 52...

Reviews: