background image

We are confident that you will be delighted with your WALDORF ELECTRIC COOKTOP, and it will become a 

most valued appliance in your commercial kitchen. 

To ensure you receive the utmost benefit from your new WALDORF Appliance, there are two  

important things you can do. 


Firstly: 

Please read the instruction book carefully and follow the directions given.  The time taken will be well 

spent. 


Secondly: 

If you are unsure of any aspect of the installation, instructions or performance of your appliance,  

contact your WALDORF dealer promptly.  In many cases a phone call could answer your question. 


CE Only: 

These instructions are only valid if the country code appears on the appliance.  If the code does not  

appear on the appliance, refer to the supplier of this appliance to obtain the technical instructions for 

adapting the appliance to the conditions for use in that country. 

WARNING: 


I

MPROPER


INSTALLATION

ADJUSTMENT

ALTERATION

SERVICE


OR


MAINTENANCE


CAN


CAUSE


PROPERTY


DAMAGE

INJURY


OR


DEATH

.  R

EAD


THE


INSTALLATION

OPERATING


AND


MAINTENANCE


INSTRUCTIONS


THOROUGHLY


BEFORE


INSTALLING


OR


SERVICING


THIS


APPLIANCE

WARNING: 


G

REAT


CARE


MUST


BE


TAKEN


BY


THE


OPERATOR


TO


USE


THE


EQUIPMENT


SAFELY


TO


GUARD


IT


AGAINST


RISK


OF


FIRE

• 

T

HE


APPLIANCE


MUST

 NOT 

BE


LEFT


ON


UNATTENDED

• 

I

T


IS


RECOMMENDED


THAT


A


REGULAR


INSPECTION


IS


MADE


BY


A


COMPETENT


SERVICEMAN


TO


ENSURE


CORRECT


AND


SAFE


OPERATION


OF


YOUR


APPLIANCE


IS


MAINTAINED

• 

DO NOT 

STORE


OR


USE


GASOLINE


OR


OTHER


FLAMMABLE


VAPOURS


OR


LIQUIDS


IN


THE


VICINITY


OF


THIS


OR


ANY


OTHER


APPLIANCE

• 

DO


NOT


SPRAY


AEROSOLS


IN


THE


VICINITY


OF


THIS


APPLIANCE


WHILE


IT


IS


IN


OPERATION

C

AUTION


This appliance is; 

• 

For professional use and is only to be used by suitably qualified / trained  
persons. 

• 

Only qualified service persons are to carry out installation, servicing and 
gas conversion operations.


• 

Components having adjustments protected (e.g. paint sealed) by the  
manufacturer should not be adjusted by the user / operator. 

• 

DO NOT operate the appliance without the legs supplied fitted. 

Introduction


Summary of Contents for RN8400E

Page 1: ...t a l l a t i o n a n d O p e r a t i o n M a n u a l Electric Cooktop Series RN8200E RN8400E RN8600E Date Purchased Serial Number Dealer Service Provider 230558 7 For use in GB IE RNL8200E RNL8400E R...

Page 2: ...0257 Fax 336 661 9546 CANADA Serve Canada 22 Ashwarren Road Downview Ontario M3J1Z5 Toll Free 800 263 1455 Ph 416 631 0601 Fax 416 631 0315 info servecanada com www servecanada com www moffat com NEW...

Page 3: ...nstallation 10 Installation Requirements Unpacking Location Clearances Assembly Fitting Adjustable Feet Rear Rollers to Leg Stand Units Fitting Adjustable Feet Rear Rollers to Cabinet and Refrigeratio...

Page 4: ...T ALTERATION SERVICE OR MAINTENANCE CAN CAUSE PROPERTY DAMAGE INJURY OR DEATH READ THE INSTALLATION OPERATING AND MAINTENANCE INSTRUCTIONS THOROUGHLY BEFORE INSTALLING OR SERVICING THIS APPLIANCE WARN...

Page 5: ...Cabinet Base excluding RN8200G series LS Leg Stand excluding RN8200G series RB Refrigerated Base RN8600G and RN8800G series only General A commercial heavy duty high efficiency Cooktop for modular ki...

Page 6: ...IEC 60245 IEC 57 e g HO5 RN F Type The branch supply line shall be individually overload protected to the correct current rating and the supply chord shall be protected against any mechanical or ther...

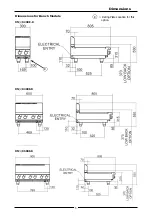
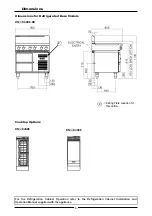
Page 7: ...5 Dimensions Dimensions for Bench Models RN L 8200E B RN L 8600E B Rating Plate Location for this option R RN L 8400E B R...

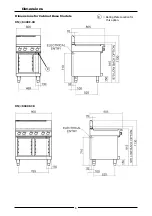
Page 8: ...6 Dimensions Dimensions for Cabinet Base Models RN L 8400E CB RN L 8600E CB Rating Plate Location for this option R R...

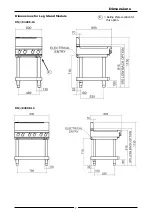
Page 9: ...7 Dimensions Dimensions for Leg Stand Models RN L 8400E LS RN L 8400E LS Rating Plate Location for this option R R...

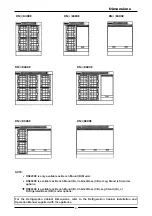
Page 10: ...ase Models RN L 8600E RB RN L 8200E Cooktop Options For the Refrigeration Cabinet Operation refer to the Refrigeration Cabinet Installation and Operation Manual supplied with the appliance Rating Plat...

Page 11: ...S model options RN8600E is available as Bench Mount B Cabinet Base CB Leg Stand LS or Refrigerated Base RB model options For the Refrigeration Cabinet Dimensions refer to the Refrigeration Cabinet Ins...

Page 12: ...t to the relevant codes and manufacturer s specifications shown in this section will void the warranty Unpacking Remove all packaging and transit protection from the appliance including all protective...

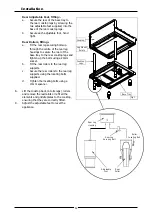
Page 13: ...egs and push fully home 6 Secure the base tray to the appliance legs by screwing the two front adjustable feet supplied into the base of the front appliance legs Secure each adjustable foot hand tight...

Page 14: ...nd tighten up the bolts using a 24mm socket b Fit the rear rollers to the rear leg supports c Secure the rear rollers to the rear leg supports using the locating bolts supplied d Tighten the locating...

Page 15: ...pliance 10 Check that the electrical supply is as shown in Specifications section Commissioning 1 Before leaving the new installation a Check the following functions in accordance with the operating i...

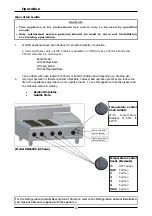
Page 16: ...To use this appliance correctly please read the following sections carefully Radiant Hotplates Griddle Plate Model RN8603E B Shown Operation For the Refrigeration Cabinet Description of Controls refer...

Page 17: ...at bases Any part of the hotplate which glows bright red is not making effective contact with the base of the utensil and this decreases the life and efficiency of the hotplate Utensils which are sign...

Page 18: ...op clean and operating at peak efficiency follow the procedures shown below After Each Use 1 Clean the griddle with a scraper tool to remove any food debris 2 Always ensure that the scraper tool blade...

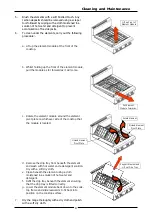
Page 19: ...ooktop that the module is located d Remove the drip tray from beneath the element and wash with hot water and a detergent solution Dry with a soft dry cloth e Clean beneath the element using a cloth m...

Page 20: ...spread over the griddle in order to form a protective film Cooktop Cooking Area a Clean the Cooktop area with a soft cloth and a mild detergent and hot water solution b Baked on deposits or discoloura...

Page 21: ...of the Appliance both can be found on the Technical Data Plate located on the appliance Fault Possible Cause Remedy Element does not work when turned ON Check individual fuses located behind the cont...

Page 22: ...20 Circuit Schematics RN8200E RN8203E...

Page 23: ...21 Circuit Schematics RN8400E RN8403E RN8406E...

Page 24: ...22 Circuit Schematics RN8600E RN8603E...

Page 25: ...23 Circuit Schematics RN8606E RN8609E...

Page 26: ...7851 Adjustable Legs 150mm Leg Base Stand Ext d Thread 232351 Rear Roller Assy 3 228288 Grease Tray Griddle 228881 Spill Tray 300mm 228882 Spill Tray 600mm 228883 Spill Tray 450mm 229069 Element Frame...

Page 27: ......

Reviews: