23
EN
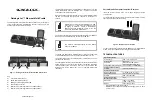
1
Anemometer
6
Aerial
2
Wind vane
7
U-bolt
3
Temperature and humidity meter
8
Battery compartment
4
Rain gauge
9
Reset
5
Spirit level
10
Led display: the light lights up for
4 seconds after switching on. The
led then flashes once every 48
seconds, indicating that data is
being transmitted (update period).
INSTALLATION
Installation of the U-bolts and the metal plate
The installation of the U-bolts, which fix the sensor to a rod, first requires the
installation of the supplied metal plate to which the ends of the U-bolts can
be attached. The metal plate (see Figure 3) has four holes through which the
ends of the U-bolts fit. The metal plate itself is pushed into a groove on the
bottom of the unit. The metal plate has a straight edge that slides into the
groove and the other side is bent at a 90-degree angle for easier attachment
to the mounting rod. Once the metal plate is inserted, you can slide the U-bolts
through the holes in the metal plate (see Figure 3).
3