background image

Vector Grip 

13

GB

1

5

2

3 4

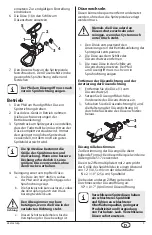
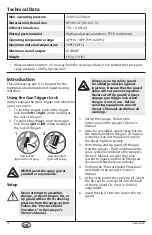
  7.  Thread the tip guard onto the gun.  

Position the tip guard in the desired 

spraying position, then tighten securely.

i

The arrow on the tip handle 

should be pointing in the forward 

direction for spraying. 

Operation

  1.  Make sure the arrow on the tip handle 

is pointing in the forward direction for 

spraying.

  2.  Start the sprayer.  Refer to the instructions 

in the sprayer’s Owner’s Manual.

  3.  Adjust the fluid pressure on the sprayer 

until the spray is completely atomized.  

Always spray at the lowest pressure 

necessary to get the desired results.

i

The spray tip determines the size 

of spray pattern and coverage.  

When more coverage is needed, 

use a larger tip instead of 

increasing fluid pressure.

  4.  To clear a clogged tip:


a.  Rotate the tip 180º so that the arrow on 

the tip handle is pointing opposite the 

spray direction.

  b.  Trigger the gun once so that the 

pressure can blow the clog out.

Attention

Never pull the trigger more than 

once with the tip in the reverse 

position.


c.  Continue this procedure until the tip is 

clear of the clog.

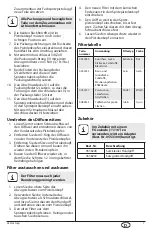
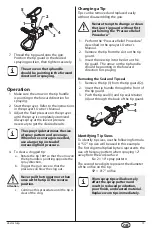
Changing a Tip

Tips can be removed and replaced easily 

without disassembling the gun.

Never attempt to change or clean 

the tip or tip guard without first 

performing the “Pressure Relief 

Procedure.”

  1.  Perform the “Pressure Relief Procedure” 

described in the sprayer’s Owner’s 

Manual.

  2.  Remove the tip from the slot on the tip 

guard.

  3.  Insert the new tip into the slot on the 

tip guard.  The arrow on the tip handle 

should be pointing in the forward 

direction for spraying. 

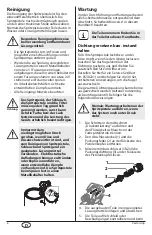
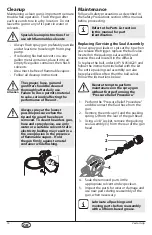
Removing the Seal and Tip seal
  1.  Remove the tip (1) from the tip guard (2).
  2.  Insert the tip handle through the front of 

the tip guard.

  3.  Push the tip seal (3) and tip seal retainer 

(4) out through the back of the tip guard. 

2

1

3
4

Identifying Tip Sizes

To identify tip sizes, use the following formula.  

A “517” tip size will be used in this example.
The first digit multiplied by two represents the 

size of the spray pattern when spraying 12” 

away from the work surface:
 

5 x 2 = 10” spray pattern

The second two digits represent the diameter 

of the orifice on the tip:
 

17 = .017” orifice

i

Worn spray tips will adversely 

affect the spray pattern and 

result in reduced production, 

poor finish, and wasted material.  

Replace worn tips immediately.

Summary of Contents for 2367218

Page 1: ...Not for sale in the U S 0416 Form No 0538803B Vector GRIP airless spray gun betriebsanleitung owner s manual wagner group com D E NL F P S GB I DK ...

Page 2: ...Auch nach dem Ausschalten des Motors steht das Gerät noch unter Druck Das Ventil PRIME SPRAY Vorfüllen Sprühen muss auf PRIME Vorfüllen gestellt sein um den Druck zu entspannen Der Ansprechdruck für das Ventil ist im Pumpenhandbuch angegeben STETS den Düsenschutz beim Sprühen aufsetzen Der Düsenschutz stellt einen gewissen Schutz dar ist aber vor allem als Warnvorrichtung gedacht STETS die Spritzd...

Page 3: ...siken und das gesamte Haftungsrisiko bei Verwendung von Teilen die nicht die technischen Mindestdaten erfüllen sowie bei Verwendung von Sicherheitsvorrichtungen die nicht vom Hersteller der Spritzpistole stammen EXPLOSIONSSCHUTZ KENNZEICHNUNG Kennzeichnung X Die Spritzpistole entspricht Ex II 2G IIC c T6 X und ist nach der Richtlinie 2014 34 EU geeignet für den Einsatz in explosionsgefährdeten Ber...

Page 4: ...den Abzug stets verriegeln Vor Wartungsarbeiten am Gerät die Betriebsanleitung durcharbeiten und alle Warnhinweise beachten 1 Das Spritzgerät vorbereiten Dazu die Anweisungen in der Betriebsanleitung des Spritzgeräts befolgen 2 Einen geerdeten Airless Spritzschlauch am Farbzulauf der Spritzpistole anschließen Den Schlauch mit zwei Schraubenschlüsseln einem an der Spritzpistole und einem am Schlauc...

Page 5: ...topfung der Düse beseitigt ist Düse wechseln Düsen können bequem entfernt und ersetzt werden ohne dass die Spritzpistole zerlegt werden muss Niemals die Düse oder den Düsenschutz wechseln oder reinigen wenn das System noch unter Druck steht 1 Den Druck entsprechend den Anweisungen in der Betriebsanleitung des Spritzgeräts entspannen 2 Die Düse aus dem Schlitz des Düsenschutzes entfernen 3 Die neue...

Page 6: ...den oder Explosionen führen wenn entzündliche Dämpfe vorhanden sind Die Spritzpistole beim Spülen fest in einen Metallbehälter halten Wartung Vor der Durchführung von Wartungsarbeiten alle Sicherheitshinweise entsprechend dem Abschnitt Sicherheitshinweise in diesem Handbuch beachten i Die Teilenummern finden Sie in der Teileliste dieses Handbuchs Dichtung ersetzen bzw instand halten Falls Ihre Spr...

Page 7: ...istolenkopf Drehen Sie diesen um und bauen ihn wieder in den Pistolenkopf ein 4 Bauen Sie den Diffuser wieder ein in dem Sie die Schritte 1 2 in umgekehrter Reihefolge befolgen Filter austauschen und ausbauen i Der Filter muss nach jeder Benutzung gereinigt werden 1 Lösen Sie die obere Seite des Abzugsschutzes vom Pistolenkopf 2 Verwenden Sie die Unterseite des Abzugsschutzes als Schraubenschlüsse...

Page 8: ... Arbeitszeit werden von uns getragen Ersetzte Produkte oder Teile gehen in unser Eigentum über 2 Garantiezeit und Registrierung Die Garantiezeit beträgt 36 Monate bei industriellem Gebrauch oder gleichzusetzender Beanspru chung wie insbesondere Schichtbetrieb oder bei Vermietung 12 Monate Für Benzin und Luft betriebene Antriebe gewähren wir ebenso 12 Monate Die Garantiezeit beginnt mit dem Tag der...

Page 9: ...hkeit des Geräts unerheblich sind bei Produkten die teilweise oder komplett zerlegt worden sind 5 Ergänzende Regelungen Obige Garantien gelten ausschließlich für Produkte die in der EU GUS Australien vom autorisierten Fachhandel gekauft und innerhalb des Bezugslandes verwendet werden Ergibt die Prüfung dass kein Garantiefall vorliegt so geht die Reparatur zu Lasten des Käufers Die vorstehenden Bes...

Page 10: ...rd provides some protection but is mainly a warning device ALWAYS remove the spray tip before flushing or cleaning the system The paint hose can develop leaks from wear kinking and abuse A leak can inject material into the skin Inspect the hose before each use NEVER use a spray gun without a trigger lock and trigger guard in place and in good working order All accessories must be rated at or above...

Page 11: ...c T6 X and is in accordance with Directive 2014 34 EU suitable for use in explosion hazardous areas as of type Zone 1 Under certain circumstances the unit itself may cause the Zone 1 condition to be in effect Any static electricity discharge from the spray gun is to be diverted to the grounded high pressure pump via the conductive high pressure hose as stipulated The maximum surface temperature co...

Page 12: ...follow all warnings 1 Set up the sprayer Refer to the instructions in the sprayer s Owner s Manual 2 Attach a grounded airless spray hose to the material inlet on the gun Using two wrenches one on the gun and one on the hose tighten securely 3 With the tip and tip guard off the gun start the sprayer Flush and prepare the spray system according to the sprayer s Owner s Manual Inspect the spray syst...

Page 13: ... until the tip is clear of the clog Changing a Tip Tips can be removed and replaced easily without disassembling the gun Never attempt to change or clean the tip or tip guard without first performing the Pressure Relief Procedure 1 Perform the Pressure Relief Procedure described in the sprayer s Owner s Manual 2 Remove the tip from the slot on the tip guard 3 Insert the new tip into the slot on th...

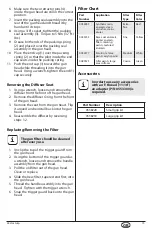
Page 14: ...ner while flushing Maintenance Follow all safety precautions as described in the Safety Precautions section of this manual before proceeding i Refer to the Parts List section in this manual for part identification Replacing Servicing the Seal Assembly If your spray gun leaks or spits at the tip when you release the trigger replace the ball valve located on the packing seal assembly and reverse the...

Page 15: ... into the gun head 4 Reassemble the diffuser by reversing steps 1 2 Replacing Removing the Filter i The gun filter should be cleaned after every use 1 Unclip the top of the trigger guard from the gun head 2 Using the bottom of the trigger guard as a wrench loosen and remove the handle assembly from the gun head 3 Pull the old filter out of the gun head Clean or replace 4 Slide the new filter taper...

Page 16: ... shift operations in particular or in the event of rentals it amounts to 12 months Systems driven by petrol or air are also guaranteed for a 12 month period The guarantee period begins with the day of delivery by the authorised specialist shop The date on the original purchase document is authoritative For all products bought in authorised specialist shops from 01 02 2009 the guarantee period is e...

Page 17: ... fully taken apart 5 Additional regulations The above guarantees apply exclusively to products that have been bought by authorised specialist shops in the EU CIS Australia and are used within the reference country If the check shows that the case is not a guarantee case repairs are carried out at the expense of the buyer The above regulations manage the legal relationship to us concludingly Additi...

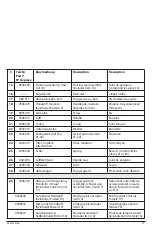
Page 18: ...sembly 2 finger gun includes item 2 and 17 Détente et ensemble de verrou pistolet à deux doigts inclut les articles 2 et 17 5 Oberes Gehäuse Upper housing Boîtier supérieur 6 594 033 Sitz Seat Assise 7 594 006 Diffusor Rundring Diffuser o ring Joint torique du diffuseur 8 0538322 Diffuser 7 8 Diffuser 7 8 Diffuseur 7 8 9 0553xxx Düse komplett mit Teil 11 12 Tip assembly includes items 11 12 Buse c...

Page 19: ...r mittlere Filterfeinheit Filter medium Filtre moyen 25 0296343 Feder Spring Ressort comprend les pièces 21 et 22 26 560 038 Griffdichtung Handle seal Joint de poignée 27 0296344 Schlauch Tube Tuyau 28 0538320 Abzugbügel Trigger guard Protection de la détente 29 0538222 Abzug und Verriegelung Pistole für 4 Finger beinhaltet Posten 2 und 17 Trigger and lock assembly 4 finger gun includes item 2 and...

Page 20: ... D J Wagner GmbH Otto Lilienthal Straße 18 D 88677 Markdorf Postfach 11 20 D 88669 Markdorf Deutschland Tel 49 75 44 505 1664 Fax 49 75 44 505 1155 wagner wagner group com www wagner group com GB Wagner Spraytech UK Limited The Coach House 2 Main Road Middleton Cheney OX17 2ND Great Britain UK Helpline 01295 714200 Fax 01295 710100 enquiries wagnerspraytech co uk DK Wagner Spraytech Scandinavia A ...

Reviews: