background image


9

9


Index

Contents

Index

Contents


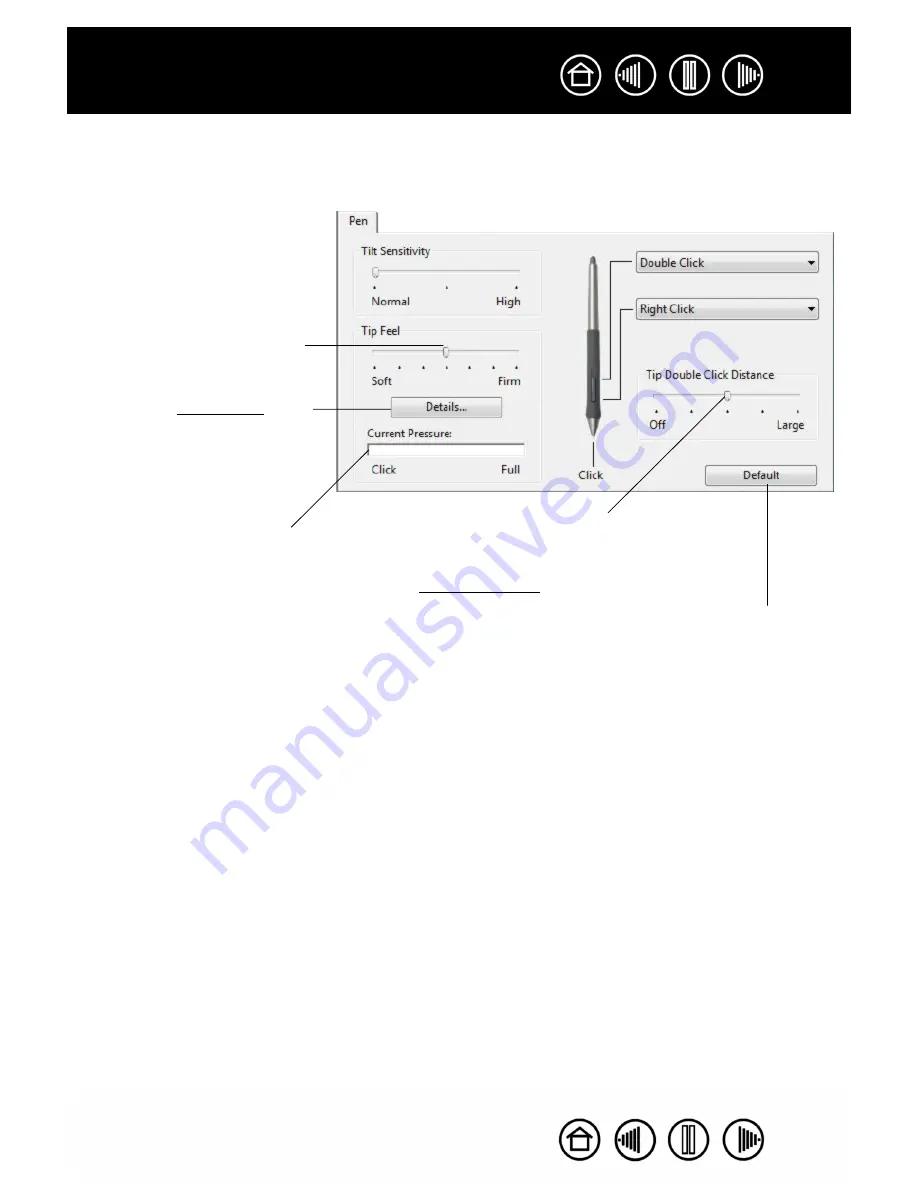
ADJUSTING TIP FEEL AND DOUBLE-CLICK


To adjust the tip sensitivity of your Cintiq pen, select the P


EN


 tab.  To create broad brush strokes or to click 

with a light touch, use a soft tip setting.  For maximum control while drawing thin lines, use a firm tip setting.

Customizes the amount of pressure 
needed to click or draw.  Drag the 
slider to a softer or firmer setting.

With your screen cursor positioned 
over an empty area of your control 
panel, press down on the tablet with 
your pen tip to test the current tip 
feel setting.  You can use the 
C

URRENT

 P

RESSURE

 bar to 

determine how hard you must press 
on the pen to reach maximum 
pressure.

Displays the tip F

EEL

 D

ETAILS

 dialog 

box where you can further 
customize the tip sensitivity.

Hints:

Use a soft T

IP

 F

EEL

 for a wider range of pressure values with most 

pressure-sensitive applications.

In some applications a soft pressure setting can make the pen overreact – 
any small press on the pen is magnified on the screen.  If you experience 
this, try a firmer T

IP

 F

EEL

 setting.

Double-clicking: To make double-clicking easier, expand the tap area that 
accepts a double-click (the double-click distance).

Note:

 A large double-click distance may cause a delay at the beginning of 

your brushstrokes in some drawing applications.  If you notice such effects, 
try setting a smaller double-click distance and using the side switch to 
double-click.  You can also set one of the ExpressKeys to double-click.

Returns the tab settings 
to their factory default 
conditions.

Adjusts the size of the double-click area.  
A larger setting makes double-clicking 
easier.

Drag the slider to the O

FF

 position if you 

do not want double-click assist.

Summary of Contents for CINTIQ

Page 1: ...buttons 12 Button functions 13 Customizing tilt sensitivity 18 Using Cintiq with other monitors 18 Customizing the tablet functions 19 Customizing ExpressKeys 20 Customizing tablet Touch Strips 21 Ad...

Page 2: ...dialog boxes and control panel options Remember that you can always use your viewer zoom in tool to increase the size of the page on your display screen The following kinds of information are not incl...

Page 3: ...front page Go to table of contents Go to index Go back to previous view Page back or page forward Go to beginning of section Go to topic Topic continued Adobe Reader provides you with additional tool...

Page 4: ...Opening the control panel Control panel overview Control panel settings OPENING THE CONTROL PANEL To open the Wacom Tablet control panel use the Cintiq pen on the pen display Windows Click on the Win...

Page 5: ...est there in a few moments the Tool Tip will pop up Additionally your keyboard tab and arrow keys can be used to navigate the control panel Tabs display customizable settings for the selected tool Dis...

Page 6: ...stomizing the pen Customizing the tablet functions Customizing the Pop up Menu Working with Display Toggle Working with multiple tools Working with application specific settings Changing the tablet mo...

Page 7: ...he pen tip to click on the center of the crosshairs in the upper left corner 5 Then click on the center of the crosshairs that are displayed in the lower right corner 6 Test the alignment by positioni...

Page 8: ...ol panel TOOL list after touching the active area of the pen display with the pen tip The control panel will automatically update to show the new tool and the options available for customization In ap...

Page 9: ...e tip sensitivity Hints Use a soft TIP FEEL for a wider range of pressure values with most pressure sensitive applications In some applications a soft pressure setting can make the pen overreact any s...

Page 10: ...r Returns the tab settings to their factory default conditions Customizes the amount of pressure needed to erase Drag the slider to a softer or firmer setting Displays the eraser FEEL DETAILS dialog b...

Page 11: ...overrides the detail pressure settings If you customize the detail settings then drag the slider your detail settings will be removed Drag the slider to adjust the click threshold level This setting d...

Page 12: ...lick here to change the function assigned to the pen tip At least one tool button should be set to the CLICK function The tip must be set to CLICK in order to draw in most graphics applications Return...

Page 13: ...l for dragging objects or selecting blocks of text 4TH CLICK Simulates a 4th mouse button click BACK Simulates the BACK command in browser applications 5TH CLICK Simulates a 5th mouse button click FOR...

Page 14: ...Cintiq pen display and your other displays When selected Cintiq can be used either as a pen display the screen cursor is positioned at the pen tip location or as a standard Wacom tablet the screen cu...

Page 15: ...ations from the ADD SPECIAL drop down menu When you make a selection it is added to the KEYS entry box After defining a keystroke or keystroke sequence click OK Important Because the ENTER Windows and...

Page 16: ...to follow the direction of pen movement on the tablet Release the button or lift the pen tip from the tablet surface when you are done In some application windows the document will precisely follow th...

Page 17: ...g this option displays the DEFINE MODIFIER dialog box where you can assign one or more modifier key functions After choosing the modifier function s click OK Sets the screen cursor acceleration when i...

Page 18: ...ons for navigating on the other monitors Set one of the ExpressKeys or a pen side switch to the DISPLAY TOGGLE function You can then press the button to toggle the screen cursor between the Cintiq pen...

Page 19: ...ize the Cintiq pen Simply open the Wacom Tablet control panel and select the FUNCTIONS icon in the TOOL list Select a tab to customize and change settings using the available options Customizing table...

Page 20: ...select an item from the corresponding pull down menu Note ExpressKeys functions can be defined for use with specific applications and any changes you make on this tab apply to the currently selected...

Page 21: ...h Strip FUNCTION to perform when the Touch Strip is in use AUTO SCROLL ZOOM is the default setting for each Touch Strip When selected the Touch Strip zooms in most graphics applications and scrolls in...

Page 22: ...scrolling speed When you select one or more COMBINE WITH modifier key options the selected option s will be sent to the application along with each scroll event This can be used for example to create...

Page 23: ...our Cintiq pen display model When KEYSTROKES is selected in the Touch Strip s FUNCTION pull down menu the tab displays the custom keystrokes options for that Touch Strip To customize the keystroke s t...

Page 24: ...STRIP SETTINGS dialog box is displayed The settings within this dialog box are global and apply to all applications If you prefer not to use the continuous and single step operations of the Touch Stri...

Page 25: ...unctions that have been added to the Pop up Menu To change the order of an item drag it to a new location Double click on an item to make edits Menu options enable you to change the appearance FONT SI...

Page 26: ...the screen cursor is toggled from your Cintiq pen display to another active pen display or monitor If additional displays are attached to the system the screen cursor will toggle to each display in t...

Page 27: ...ars click DELETE to confirm your selection The selected tool is removed from the list along with any custom settings you may have created for it A removed tool can be added back to the TOOL list by pl...

Page 28: ...e ALL icon changes to ALL OTHER and an application icon is displayed for the newly added application s In the following example application specific settings have been added for the pen for both Photo...

Page 29: ...ings applications that have not been customized in this manner will use the tool settings for ALL OTHER Tip First customize settings for one application When you feel comfortable with the process you...

Page 30: ...ication specific setting Then in the APPLICATION list select the application you want to remove from the list 2 Click on the APPLICATION list s button In the dialog box that appears click DELETE to co...

Page 31: ...rches the USB ports When the new tablet is found it is automatically initialized If multiple tablets are installed the tablet used to open the Wacom Tablet control panel is selected as the default tab...

Page 32: ...hese applications take advantage of the eraser in different ways depending on what makes sense for the application Fingerwheel The control wheel on the optional Airbrush Journal A Microsoft Windows ap...

Page 33: ...cursor The pointer on the display screen Screen cursors come in different shapes such as an I beam arrow or box depending on which application you are running Tablet PC Input Panel TIP The Microsoft W...

Page 34: ...ings 23 Display Toggle working with 26 Double click customizing 9 Eraser feel customizing 10 advanced 11 Features control panel 5 Functions button 13 Installing multiple tablets 31 Manual about 2 Moni...

Page 35: ...egistered trademarks of Wacom Co Ltd Adobe Reader and Photoshop are either registered trademarks or trademarks of Adobe Systems Incorporated in the United States and or other countries Microsoft Windo...

Reviews: