background image

 wc_si000963gb_FM10.fm

14

Safety Information

HDR 115

1.5

Safety Guidelines for Operating Combustion Burners

When using the machine:

Clean up any spilled fuel immediately.

Replace the fuel tank cap after refueling the machine.

Refill the fuel tank in a well-ventilated area.

Shut down the generator, if equipped, when refueling.

When refueling the machine:

Do not fill or drain the fuel tank near an open flame or while the machine is 
running.

Do not smoke when refueling the machine.

Do not use gasoline, crankcase oil, or any oil containing gasoline.


DANGER
Carbon monoxide

. Using this machine indoors CAN KILL YOU IN MINUTES. 

Exhaust gas contains carbon monoxide (CO). This is a deadly poison you cannot 
see or smell. If you can smell the exhaust, you are breathing CO. Even if you 
cannot smell the exhaust, you could be breathing CO. 

NEVER operate the machine inside an enclosed area, such as a home, tunnel, 
or garage. 

ONLY use the machine outside and far away from windows, doors, and vents. 
These openings can pull in exhaust gas.

ALWAYS use a battery-powered or battery-backup CO alarm in nearby struc-
tures. Even when you use the machine correctly, CO may leak into nearby 
structures. 

If you start to feel sick, dizzy, or weak after the machine has been running, move 
to fresh air IMMEDIATELY. See a doctor. You could have carbon monoxide poi-
soning. 

Summary of Contents for HDR115

Page 1: ...Operator s Manual Direct Fired Air Heater HDR115 Type HDR115 Document 5100020937 Date 1017 Revision 03 Language EN 5 1 0 0 0 2 0 9 3 7...

Page 2: ...distribution not authorized by Wacker Neuson Production Americas LLC represents an infringement of valid copyrights Violators will be prosecuted Trademarks All trademarks referenced in this manual are...

Page 3: ...urning Equipment in Canada and NFPA 31 Standard for the Installation of Oil Burning Equipment in the USA WARNING Risk of personal injury or machine damage from improper use Before using the machine re...

Page 4: ...ng parts or service for this machine WARNING Work site fire burn inhalation and explosion hazards Keep solid combustibles such as building materials paper or cardboard at a safe distance away from the...

Page 5: ...n contained in this manual is based on machines manufactured up until the time of publication Wacker Neuson reserves the right to change any portion of this information without notice The illustration...

Page 6: ...Foreword HDR 115 6 wc_tx004151gb_FM10 fm...

Page 7: ...Lifting and Transporting 23 3 1 Lifting the Machine 23 3 2 Transporting the Machine 24 4 Machine Setup 25 4 1 Preparing the Machine for First Use 25 4 2 Recommended Fuels 26 4 3 Refueling the Machine...

Page 8: ...42 6 5 Adjusting the Air Damper 43 6 6 Checking and Adjusting the Fuel Pressure 44 7 Maintenance 46 7 1 Periodic Maintenance Schedule 46 7 2 Inspecting and Cleaning the Machine 47 7 3 Removing the Ac...

Page 9: ...ntial personal hazards Obey all safety messages that follow this symbol DANGER DANGER indicates a hazardous situation which if not avoided will result in death or serious injury To avoid death or seri...

Page 10: ...uirements that are incompatible with the heater requirements Operating the heater in a manner that is inconsistent with all federal state and local codes and regulations Using the machine as a ladder...

Page 11: ...ualifications have received instruction on how to properly use the machine are familiar with required safety devices The machine must not be accessed or operated by children people impaired by alcohol...

Page 12: ...nd guards are in place and in working order All controls operate correctly The machine is set up correctly according to the instructions in the Operator s Manual The machine is clean The machine s lab...

Page 13: ...disconnect power from the machine After Use Ensure that the machine will not tip over roll slide or fall when not being operated Store the machine properly when it is not being used The machine shoul...

Page 14: ...e Using this machine indoors CAN KILL YOU IN MINUTES Exhaust gas contains carbon monoxide CO This is a deadly poison you cannot see or smell If you can smell the exhaust you are breathing CO Even if y...

Page 15: ...with a known problem or deficiency All repairs and adjustments shall be completed by a qualified technician Turn off the machine before performing maintenance or making repairs Remain aware of the mac...

Page 16: ...s equivalent to the original in all types of specifications such as physical dimensions type strength and material Personal Protective Equipment PPE Wear the following Personal Protective Equipment PP...

Page 17: ...wc_si000963gb_FM10 fm 17 HDR 115 Safety Information Notes...

Page 18: ...wc_si000964gb_FM10 fm 18 Labels HDR 115 2 Labels 2 1 Label Locations wc_gr013182 A A B B C D E E F G H K M N...

Page 19: ...E Lifting point C WARNING Electric shock hazard Read Operator s Manual for instructions D CAUTION This machine uses diesel fuel E Tie down point AVERTISSEMENT AVERTISSEMENT 5100015212 ADVERTENCIA ADVE...

Page 20: ...doors and windows are open Only use outside away from windows doors and vents Read the Operator s Manual before use G CAUTION Hot while in operation Do not touch Keep children clothing and combustible...

Page 21: ...ontrol panel switch in order to ensure automatic cooling off Heater will stop by itself after automatic cooling off Clean fuel filter regularly and drain water from fuel tank if necessary When heater...

Page 22: ...of oil and oil vapors before starting or resetting the burner Resetting From Restricted or Hard Lockout WARNING Avant de commencer ou de r initialiser le contr le de l tat de verrouillage restreint d...

Page 23: ...ach the lifting devices and equipment to the lifting eyes b Do not attach lift the machine by the handle Do not attach devices to any other part of the machine 2 Lift the machine a small distance 3 Ch...

Page 24: ...on both sides of the machine When tying down the machine route tie down straps or chains through the lower frame only Do not route tie down straps or chains over the top of the machine 3 Cover all ope...

Page 25: ...g location DANGER Carbon monoxide Using the machine indoors CAN KILL YOU IN MINUTES Exhaust gas contains carbon monoxide CO This is a deadly poison you cannot see or smell If you can smell the exhaust...

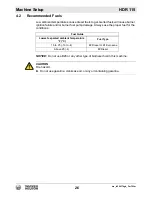
Page 26: ...lure and or burner fuel pump damage Always use the proper fuel for the conditions NOTICE Do not use B20 or any other type of biodiesel fuel in this machine Fuel Guide Lowest expected ambient temperatu...

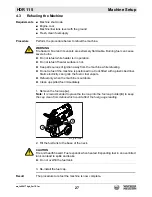
Page 27: ...lt The procedure to refuel the machine is now complete WARNING Fire hazard Fuel and its vapors are extremely flammable Burning fuel can cause severe burns Do not refuel while heater is in operation Do...

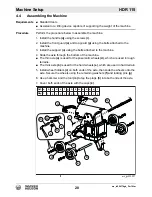
Page 28: ...to the machine 4 Slide the axle through the bottom of the machine The thin axle a is used for the pneumatic wheels d which are used in rough terrains The thick axle b is used for the hard wheels e whi...

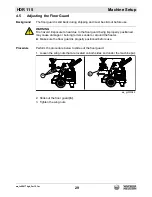
Page 29: ...lide out the floor guard 1 Loosen the wing nuts that are located on both sides and under the machine a 2 Slide out the floor guard b 3 Tighten the wing nuts WARNING Fire hazard Exposure to heat due to...

Page 30: ...ion Ref Description a Combustion chamber p Reset button and reset lamp b Burner q Control switch c Nozzle r Remote thermostat connection port d Solenoid valve s Power indicator lamp e Diesel pump t Po...

Page 31: ...ell the exhaust you could be breathing CO NEVER operate the machine inside an enclosed area such as a home tunnel or garage ONLY use the machine outside and far away from windows doors and vents These...

Page 32: ...ooled water or deep snow Guidelines Observe the following guidelines when positioning the machine for operation Installer must be familiar with all applicable laws codes regulations or other restricti...

Page 33: ...um 5 until the desired angle is achieved 3 Tighten the locking handles a only when alignment is correct To prevent injury or damage be sure the locking handle is not improperly aligned c CAUTION Pinch...

Page 34: ...Use 10 gauge extension cords for lengths up to 30 m 100 ft Grounding requirements Electrical grounding must comply with the National Electric Code ANSI NFPA 70 or the CSA C22 1 Canadian Electrical Cod...

Page 35: ...green when the supply power is present The reset lamp reset button a illuminates red when the machine is in a burner lock out state The burner lock out must be cleared before machine operation can res...

Page 36: ...poison you cannot see or smell If you can smell the exhaust you are breathing CO Even if you cannot smell the exhaust you could be breathing CO NEVER operate the machine inside an enclosed area such...

Page 37: ...ot being used I the burner will fire continuously In applications in which the remote thermostat is being used II the burner will fire until the air temperature of the application area reaches the tar...

Page 38: ...tly cool 5 4 Emergency Shutdown Procedure Procedure If a breakdown or accident occurs while the machine is operating perform the procedure below 1 Turn off the machine 2 Unplug the power cord 3 Remove...

Page 39: ...to be heated 4 Adjust the target temperature with the dial e 5 Select the thermostat operating mode II f Thermostat adapter An adapter is available to convert the proprietary thermostat connection to...

Page 40: ...o disconnect the ground wire c from the burner assembly b 5 Rotate the burner assembly counter clockwise and remove it from the flame head and air tube assembly e 6 Perform the required maintenance No...

Page 41: ...r assembly See topic Removing and Installing the Burner 2 Inspect the condition of the electrode tips a Replace any damaged or worn electrodes 3 Verify the electrode gap is set to the recommended meas...

Page 42: ...he Burner Assembly 2 Unscrew the nozzle a from the nozzle assembly 3 Screw the new nozzle into the nozzle assembly 4 Inspect the turbulator b for the following Wear Replace if necessary Cleanliness Cl...

Page 43: ...e inadequate air settings increases efficiency and lowers stack temperature but may cause soot build up rich mixture Procedure Perform the procedure below to adjust the air damper 1 Perform the initia...

Page 44: ...e fuel pressure 1 Remove the access panel See topic Removing the Access Panel 2 Disconnect the wire from the solenoid valve a 3 Remove the threaded plug b from the pressure test port using a hex key w...

Page 45: ...ses fuel pressure NOTICE Do not adjust the fuel pressure to a setting outside the operational parameters 8 Press the reset button 9 Repeat steps 5 6 to re check the settings 10 Remove the pressure gau...

Page 46: ...1000 1200 Inspect and clean the machine Inspect the fuel hoses Check fuel level Inspect electrical components Inspect the CAD cell Replace the burner nozzle Clean and check adjust burner electrode set...

Page 47: ...plosion hazard Residue from flammable materials such as solvents or gasoline could ignite and cause a fire or an explosion Do not use flammable materials or solvents to clean the machine WARNING Elect...

Page 48: ...nents of the machine 1 Remove the access panel See topic Removing the Access Panel 2 Use compressed air to clean the enclosure and ventilator b 3 Inspect and clean the high tension connectors and wire...

Page 49: ...fuel pump Procedure Perform the procedure below to remove the access panel 1 Shut down the machine and allow it to cool 2 Disconnect the power cord from the power source 3 Remove the screws a that fa...

Page 50: ...nel 2 Twist and pull out the plastic protective holder a off the base of the burner assembly The CAD cell b is inside this plastic holder 3 Inspect the CAD cell for cleanliness Be sure the cell is fre...

Page 51: ...or storage Perform the procedures below to prepare your machine for storage Complete any needed repairs Stabilizing the fuel After completing the procedures listed above fill the fuel tank completely...

Page 52: ...or is malfuntioning Replace electric motor Electric motor bearings are malfuntioning Replace electric motor Condenser is malfunctioning Replace condenser Motor starts no ignition or cuts out Electric...

Page 53: ...of the air damper Fuel is contaminated Replace fuel Clean or replace oil filter Air leaks present in fuel circuit Check fuel line and filter for possible leaks Fuel supply is insufficient at burner C...

Page 54: ...output BTU h 115 250 Fuel pressure psi 166 Fuel consumption gal h L h 0 85 3 2 Power supply V Hz 120 1 60 Power consumption W 175 Current consumption A 2 15 Run time estimate h 13 Fuel tank capacity g...

Page 55: ...t button 6 Capacitor 13 Reset lamp 7 Burner motor 14 Electrodes Wire Colors B Black R Red Y Yellow Or Orange G Green T Tan Br Brown Pr Purple L Blue V Violet Cl Clear Sh Shield P Pink W White Gr Gray...

Page 56: ......

Page 57: ...rveonderdelen Importante Para obter informa es sobre as pe as sobresselentes consulte o seu fornecedor da Wacker Neuson ou aceda ao site Web da Wacker Neuson em http www wackerneuson com Wa ne W celu...

Page 58: ......

Reviews: