background image

VXL Instruments Ltd

Itona TC61yy/TC63yy 

Hardware User’s Guide 

Connectors and Cables 


13 

Environmental Operating  


Temperature  :                     + 5

o

C to +40

o


Storage temperature: 

- 20

C to +65

o


Humidity: 


20% to 80% RH non-condensing 


Electrical 


Line Voltage: 


100V to 240V AC (+6, -10%) 


Line Frequency: 


50 / 60 Hz 


Power Inlet:  


1.2A, 3-pin power plug (IEC 320) 


Power Outlet: 


3-pin power socket  (IEC 320 ) 

Note:

 for Devices upto 0.30A max., 100VAC~50/60Hz. 


for Devices upto 0.12A max., 240VAC~50/60Hz. 


MTBF 

  > 

50,000 

Hrs 


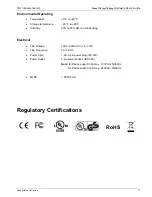
Regulatory Certifications 


RoHS 


Summary of Contents for Itona TC61yy

Page 1: ...1 Itona TC61yy Itona TC63yy Hardware User s Guide VXL Instruments Ltd No 17 House of Excellence Electronics City Hosur Road Bangalore 560 100 INDIA www vxl net...

Page 2: ...g and recording for any purpose without the express written permission of the manufacturer Every effort has been made to make this guide as complete and as accurate as possible but no warranty or fitn...

Page 3: ...ication number The full information of the associated label is as follows This device complies with Part 15 of the FCC rules Operation is subject to the following two conditions 1 This device may not...

Page 4: ...f the following chapters Introduction provides an overview of the product Installation contains the procedure to setup the hardware Specifications provides hardware mechanical electrical interface and...

Page 5: ...ations 11 Hardware 11 Mechanical 11 Environmental Operating 12 Electrical 13 Connectors and Cables 14 Connectors 14 COM Port 14 Printer Port Parallel 14 10 100 1000 LAN Port 15 Video Port 15 Mouse Key...

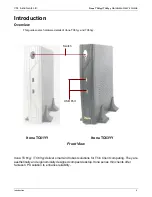
Page 6: ...ardware details of Itona TC61yy and TC63yy Itona TC61YY Itona TC63YY Front View Itona TC61yy TC63yy deliver smart and robust solutions for Thin Client computing They are aesthetically and ergonomicall...

Page 7: ...VXL Instruments Ltd Itona TC61yy TC63yy Hardware User s Guide Introduction 7...

Page 8: ...CKING MATERIAL THEY WOULD BE REQUIRED TO AVOID DAMAGE DURING TRANSIT IF REQUIRED IN FUTURE Step Two Prepare 1 The site where you want to install the product must have the following 100 240V AC 1 2A 50...

Page 9: ...ED FROM THE UNIT PLEASE USE 6A MIN 250V AC 0 75 sq mm 18AWG 3C H05VV F SVT SPT 2 CERTIFIED POWER CORD Pictures below show the various connectors available on the rear panel of the Itona TC61yy and TC6...

Page 10: ...th each connector of the client Ensure that COM VGA and Parallel ports are adequately fastened with the screws provided with the cables Ports Connector Symbol 9 Video port 9 USB ports 9 LINE OUT port...

Page 11: ...HDD 2 5 SATA HDD 2 5 inch Flash IDE 44 Pin RAM 128MB 2GB DDRII 533 667 Networking 1 10 100Mbps Networking 2 10 100 1000Mbps Display resolution 16 32 Bits 1920x1200 60Hz max Power Supply Internal Power...

Page 12: ...es 12 PROCEDURE FOR FIXING SINGLE SIDE WALL MOUNTING BRACKET for Itona TC61yy and TC63yy STEPS 1 Wall 2 Drill holes and Insert Wall Plug M7x33 4no 3 Place Single Side Wall Mounting Bracket 4 Fix Self...

Page 13: ...mperature 20o C to 65o C Humidity 20 to 80 RH non condensing Electrical Line Voltage 100V to 240V AC 6 10 Line Frequency 50 60 Hz Power Inlet 1 2A 3 pin power plug IEC 320 Power Outlet 3 pin power soc...

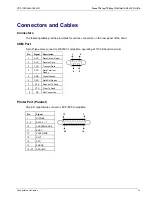
Page 14: ...C compatible operating at 115 2K baud maximum Pin Signal Description 1 DCD Data Carrier Detect 2 RxD Receive Data 3 TxD Transmit Data 4 DTR Data Terminal Ready 5 GND Signal Ground 6 DSR Data Set Ready...

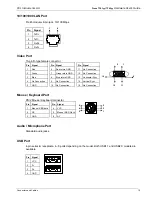
Page 15: ...n return GND 12 No Connection 3 Blue 8 Blue return GND 13 Horizontal Sync 4 No Connection 9 No Connection 14 Vertical Sync 5 GND 10 No Connection 15 No Connection Mouse Keyboard Port PS 2 Mouse Keyboa...

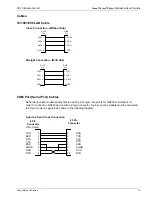
Page 16: ...nnections In order to connect an RS232 device with a 25 pin connector 9 pin connector signals must be converted to 25 pin connector signals as shown in the following diagram 9 pin to 25 pin Cross Conn...

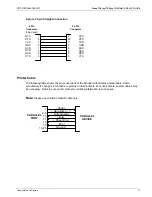
Page 17: ...nctions or polarity on their printers For such printers custom cables may be necessary Refer to your printer manual for cabling information in such cases Note Please use certified shielded cable only...

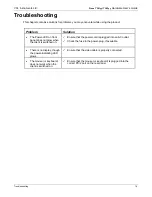
Page 18: ...anel does not glow when the client is switched on 9 Ensure that the power cord is plugged into an AC outlet 9 Check the fuse in the power plug if available There is no display though the power indicat...

Reviews: