25
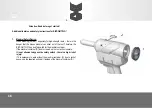
Removing the battery
The
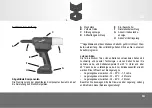
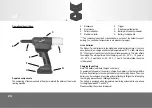
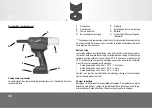
battery (G)
is equipped with a
locking mechanism (H)
. As long as the bat-
tery remains inside the electric riveting machine it is held in position by a spring.
To remove the battery (G), press the unlocking button (H) and pull the battery from
the electric riveting device.
Don‘t use force.
Putting the device into operation
Insert the battery. Only use original Rivdom Two Li-Ion batteries with the voltage
of 20 V depicted on the type label of your electric riveting machine.
The use of other batteries may lead to injuries and risk of fire.
Push the battery (G) from the front into the stand of the electric riveting machine,
holding the locking button (H) pressed. Push the battery into the stand completely
until it is securely locked.
Switching the device into stand-by mode
Press the
trigger (E)
for a short time. The white LED for the illumination of the
riveting area lights up. The device is thereby switched to stand-by for 10 sec.
Pressing the power switch again will reset the stand-by counter to 10 sec.
Changing nozzles
The
nozzles (A)
are marked with numbers corresponding to the rivet cross-sec-
tion. Hold the power switch (E) pressed, that will lead to the clamping mechanism
moving into the rear position. Use the included wrench SW 13 to switch to the
required nozzle and release the power switch.
Attention! Tool will only work if mandrel container is screwed on the tool!
Riveting
Insert the rivet into the nozzle (A) and the other end of the rivet into the work-piec-
es to be riveted. Press the power switch until the rivet is removed, then release
the power switch. Tilt the riveting device backwards so that the removed rivet pin
falls into the
mandrel collection device (D)
. If the rivet doesn‘t come off in a
single working stroke, repeat the procedure.
Failure
If rivets which exceed the indicated power of the device are used the battery is
overloaded, the device will stop operating and the
LED (C)
will flash red for 5 sec
and the tool will automaticly reverse. Wait until the red LED (C) goes out, after that
you can start working again.
If the battery is empty, the device is powered down by a protective circuit and the
LED (C) will flasch yellow for 5 sec and the tool doesn‘t move any more.
Please exchange the empty battery with a fully charged one, after that you can
start working again.
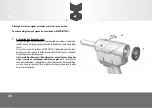
Changing the clamping jaw (>> page 6)
The clamping jaws are wearing parts. If you are unable to rivet in a single working
stroke you should change the clamping jaws:
I. (1) Front sleeve (SW 27)
II. (2) Clamping sleeve (SW 17)
(3) Riveting machine (SW 17)
GB
Summary of Contents for Rivdom TWO2
Page 1: ...1 ORIGINALBETRIEBSANLEITUNG F Notice originale GB Original instructions ...
Page 2: ......
Page 6: ...6 I II III IV V VI 1 1 2 3 4 5 D ...
Page 17: ...17 D ...
Page 27: ...27 GB ...

