background image

17

DIRECTORY

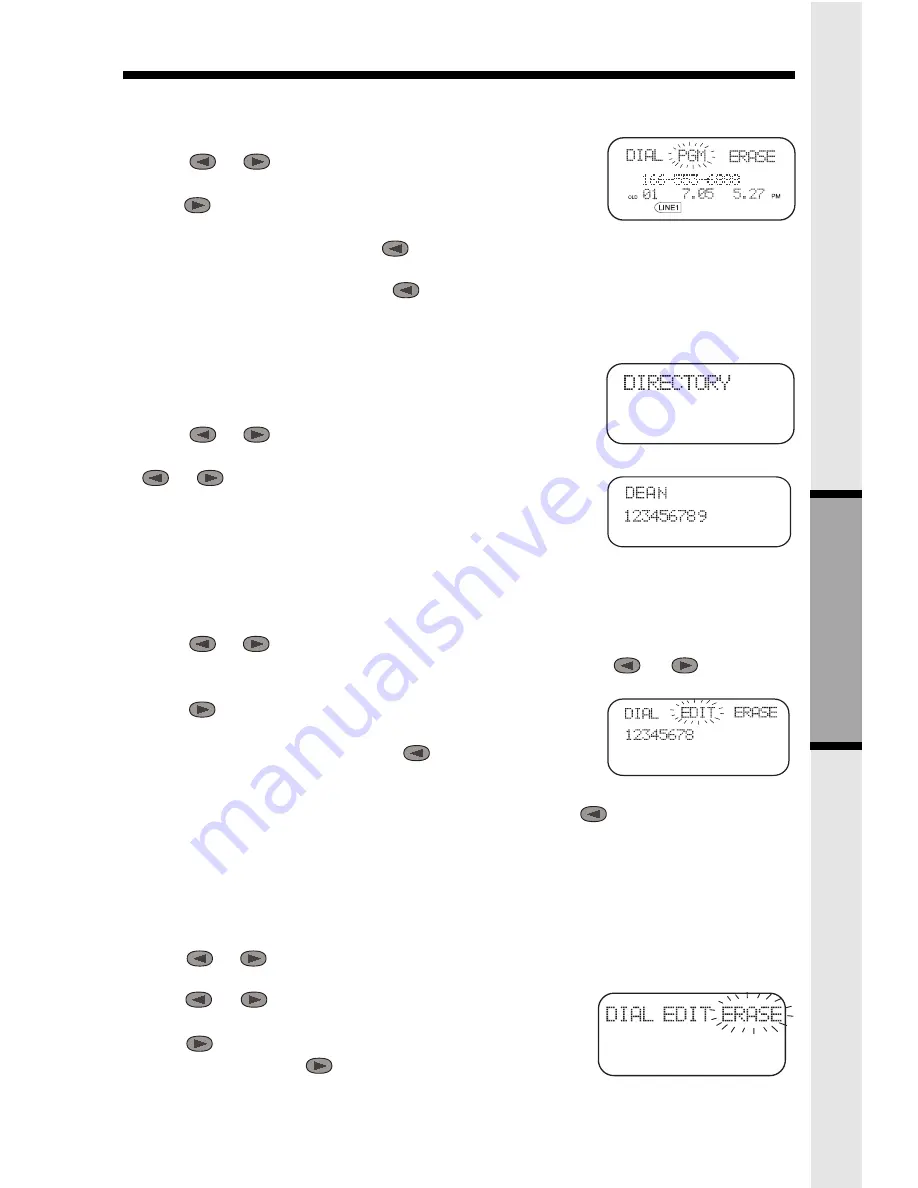
STORING A CALLER ID RECORD IN THE DIRECTORY

With the Handset OFF:
1. Press 

 or 

 until you see the desired call.

2. Press SELECT .
3. Press

 until PGM is blinking.

4. Press SELECT .
 If you want to edit the name, press 

 to erase letters.  Use the dialpad to enter new letters.

When the name is correct, press SELECT.
If you want to edit the number, press 

 to erase digits.  Use the dialpad to enter new digits.

When the number is correct, press SELECT.
You will then hear a long beep.  The name and number have been stored in the Directory.

MAKING DIRECTORY CALLS

• Press SELECTDIRECTORY will appear.
• Press 

 or 

 to scroll to the desired name; 

or,

• Search by entering the first letter of the name, and then press

 or 

  if necessary.

• Press the desired LINE key.  You will hear a dial tone, and the

number will be dialed.

EDITING A DIRECTORY ENTRY

1. Press SELECT The Handset says DIRECTORY.
2. Press 

 or 

 to scroll to the desired name; 

or,

Search  by entering  the  first  letter of the name, and then press 

  or 

 if necessary.

3. Press  SELECT  .
4. Press 

 until EDIT is blinking.

5. Press SELECT .The name appears.
6. If you want to edit  the name, press 

  to  erase  letters. Use

the dialpad  to  enter  new letters. When the name is correct,
press SELECT.

7. The number appears. If you want to edit the number, press 

  to erase digits.  Use the

dialpad to enter new digits. When the number is correct, press SELECT.

ERASING A DIRECTORY ENTRY

1.Press  SELECT.
2.Press 

 or 

 to scroll to the desired name; 

or,

Search  by entering the  first  letter  of the name, and then
press 

 or 

 if necessary.

3.Press SELECT .
4.Press 

 until ERASE is blinking.

5.Press SELECT. Press 

 until 

YES is blinking.

6.Press  SELECT.


AD

V

ANCED OPERA

TIONS

Summary of Contents for VT 2961

Page 1: ...nless proper ventilation is provided 7 This product should be operated only from the type of power source indicated on the marking label If you are not sure of the type of power supply to your home consult your dealer or local power company 8 Do not allow anything to rest on the power cord Do not locate this product where the cord will be abused by persons walking on it 9 Do not overload wall outl...

Page 2: ...the appropriate type andsize battery pack specified in the instruction manual provided for this product 2 Do not dispose of the battery pack in a fire The cell may explode Check with State and local codes for possible special disposal instructions 3 Do not open or mutilate the battery pack Released electrolyte is corrosive and may cause damage to the eyes or skin It may be toxic if swallowed 4 Exe...

Page 3: ...it 3 Wall Mounting Bracket 4 AC power Adaptor 5 Telephone Line Cords x2 6 Battery Pack To purchase replacement battery packs call VTECH Communications at 1 800 595 9511 In Canada call VTECH Electronics at 1 800 267 7377 7 Short Line Cord 8 Belt Clip HANDSET WALL MOUNTING BRACKET BATTERY PACK AC POWER ADAPTOR TELEPHONE LINE CORDS BELT CLIP BASE UNIT SHORT TELEPHONE LINE CORD VOLUME LINE 1 LINE 2 OF...

Page 4: ...ACK DIALING KEYS 0 9 BACK KEY FORWARD KEY SELECT KEY OFF KEY LINE 2 KEY LINE 1 KEY FLASH KEY PROG KEY REDIAL PAUSE KEY ANTENNA DISPLAY HOLD KEY 6 5 4 GHI JKL MNO 9 7 8 PQRS TUV PROG CONF HOLD INTERCOM FLASH REDIAL PAUSE WXYZ 0 TONE OPER 1 2 3 ABC DEF OFF LINE 1 LINE 2 SELECT CONF KEY INTERCOM KEY ...

Page 5: ... Off Key VOLUME LINE 1 LINE 2 OFF MIC SPARE BATTERY CHARGING NEW CALL 1 2 3 SKIP REPEAT DELETE TIME SET CONF INTERCOM HOLD FLASH MUTE SELECT MENU MEMO ANSWER ANSWER ON OFF MAIL BOX PLAY STOP MENU Memo Key Answer On Off Key Menu Key Select Key Spare Battery Indictor Charging Indictor Microphone Conf Key Hold Key Flash Key Repeat Key Skip Key Mute Key Intercom Key CORDLESS VT 2961 DIGITAL900MHz Spar...

Page 6: ...one The Handset can charge face up or down AC OUTLET LINE 2 DC LINE 2 DC IN 9V L1 L1 L2 L2 SLIDE IN THE BATTERY COVER PLEASE NOTE THE CORRECT POSITION OF THE BATTERY PACK WHEN INSTALLING PLACE THE NEW BATTERY PACK INTO THE BATTERY COMPARTMENT PRESS and SLIDE DOWNWARD VOLUME LINE 1 LINE 2 OFF MIC SPARE BATTERY CHARGING NEW CALL 1 2 3 SKIP REPEAT DELETE TIME SET CONF INTERCOM HOLD FLASH MUTE SELECT ...

Page 7: ...e 2 lines each coming out of a separate wall jack Connect a phone cord from the wall jack you wish to designate as your LINE1 to the L1 L1 L2 jack on the back of the phone next connect a phone cord from the remaining wall jack to the L2 jack on the phone NOTE You can use your VT2961 as a one line phone as well For best results raise the antenna on the Handset and Base Unit when using your telephon...

Page 8: ...3 The SPARE BATT LED will then be illuminated 4 Close the spare battery cover Please note that the Spare Battery compartment charges at a slower rate than a battery pack charging in the Handset It takes 24 hours to fully charge a battery pack in the Spare Battery charger SETTING UP YOUR VT2961 GETTING STARTED VOLUME LINE 1 LINE 2 OFF MIC SPARE BATTERY CHARGING NEW CALL 1 2 3 SKIP REPEAT DELETE TIM...

Page 9: ...l mounting bracket with the holes on the bottom of the base Snap the wall mounting bracket firmly into place 3 Mount the base on the wall Position the base so the mounting studs will fit into the holes on the bottom of the base Position the power cord to extend down the wall Slide the base down on the mounting studs until it locks into place 4 Connect the telephone line cord s Insert one end of th...

Page 10: ...ks 5 Press SELECT ENTER AREA CODE is displayed 6 Enter 000 7 Press SELECT and continue below You may program up to 5 local area codes An area code is local if you do not dial 1 when you make calls to that area code In other words you make calls to local area codes by dialing 10 digits area code plus phone number without a preceding 1 This might include your own area code 1 Press PROG 2 Press until...

Page 11: ...fourth step press until ON is flashing then press SELECT MAKING CALLS From the Handset Press desired LINE key and listen for dial tone Dial the phone number The corre sponding LINE key on the Base Unit will blink Press OFF to end your call Alternate Method 1 Dial the phone number checking the display for accuracy If you make a mistake use the key to backspace 2 Once you have entered the phone numb...

Page 12: ...ing LINE key The LINE key will glow steadily 2 The corresponding LINE key on the Handset will blink while the Speakerphone is in use 3 Press OFF to end your call HANDSET VOLUME Adjust the Handset volume with the and keys located on the side of the Handset The Handset will display the relative volume level as you adjust it BASE SPEAKERPHONE VOLUME Adjust the Base Unit volume with the and keys The B...

Page 13: ...nswer To answer Call Waiting press FLASH To return to your original call press FLASH again This procedure is the same for Handset and Speakerphone calls PAGING THE HANDSET To make the Handset ring press INTERCOM on the Base To stop the ringing press OFF on the Handset or Base Unit INTERCOM Conversation between the Base and Handset From the Handset Press INTERCOM The Base Unit will ring and the int...

Page 14: ...to both lines at the same time 1 While you are one line press HOLD 2 Make or receive a call on the avaiable line 3 Press CONF You are now talking to both lines 4 To end your conference call press OFF The procedure is the same for the Handset and Base To place both lines on hold press HOLD Press CONF to return to the conference call To switch from Handset to Base or vice versa press HOLD on whichev...

Page 15: ...ut You can speed dial numbers from the Call Log And you can store names and numbers from the Call Log into your directory REVIEWING THE CALL LOG With the Handset OFF 1 Press or You will see the number of NEW not viewed and OLD previously viewed calls 2 Continue to press or to review the callers Some locations are not equipped to send Caller ID information when a person places a call When you recei...

Page 16: ...he characters KEY CHARACTERS 1 1 2 A B C 2 3 D E F 3 4 G H I 4 5 J K L 5 6 M N O 6 7 P Q R S 7 8 T U V 8 9 W X Y Z 9 0 0 If consecutive characters are found on the same key D and E for example you ll need to press to advance to the next space For example to enter the name DEAN Press 3 D Press Press 3 twice E Press 2 A Press 6 twice N 5 When the name is complete press SELECT The screen will display...

Page 17: ... desired LINE key You will hear a dial tone and the number will be dialed EDITING A DIRECTORY ENTRY 1 Press SELECT The Handset says DIRECTORY 2 Press or to scroll to the desired name or Search by entering the first letter of the name and then press or if necessary 3 Press SELECT 4 Press until EDIT is blinking 5 Press SELECT The name appears 6 If you want to edit the name press to erase letters Use...

Page 18: ...or direct acces to LINE2 The Data Port only provides access to Line 2 so you must have an active line connected to the LINE2 input on the back of the VT 2961 Connect an RJ 11 2 element phone cord from the Data Port to you fax laptop etc NOTE While the Data Port is in use accidental use of Line 2 by a parallel phone the VT 2961 Handset or a Call Waiting ID alert may in inerrupt the data transmissio...

Page 19: ...dless Handset the microphone on the Handset will be muted This is done to limit the effect of back ground noise The following operational characteristics also apply to other headsets which are not sold by VTech however VTech assumes no responsibility for their performance The VTech compatible Headset has a reversible mon aural design You can wear you Headset on either ear leaving one ear free for ...

Page 20: ... message after the tone will be used see Recording the OGM 2 Announce Only mode If this mode is set the caller is not able to leave his message If no announcement is recorded the factory default greeting is Hello I m unable to answer your call right now Please call again Thank you will be used see Recording the OGM Example for OGM1 for multi user application Hi We can t come to the phone right now...

Page 21: ...be used Set Security Code The security code programmed into the Answering System is used to gain access to functions from remote locations The security code default setting is 19 1 Press MENU unit you hear Set security code 2 Press TIME SET to hear the current security code 3 Press SELECT briefly to increase the security code by 1 Or hold SELECT continuously to increase the code by multiples of 10...

Page 22: ...y 10 seconds to notify you when new messages have been received set Audible Message Alert to ON Otherwise it is preset to OFF 1 Press MENU until you hear Set Audible Message Alert 2 Press SELECT until the desired setting ON or OFF is announced 3 Press TIME SET to confirm your choice The voice prompt of Audible Message Alert On or Audible Message Alert Off will be heard Set Day Time VOLUME LINE 1 L...

Page 23: ...3 Press TIME SET to confirm your selection Call Screening is ON or OFF will be announced Set Number of Rings The Answering System has 4 ring type settings 2 rings The incoming call is answered after 2 rings 4 rings The incoming call is answered after 4 rings 6 rings The incomng call is answered after 6 rings Toll Saver The incoming call is answered after 2 rings only if there are new messages memo...

Page 24: ...en playback the old messages The and keys can be used to skip forward and backward during message playback To stop message playback and return to normal operation mode press any MAILBOX key The day and time stamp is announced after each message is played After all messages and memos have been played the final voice prompt will be End of messages and the Answering System will exit playback mode Not...

Page 25: ...R ON OFF The BACKLITE LED will then be turned off and Answering machine off will be announced The display will still show the number for new messages Even if the Answering System is set to OFF it will still answer calls after 10 rings An announcement Please enter your security code is given and you can enter your security code to use remote operation See Remote Operation of Answering System Deleti...

Page 26: ...CK The default speed is normal Playback speed will return to normal once you exit the playback mode Adjusting Volume VOLUME LINE 1 LINE 2 OFF SPARE BATTERY CHARGING NEW CALL 1 2 3 SKIP REPEAT DELETE TIME SET CONF INTERCOM HOLD FLASH MUTE SELECT MENU MEMO ANSWER ANSWER ON OFF MAIL BOX PLAY STOP MENU VT 2961 DIGITAL CORDLESS 900MHz VOLUME Check Day and Time VOLUME SPARE BATTERY CHARGING NEW CALL 1 2...

Page 27: ...wering System OFF mode The Answering System will answer a call after 10 rings and Memory full Please enter your security code is announced You may enter remote operation mode by entering the security code If memory is full any attempt to record memos or OGM s will be ignored Power Failure After a power failure CL will flash to notify you to set the day and time All the messages OGM s and menu sett...

Page 28: ...ans Flashing number You have that amount of new messages 0 You have no new messages CL flashing he clock needs to be set A Answering System is in Announce Only mode F flashing Answering System memory is full 99 flashing Recording time has exceeded 99 seconds 1 8 Volume level as you re setting it Answering System is answering a call or in remote mode flashing Answering System is in programming mode...

Page 29: ... with any incoming call 3 Enter followed by your 2 digit security code during the announcement The default security code is 19 4 Once the security code is received a double confirmation beep will be given and you are in Remote Operation mode You can then control the Answering Machine functions using the telephone keypad 5 The user can also enter the Remote Operation mode during message recording T...

Page 30: ...y 1 Enter 7 to record a new OGM You will hear Now recording followed by a beep to signal start of recording 2 Press 5 to stop recording Your new OGM will playback automatically Check OGM1 Remotely Enter 7 to review OGM You will hear playback of OGM followed by a beep Turning Answering System ON or OFF Pressing 0 toggles the Answering System ON OFF Answer machine on or Answer machine off will be an...

Page 31: ...the system on or off Press 5 to return to the simple voice menu Pressing any function code will stop the voice menu and perform the corresponding functions Exiting Remote Operation 1 Enter 0 on the touch tone keypad to exit remote operation mode The Answering System confirms your action with a long beep and then disconnects 2 The Answering System also automatically disconnects if no key is pressed...

Page 32: ...es during storms Cleaning your telephone Your telephone has a durable plastic casing that should retain its iuster for many years Clean it only with a soft cloth slightiy dampened with water or a mild soap Do not use excess water or cleaning solvents of any kind Remember that electrical appliances can cause serious injury if used when you are wet or standing in water If your Base Unit should fall ...

Page 33: ...or the base unit to another outlet YOU GET NOISE STATIC OR A WEAK SIGNAL WHEN YOU RE AWAY FROM THE BASE UNIT You may be out of range Either move close to the base or relocate the base unit The layout of your home may be limiting the range Try moving the base unit to another position THE HANDSET DOES NOT RING WHEN YOU RECEIVE A CALL Make sure you have the handset ringer activated To set the ringer ...

Page 34: ...adle If it does not seem to respond after trying this a few times do the following in the order listed 1 Disconnect the power to the base 2 Disconnect remove the handset battery pack 3 Remove the base unit battery pack where applicable 4 Wait a few minutes 5 Connect power to the base 6 Install the handset battery pack 7 Install the base unit battery pack where applicable 8 Place the handset in the...

Page 35: ...anty as determined by VTECH Communications Ship the unit via UPS Insured or equivalent to VTECH COMMUNICATIONS 11035 SW 11th St Bldg B Suite 270 BEAVERTON OREGON 97005 In Canada ship the unit via UPS Insured or equivalent to VTECH ELECTRONICS Suite 200 7671 Alderbridge Way Richmond B C V6X 1Z9 VTECH Communications assumes no responsibility for units sent without prior Return Authorizatlon WHAT DOE...

Page 36: ...ply with part 15 of the FCC rules These limits are designed to provide reasonable protection against harmful interference in a residential installation This equipment generates uses and can radiate radio frequency energy and if not installed and used in accordance with the instructions may cause harmful interference to radio communications However there is no guarantee that interference will not o...

Page 37: ... by the device to prevent overloading The termination on a loop may consist of any combination of devices subjected only to the requirement that the sum of the REN does not exceed five 5 0 Notice The Industry Canada label identifies certified equipment This certification means that the equipment meets certain telecommunications network protective operational and safety requirements The Department ...

Page 38: ...e RBRC program provides a convenient alternative to placing used nickel cadmium batteries into the trash or municipal waste which may be illegal in your area VTech s participation in RBRC makes it easy for you to drop off the spent battery at local retailers participating in the RBRC program or at authorized VTech product service centers Please call 1 800 8 BATTERYTM for information on Ni Cd batte...

Page 39: ...C and IC Actual operating range may vary according to environmental conditions at the time of use SIZE Handset 17 5 x 6 x 4 5cm L x W xT Maximum Antenna excluded Base 20 5 x 17x 70cm L x W x T Maximum Antenna excluded WEIGHT Handset 205 grams Base 570 grams POWER REQUIREMENTS Handset Self contained nickel cadmium rechargeable battery supply 3 6V nominal 600mAh capacity Base 9VDC 600mA MEMORY DIREC...

Page 40: ...ume 12 Mute 12 Speakerphone Tips 13 Call Timer 13 Hold 13 Call Waiting 13 Paging the Handset 13 Intercom 13 Base Unit Ringer 13 Setting The Handset Ringer 14 Conference Calling 14 CALLER ID Reviewing the Call Log 15 Erasing Calls 15 Speed Dialing from Caller ID 16 DIRECTORY To store a Name and Number 16 Storing a Caller ID Record in the Directory 17 Making Directory Calls 17 Editing a Directory En...

Page 41: ...41 TABLE OF CONTENTS REMOTE OPERATION OF ANSWERING SYSTEM 29 MAINTENANCE 32 IN CASE OF DIFFICULTY 33 WARRANTY STATEMENT 35 FCC AND IC REGULATIONS 36 TECHNICAL SPECIFICATIONS 39 ...

Page 42: ... Distributed in the U S A by VTech Communications Inc Beaverton Oregon 97008 Distributed in the Canada by VTech Electronics Canada Ltd Suite 200 7671 Alderbridge Way Richmond B C V6X 1Z9 Copyright 2000 for VTECH TELECOMMUNICATIONS LTD Printed in China 91 5120 20 00 ISSUED 0 ...

Reviews: