background image

3

2.1       package contents

The package contains the following items:

 Handset
 Base station
 Power adaptor for base station
 Charger with power adapter
 Telephone line cord
 AAA NiMH rechargeable batteries 
 User’s manual

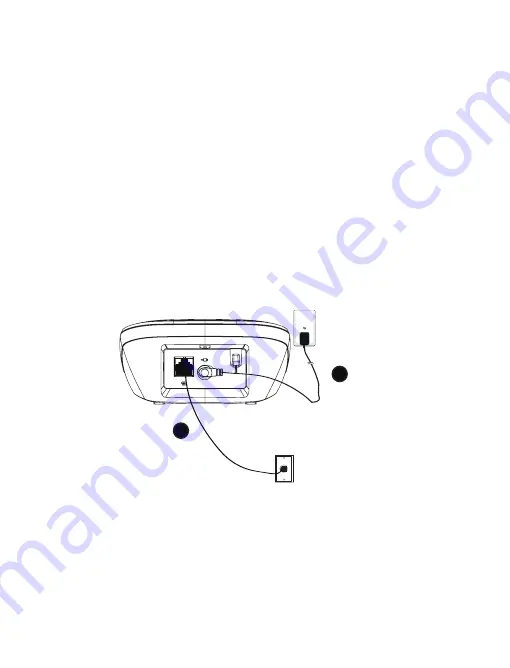
2.2       connect the corded Base Station


2.     Set Up tHe teLepHone

NOTE

Use only the supplied power adapter.

To wall power 

outlet

To telephone 

wall jack

Summary of Contents for LS1500-B

Page 1: ...User s manual www euphones vtech com LS1500 B ...

Page 2: ...When the power supply cord or plug is damaged or frayed If the product does not operate normally by following the operating instructions If the product has been dropped and the cabinet has been damaged If the product exhibits a distinct change in performance Avoid using a telephone other than a cordless type during an electrical storm There may be a remote risk of electric shock from lightning Do ...

Page 3: ...r more detailed information about disposal of your old appliance battery please contact your city office waste disposal service or the shop where you purchased the product If you have questions about this product or having difficulty with setup or operation contact our Customer Service Centre Power adaptor information Power adaptor VTech Qingyuan Plastics Electronics Co Ltd Model VT04EEU06045 Inpu...

Page 4: ...ion 1 Power adaptor for base station 1 Charger with power adapter 1 Telephone line cord 2 AAA NiMH rechargeable batteries 1 User s manual 2 2 Connect the Corded Base Station 2 SET UP THE TELEPHONE NOTE Use only the supplied power adapter 1 2 To wall power outlet To telephone wall jack ...

Page 5: ...nstall and Charge the Handset Battery NOTES Use only the supplied AAAx2 Ni MH 400mAh batteries If you do not use the handset for a long time disconnect and remove the battery to prevent possible leakage 1 2 3 ...

Page 6: ... 3 GET TO KNOW YOUR PHONE 3 1 Overview of the Handset 1 2 4 5 6 7 8 9 11 12 3 10 14 13 ...

Page 7: ...de Press and hold to access the voice mail key in idle mode Press and hold to enable or disable the keypad lock key during a call in Pulse mode Press to switch to tone mode key in idle mode Press and hold to turn on off the ringer 0 key in predialing number editing mode Press and hold to insert a pause key in Call Log mode Press to review caller s number if applicable 9 MICROPHONE 10 TALK SPEAKERP...

Page 8: ...the Base Station PAGE Press to page all registered handset s Handset s will ring for approximately 60 seconds Press and hold for 5 seconds to enter the registration mode 2 CHARGING CRADLE For charging the handset 1 2 1 ...

Page 9: ... Flashes when there is an incoming call Steadily on when an intercom call is in progress Flashes when there is an incoming intercom call or the call is on hold Steadily on when the speakerphone is turned on Steadily on when the answering machine TAM is turned on Flashes when new TAM message is received Steadily on when an alarm is set Flashes when the alarm time set before reaches Steadily on when...

Page 10: ...Steadily on when there are more digits after the text currently displayed Steadily on when the battery is two third charged Steadily on when the battery is one third charged Flashes when low battery is detected indicating that it needs charging Animates when battery is charging ...

Page 11: ... and hold to return to idle mode Main Menu CONTACTS CALL LOG Sub menu Review contacts list Under a Contacts entry ADD VIEW EDIT DELETE DEL ALL CAPACITY FASTDIAL Review Call Log Under a selected Call Log entry STORE DELETE DEL ALL DETAILS Key Press BS SET HS SET MEM KEY DEL HS DIALMODE FLASH BARGEIN CHG PIN RINGER TONE EQLIZER SEL BASE LANGUAGE HS NAME DISPLAY AUTO ANS MAILBOX M1 M2 ...

Page 12: ...11 CLOCK ALARM REGISTER DATE FMT TIME FMT SET TIME SET DATE ON OFF PIN DEFAULT PIN ...

Page 13: ...swer an Incoming Call Press OR If AUTO ANSWER is ON Lift the handset 4 5 Adjust Listening Volume During a Call To adjust listening volume during a call Press or on the right side of the handset 4 6 Volume Booster Feature The volume booster feature allows you to amplify the handset earpiece volume to compensate for the ear s limited sensitivity To turn on or off the volume booster feature during a ...

Page 14: ...ss and hold 4 11 Redial the Last Number 4 11 1 Redial a Number from the Redial List Press p q a desired entry Press NOTE If there is no number in the list the display shows EMPTY 4 11 2 Store a Redial Number into the Contacts Press p q a desired entry Press p q STORE Press Enter name Press Edit number Press p q a desired melody Press 3 3 4 5 6 ...

Page 15: ... useful way for finding lost handset s To locate the misplaced handset s Press on the base station All the registered and available handsets will produce the paging tone and PAGING is displayed on the LCD To stop the paging tone Press on any handset OR Press on the base station again to stop paging NOTE If there is an incoming call during paging the phone will ring with the incoming call instead o...

Page 16: ... the display shows EMPTY 3 Press p q ADD 4 Press Enter name 5 Press Enter number 6 Press p q a desired melody 7 Press 5 2 Review a Contacts Entry Press p q CONTACTS Press p q a desired entry 3 Press p q VIEW 4 Press 5 3 Dial a Contacts Entry Press p q CONTACTS Press p q a desired entry Press to dial out 3 ...

Page 17: ...p q CONTACTS Press p q a desired entry Press p q DELETE Press 5 6 Delete the Entire Contacts Entries Press p q CONTACTS Press twice p q DEL ALL Press twice 5 7 Check the Contacts Usage You can check how many contacts entries have been occupied in your phone and how many entries are available for you to store in the contacts Press p q CONTACTS Press twice p q CAPACITY Press 3 4 5 6 3 4 3 3 ...

Page 18: ... twice p q FASTDIAL Press p q 2 9 Press If there is no number stored in the selected key 4 Press p q a desired entry 5 Press If there is already a number stored in the selected key 4 Press EDIT 5 Press to select an entry from the contacts list 6 Press to confirm the setting 5 8 2 Delete the Fast Dial Number Press p q CONTACTS Press twice p q FASTDIAL Press p q 2 9 Press p q The entry to be deleted...

Page 19: ...er log history to find out who called to easily return a call or to save the caller s name and number into your contacts EMPTY appears if there are no records in the call log 1 Press to access the call log OR Press p q CALL LOG Press 6 3 Store a Call Log Number into the Contacts 1 Press to access the call log OR Press p q CALL LOG Press 2 p q a desired entry 3 Press p q STORE 4 Press Enter name 5 ...

Page 20: ...ntry 3 Press p q DELETE 4 Press 6 5 Delete the Entire List of the Call Log 1 Press to access the call log OR Press p q CALL LOG Press 2 Press p q DEL ALL 3 Press twice 6 6 View the Details of the a Call Entry 1 Press to access the call log OR Press p q CALL LOG Press 2 p q a desired entry 3 Press p q DETAILS 4 Press ...

Page 21: ...out to the voice mail number directly to listen to your voice mail messages 7 1 Access Voice Mail Messages will display and the VMWI entry is stored in the call log when you have new message in your voice mailbox 1 Press to access the call log OR Press p q CALL LOG Press 2 p q a desired entry 3 Press to dial out to the voice mail server 7 2 Delete VMWI Entries To delete a single VMWI entry from th...

Page 22: ...he call log OR Press p q CALL LOG Press 2 Press and hold 4 to delete all VMWI entries NOTES When all VMWI entries have been deleted the will disappear If you choose the DEL ALL function in the call log the handset will also delete all VMWI entries and call log entries ...

Page 23: ...ne applicable to model with answering machine or call log entries 8 1 1 Set the Date Format 1 Press p q CLOCK 2 Press p q DATE FMT 3 Press p q DD MM YY MM DD YY 4 Press 8 1 2 Set the Time Format 1 Press p q CLOCK 2 Press p q TIME FMT 3 Press p q 12 HR 24 HR 4 Press to confirm 8 1 3 Set the Time 1 Press p q CLOCK 2 Press p q SET TIME 3 Press Enter time 4 Press Note If time has been set before the c...

Page 24: ...ll be displayed 8 2 Alarm Settings Using the handset 1 Press p q ALARM 2 Press p q ON OFF 3 Press If ON is selected 1 Press Enter time 2 Press You will need to set the snooze function 3 Press p q ON OFF 4 Press 8 3 Handset Settings 8 3 1 Set the Ringer Melody for External Calls 1 Press p q HS SET 2 Press p q RINGER 3 Press p q EXT RING 4 Press p q a desired melody 5 Press ...

Page 25: ...p q RING VOL 4 Press p q a desired volume 5 Press 8 3 4 Set the Alert Tones A single beep is emitted when you press a key You can turn on or off the key tone You can also turn on the alert tones when low battery and out of range are detected Low battery tone will be emitted while you are talking with the phone to alert you that you need to charge your battery Out of range tone will be emitted whil...

Page 26: ... 4 Press 8 3 6 Select the Base If you have registered the handset to more than one base you can select any one of them to use with your handset 1 Press p q HS SET 2 Press p q SEL BASE 3 Press p q a desired base 4 Press 8 3 7 Rename the Language 1 Press p q HS SET 2 Press p q LANGUAGE 3 Press a desired language 4 Press 8 3 8 Rename the Handset 1 Press p q HS SET 2 Press p q HS NAME 3 Press Edit han...

Page 27: ...p q ON OFF 4 Press 8 3 11 Set the Mailbox Number You can save a mailbox number into your handset To dial the mailbox number press and hold 1 on the handset 1 Press p q HS SET 2 Press p q MAILBOX 3 Press Enter the mailbox number 4 Press to confirm 8 3 12 Set the Direct Memory Keys There are two direct memory keys M1 and M2 You can store two numbers into these keys and dial them directly from idle m...

Page 28: ...lash Time The flash time settings is country dependent Please contact your local service provider for the correct settings 1 Press p q BS SET 2 Press p q FLASH 3 Press p q SHORT MID LONG 4 Press 8 4 3 Set the Barge in Protection You can turn on the barge in feature to prevent calls from being interupted when another registered handset is lifted applicable when extra handset s is are registered 1 P...

Page 29: ...ress p q BS SET 2 Press p q CHG PIN 3 Press 4 Enter old PIN default 0000 5 Press Enter new PIN 6 Press Enter new PIN again 7 Press to confirm 8 5 Reset Your Phone You can reset your phone to the default settings After reset all your personal settings call log entries and redial list entries will be deleted but your contacts remains unchanged 1 Press p q DEFAULT 2 Press 3 Enter the 4 digit PIN defa...

Page 30: ... to synchronize Remove and re insert the battery If that still does not work it might be necessary to purchase a new battery Disconnect the telephone base from the telephone wall jack and plug in a working telephone If the other telephone does not work the problem is probably in the wiring or the telephone service Call your telephone service provider Low battery shows on screen Place the handset i...

Page 31: ...phones digital telephones intercoms room monitors televisions VCRs personal computers kitchen appliances and other cordless telephones If your telephone is plugged in with a modem or a surge protector plug the telephone or modem surge protector into a different location If this doesn t solve the problem re locate your telephone or modem farther apart from each other or use a different surge protec...

Page 32: ...andset Wait a few minutes before connecting power to the telephone base Re install the battery and place the handset in the telephone base Wait for the handset to synchronize with the telephone base Allow up to one minute for this to take place This telephone is not equipped with a grounding function Therefore some of the functions may be limited when used in PBX systems Please contact the technic...

Page 33: ...warranty helpline or email them For Extended Warranty Please keep a copy of your proof of purchase you will need this when presenting the product back to where you bought it from If you have a problem after 2 years of purchase up to 5 years from purchase Within 30 days of purchase you need to have registered your device at www euphones vtech com The following parts to your device are not covered b...

Page 34: ... and telecommunications terminal equipment and is suitable for connection and operation in the member state indicated on the base station and or packaging The declaration of conformity may be viewed at www euphones vtech com The CE symbol confirms the conformity of the telephone and the above directive 11 Approval and conformity ...

Page 35: ...l to electronic equipment For your own safety take caution when using electric appliances during storms Cleaning your telephone Your telephone has a durable plastic casing that should retain its luster for many years Clean it only with a soft cloth slightly dampened with water or a mild soap Do not use excess water or cleaning solvents of any kind NOTE Remember that electrical appliances can cause...

Page 36: ...VTECH TELECOMMUNICATIONS LTD A member of THE VTECH GROUP OF COMPANIES 2015 VTech Telecommunications Ltd All Rights Reserved V1 0 12 15 ...

Reviews: