When placing the iron on its stand, ensure that the surface on which the stand is
placed is stable.
The iron is not to be used if it has been dropped, if there are any visible signs of
damage or if it is leaking.
This appliance is not intended for use by persons (including children) with
reduced physical, sensory or mental capabilities, or lack of experience and
knowledge, unless they have been given supervision or instruction concerning
use of the appliance by a person responsible for their safety.
Children should be supervised to ensure that they do not play with the appliance.
Keep the iron and its cord out of reach of children younger than 8 years of age
when it is energized or cooling down.
IMPORTANT
-While operating, the iron and the boiler reach very high temperatures, be very
careful, burns danger. Do not touch the metal parts of the iron when it is hot.
-Before replacing or cleaning, unplug the device from the power supply outlet and
wait until it completely cools down.
-Do not use the device outdoors.
-Do not use the device close to curtains, furniture or other inflammable objects.
-Caution: the steam is very hot, burns danger. Never direct the steam jet towards
persons, animals or objects that could be damaged or burned.
-Use only tap water or demineralized water to fill the tank. Other liquids could
damage components and gaskets causing the loss of the guarantee of the product.
-Do not put other liquids, other materials or additives in the tank.
-
Always place the iron on a stable, flat and heat-resistant surface.
-Do not load weights on the monotube nor try to squash it.
-Do not wind the cable around the device.
-Check carefully that the label of the fabric to iron matches the setting and the
temperature of the iron.
-Always place the iron on its seat on the station, do not let the iron remain on fabrics
or elsewhere.
INSTALLATION
Take the device out of the box and remove the packing. In order to ensure sufficient
ventilation the distance between the iron and the wall or other objects should be at
least of 15cm on the back and of 15cm on the side.
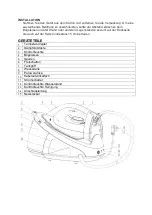
PARTS OF THE DEVICE
1
Temperature Control Dial
2
Steam Trigger
3
Ready Light
4
Iron
5
Lock
6
Unlock
7
Tank handle
8
Water Tank
9
Station
10
Cord storage compartment
11
Power Switch
12
Lower Water Indicator Light
13
Clean Indicator Light
14
Steam cord
15
Power Cord
Summary of Contents for DPS-6220
Page 2: ...OPERATING INSTRUCTION DPS 6220 GBR...
Page 8: ...ITA MANUALE DELL UTENTE DPS 6220...
Page 15: ...BEDIENUNGSANLEITUNG DPS 6220 DEU...
Page 22: ...RUS DPS 6220...
Page 23: ......
Page 24: ...8...
Page 25: ...15 1 2 3 4 5 6 7 8 9 10 11 12 13 14 15...
Page 26: ...a b c 1 2 d e f MAX g h 2 O 2...
Page 27: ...i 36 6 3 1 3 6 j 2 1 2 k l 5 a g 20 30 a b c...
Page 28: ...DPS 6220 22P 25 DPS 6220 22Q 25 220 240 50 60 230 50 60 2000 2400 2200...
Page 29: ...KORISNI KO UPUTSTVO DPS 6220 SRB...
Page 36: ...ESP MANUAL DE INSTRUCCIONES DPS 6220...
Page 43: ...PRT MANUAL DE INSTRU ES DPS 6220...
Page 50: ...GRC DPS 6220...
Page 51: ......
Page 52: ...8 15 cm 15 cm...
Page 53: ...1 2 3 4 5 6 7 8 9 10 11 12 13 14 15...
Page 54: ...1 2 MAX ECO 2 ECO...
Page 55: ...ECO 2 36 6 3 1 3 6 2 1 2 5 20 30...
Page 56: ...Technical data DPS 6220 22P 25 DPS 6220 22Q 25 220 240V 50 60Hz 230V 50 60Hz 2000 2400W 2200W...
Page 57: ...SVN NAVODILA ZA UPORABO DPS 6220...
Page 63: ...KORISNI KE UPUTE DPS 6220 HRV...
Page 70: ...KORISNI KO UPUTSTVO DPS 6220 BIH MNE...
Page 77: ...MKD DPS 6220...
Page 78: ......
Page 79: ...8 15...
Page 80: ...1 2 3 4 5 6 7 8 9 10 11 12 13 14 15...
Page 81: ...1 2 MAX 2...
Page 82: ...2 36 6 3 1 3 2 1 2 5 20 30...
Page 83: ...DPS 6220 22P 25 DPS 6220 22Q 25 220 240V 50 60Hz 230V 50 60Hz 2000 2400W 2200W...
Page 84: ...ALB UDH ZIM P R P RDORIM DPS 6220...
Page 91: ...www voxelectronics com...

