background image

3

provided to charge the device first, preferably for one hour or until the power is sufficient before

turning it on.

When charging the device when it is off, the screen will display the charging logo and battery

percentage in about 8-10 seconds.

When the device is turned on, the battery is marked with "lightning" in the upper right corner of the

screen.

2. Network connection:

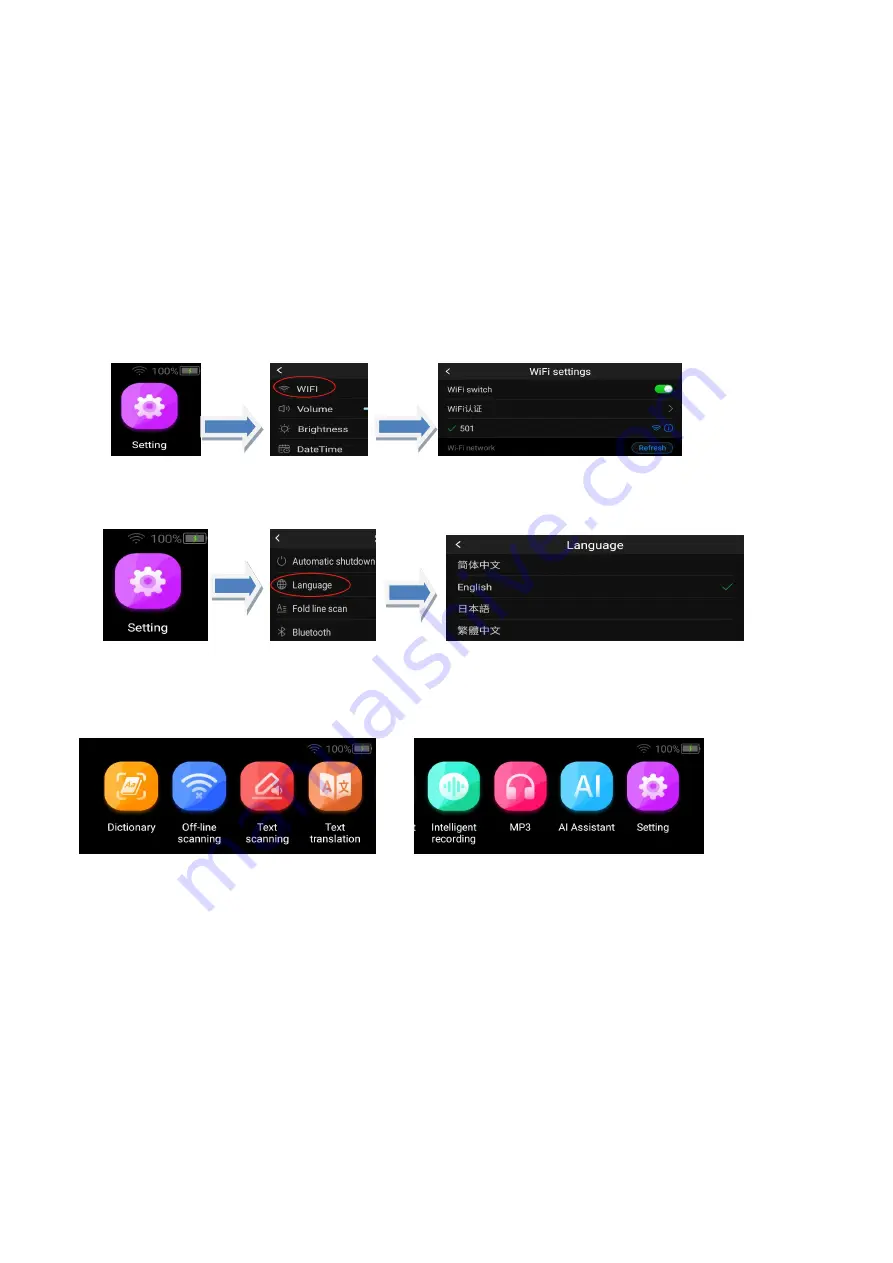
After turning on the device, go to the Settings--WIFI interface to connect to the

network.

This product works better in the networked state, it can be connected to WIFI or mobile phone

hotspot.

3. Interface language

Settings—Interface Language, select the language you need for the operation interface.

4. Home screen

The home screen is the function entrance of the device. Tap the screen to select function, and you can

slide the screen left and right.

5. Scan operation

(1) A kind reminder, during the scanning operation, the equipment should be inclined 45-80 degrees

with the plane, and the front sight should be aligned with the centerline of the text;

(2) Press the pen tip and when the light starts to turn on, drag the pen tip to the right to scan at a

constant speed. During the scanning process, keep the pen tip light always on;

(3) Aim the crosshair at the blank space in front of the first letter and start scanning.After the crosshair

has passed the last letter, raise the nib;

(4) View the results and click the screen to perform corresponding operations;

Summary of Contents for X5 Pro

Page 1: ...1 VORMOR Scanner User Manual ...

Page 2: ... red button to adjust the volume Return button shared AI button Short press the device Round button or tap the return icon to return Touch screen Touch screen to select the function In the function interface press and hold the left side of the screen and slide right to make selection press and hold the right side of the screen and slide left to return Voice blue red key This is the voice input key...

Page 3: ...uage select the language you need for the operation interface 4 Home screen The home screen is the function entrance of the device Tap the screen to select function and you can slide the screen left and right 5 Scan operation 1 A kind reminder during the scanning operation the equipment should be inclined 45 80 degrees with the plane and the front sight should be aligned with the centerline of the...

Page 4: ...lectronic dictionary function will be automatically used by default E Dictionary Support multi language vocabulary scanning this device has massive vocabulary content this function is more suitable for language learners 1 After scanning the screen will automatically display the results Click on a word text to view the details you can choose British pronunciation or American pronunciation to broadc...

Page 5: ...ess the pen to scan raise the pen to automatically display the results and click the speaker to repeat the reading Text Translation requires internet connection Support online scan translation in up to 100 languages with software upgrades the supported languages will increase 1 In the text translation interface switch the reading aloud and select the target translation language 2 Press the pen tip...

Page 6: ...ng press the voice blue red button on the device s side then release it after speaking the corresponding language the screen will automatically display and broadcast the result Photo Translation Please connect to the Internet 1 Before taking a photo you can choose the text language of the picture choose the text language of the picture the language you need to translate into 2 After the photo tran...

Page 7: ...creen to manually input 2 Click on the right side of the screen to save the file 3 Connect the computer with a data cable and view edit the text on the computer Intelligent Recording Please connect to the Internet Support up to 100 languages of recording to text 1 First add a recording then press and hold the left side of the screen and slide to the right to select the recognition language 2 Click...

Page 8: ...nly support Chinese Long press the AI button Round key ask the weather ask Wikipedia etc Setting 1 WIFI Please connect to wifi first and the effect will be better 2 Volume adjust the volume 3 Brightness adjust the screen brightness 4 Date Time Check the date and time and set the time zone 5 language The operation interface supports simplified Chinese traditional Chinese English Japanese etc which ...

Page 9: ...front sight has passed the last letter lift the pen 5 During voice translation the best effect is when the distance between the mouth and the MIC of the device is within 30cm 6 Please speak coherently at a normal speed and do not pause multiple times during the speech The above situations may easily cause inaccurate translation 7 Please make your pronunciation as standard as possible and don t use...

Page 10: ...s accessories to avoid injury Disclaimer 1 Please read the product manual carefully before use and operate with the manual 2 This product is not responsible for the translation results Warranty regulations 1 The free warranty period of this product is 12 months 2 During the warranty period the faults caused by normal use in accordance with the manual determined by our after sales personnel or our ...

Page 11: ...11 Date Failure phenomenon Maintenance records Dealer ...

Reviews: