background image

EN

9

WWW.VONROC.COM

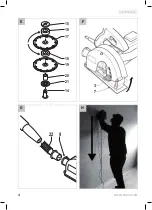
•   Mount the inner flange (21), the spindle sleeve 

(20), the new cutting disc (19), the spacers 
(18), and the new cutting disc (17).

•   Firmly tighten the outer flange (15) using the 

flange key (16).

•  Release the spindle lock button (5).
•  Mount the guard (6).
•   Raise the base (7) and tighten the locking knob 

(3).

•   Firmly tighten the Allen screws (12) using the 

Allen key (13).

4. OPERATION

Setting the slot width (fig. B ­ E)

The slot width can be set using the spacers be-
tween the cutting discs. The number of spacers 
between the cutting discs determine the slot width.
 

-  Do not set the slot width during use.
-  Always mount at least one spacer  
  between the cutting discs. 

•  Determine the slot width.
•   Mount the spacers (18) around the cutting 

discs (17 & 19) in the required order. Refer to 
the chapter “Replacing the cutting discs”.

Setting the slot depth (fig. A & F)

The slot depth is variable between 5 and 40 mm. 
The slot depth can be read from the scale (4).

Do not set the slot depth during use.

•  Slacken the locking knob (3).
•   Tilt the base (7) to the required position. Set 

a slot depth approximately 3 mm deeper than 
the required depth to compensate for possible 
unevenness of the wall surface.

•   Tighten the locking knob (3).

Switching on and off (fig. A)

•   To switch on the machine, keep the lock-off but-

ton (2) pressed and simultaneously press the 
on/off switch (1).

•   To switch off the machine, release the on/off 

switch (1).

Overload protection

The machine is equipped with an overload protec-
tion device which automatically switches off the 
machine if the machine is overloaded.

•  Switch off the machine.
•  Remove the machine from the workpiece.
•  Switch on the machine.
•   Run the machine at no-load for approximately  

1 minute to allow the machine to cool down.

Dust extraction (fig. G)

Only use the machine when it is connected to a 
vacuum device which is approved for stone dust. 
The vacuum device must be suitable for the material 
to be worked. Use a special vacuum device when 
working with toxic materials or where toxic dust is 
produced.

 -  Never use a household vacuum cleaner.  
  The use of a household vacuum cleaner  
  can easily damage both your health  
  and the vacuum cleaner.


-  Always use the dust extraction adapter.


 -  Make sure that the hose of the vacuum  
 

device is securely connected to the  


dust extraction adapter.


 -  If the vacuum device breaks down, stop  
 

work immediately, switch off the  


machine, remove the mains plug from  


the mains, and try to solve the problem.

•   Insert the dust extraction adapter (22) into the 

dust extraction connection (9).

•   Connect the hose of a vacuum device to the 

dust extraction adapter (22).

Hints for optimum use

•   Draw lines to define the direction in which to 

guide the cutting discs.

•   Hold the machine with both hands. Keep your 

second hand on the auxiliary grip (11).

•  Set the slot width.
•  Take one of the following steps:
 

   -   Lower the machine into the wall and set the 

slot depth (recommended). The machine is 
placed against the wall and the cutting discs 
lower into the wall in order to set the slot 
depth more accurately.


 -   Set the slot depth and lower the machine 

into the wall.

•   Place the machine with the guide roller (8) on 

the wall. Make sure that the cutting discs align 
with the drawn lines on the wall.

•  Set the slot depth.
•  Switch on the machine.

Summary of Contents for S2 WC501AC

Page 1: ...05 DE bersetzung Der Originalbetriebsanleitung 11 NL Vertaling van de oorspronkelijke gebruiksaanwijzing 17 FR Traduction de la notice originale 24 ES Traducci n del manual original 31 IT Traduzione...

Page 2: ...WWW VONROC COM 2 A B 3 6 7 2 10 11 1 4 5 9 8 12 3 12 7 6 5 13...

Page 3: ...WWW VONROC COM 3 C D 16 15 17 18 19 14 20 21 5 7 6...

Page 4: ...WWW VONROC COM 4 15 17 20 21 18 18 19 14 22 9 3 7 E G F H...

Page 5: ...and bystanders away while ope rating a power tool Distractions can cause you to lose control 2 Electrical safety a Power tool plugs must match the outlet Never modify the plug in any way Do not use an...

Page 6: ...the power tool s operation If damaged have the power tool repaired before use Many accidents are caused by poorly maintained power tools f Keep cutting tools sharp and clean Properly maintained cutti...

Page 7: ...see indication on the base Let the machine run at no load in a safe area after mounting the cutting discs If the machine vibrates strongly immediately switch off the machine remove the mains plug from...

Page 8: ...depth 4 Scale for slot depth 5 Spindle lock button 6 Guard 7 Base 8 Guide roller 9 Dust extraction connection 10 Main grip 11 Auxiliary grip 12 Allen screws 13 Allen key 14 Spindle 15 Outer flange 16...

Page 9: ...f the machine is overloaded Switch off the machine Remove the machine from the workpiece Switch on the machine Run the machine at no load for approximately 1 minute to allow the machine to cool down D...

Page 10: ...ts implementation into national right power tools that are no longer usable must be collected separately and disposed of in an environmentally friendly way WARRANTY VONROC products are developed to th...

Page 11: ...ne Netzkabel 1 Arbeitsplatz a Halten Sie Ihren Arbeitsbereich sauber und aufger umt Unordnung und unbeleuchtete Arbeitsbereiche k nnen zu Unf llen f hren b Arbeiten Sie mit dem Ger t nicht in explosio...

Page 12: ...et werden Das Verwenden dieser Einrichtungen verringert Gef hrdungen durch Staub h Achten Sie darauf nicht durch h ufigen Gebrauch von Werkzeugen nachl ssig zu werden und die Prinzipien zum sicheren U...

Page 13: ...gebenen Temperaturbereiche auf Unsachgem es Aufladen oder Aufladen bei Temperaturen au erhalb des angegebenen Bereichs kann den Akku sch digen und die Brandgefahr erh hen 6 Service a Lassen Sie Ihre W...

Page 14: ...staderst rke von 1 5 mm2 haben Falls Sie eine Kabeltrommel verwenden rollen Sie das Kabel immer vollst ndig ab 2 ANGABEN ZUM WERKZEUG Einf hrung Ihre Mauernutfr se wurde konstruiert um Schlitze in Mau...

Page 15: ...rsuchen Sie niemals die Schutz vorrichtung zu entfernen Legen Sie die Maschine auf eine stabile Oberfl che L sen Sie die Inbusschrauben 12 mit dem Inbusschl ssel 13 L sen Sie den Sicherungsknopf 3 und...

Page 16: ...Durch die Verwendung eines Haushaltsstaubsaugers schaden Sie sowohl Ihrer Gesundheit als auch dem Staubsauger Verwenden Sie stets den Staubabsaug adapter Vergewissern Sie sich dass der Schlauch der A...

Page 17: ...ickelt und sind f r den gesetzlich festgelegten Zeitraum ausgehend von dem urspr nglichen Kaufdatum garantiert frei von Fehlern in Material und Ausf hrung Sollte das Produkt in diesem Zeitraum aufgrun...

Page 18: ...chte werkomgeving Rommelige en donkere werkomgevingen leiden tot ongelukken b Gebruik elektrisch gereedschap nooit in een omgeving waar explosiegevaar bestaat zoals in de nabijheid van ontvlambare vlo...

Page 19: ...rzaakt h Denk niet dat doordat u gereedschap vaak gebruikt u wel weet hoe het allemaal werkt en dat u de veiligheidsbeginselen voor het gebruik van het gereedschap wel kunt negeren Een onbezonnen acti...

Page 20: ...t in de instructies wordt aangeduid Op een onjuiste wijze laden of laden bij temperaturen buiten het aangeduide bereik kan de accu beschadigen en het risico van brand doen toenemen 6 Service a Laat uw...

Page 21: ...altijd de kabel volledig uit 2 TECHNISCHE INFORMATIE Bedoeld gebruik Uw muurfrees is ontworpen voor het maken van sleuven in metselwerk De machine is uitsluitend geschikt voor rechtshandig gebruik TE...

Page 22: ...ehulp van de inbussleutel 13 Draai de vergrendelingsknop 3 los en breng de zool 7 naar beneden Verwijder de beschermkap 6 Houd de asvergrendelingsknop 5 ingedrukt om de as 14 te vergrendelen Draai de...

Page 23: ...ine uit verwijder de netstekker uit het stopcontact en probeer het probleem te verhelpen Plaats de stofafzuigadapter 22 in de stofafzui gaansluiting 9 Sluit de slang van een stofafzuigvoorziening aan...

Page 24: ...eval kan VONROC aansprakelijk worden gesteld voor inci dentele schade of gevolgschade Reparaties van dealers zijn gelimiteerd tot de reparatie of vervan ging van defecte producten of onderdelen Het pr...

Page 25: ...s actionn es Les c bles endommag s ou entrem l s augmentent le risque de choc lectrique e Lorsque un appareil est utilis l ext rieur utilisez uniquement un c ble prolongateur pr vu cet effet L utilisa...

Page 26: ...ctrique les accessoires et les embouts etc conform ment ces instructions et de la mani re pr vue pour le type sp cifique de l appareil lectrique en prenant en compte les conditions de travail et le tr...

Page 27: ...isez pas la machine avec les disques de coupe dirig s vers le haut ou lat ralement Utilisez uniquement des disques de coupe adapt s cette machine Utilisez uniquement des disques de coupe aux dimension...

Page 28: ...n es L utilisation de l outil dans d autres applicati ons ou avec des accessoires diff rents ou mal entretenus peut consid rablement augmenter le niveau d exposition La mise hors tension de l outil et...

Page 29: ...ec les pi ces d cartement entre les disques de coupe Le nom bre de pi ces d cartement entre les disques de coupe d termine la largeur de saign e Ne r glez pas la largeur de saign e pendant l utilisati...

Page 30: ...N exercez pas de pression excessive sur la machine Laissez la machine faire le travail teignez la machine et attendez son immobili sation totale avant de la reposer 5 ENTRETIEN Si vous voulez proc de...

Page 31: ...dr an producirse descargas el ctricas incendios y o lesiones gra ves Conserve las advertencias de seguridad y las instrucciones para su posterior consulta Los siguientes s mbolos se utilizan en el man...

Page 32: ...el ctrico h No permita que la familiaridad adquirida con el uso frecuente de las herramientas le haga confi arse e ignorar los principios de seguridad de las herramientas Una acci n descuidada puede c...

Page 33: ...es apto para un tipo de bater as determinado puede provocar riesgo de incendio si se usa para cargar otra clase de bater as b Use las herramientas el ctricas s lo con las bater as indicadas espec fica...

Page 34: ...ar la m quina Nunca intente hacer que se detengan los discos de corte Nunca ponga la m quina sobre una mesa o un banco de trabajo sin haberla desconectado previamente Retroceso El retroceso es el movi...

Page 35: ...pal 11 Empu adura auxiliar 12 Tornillos Allen 13 Llave Allen 14 Husillo 15 Brida exterior 16 Llave para bridas 17 Disco de corte 18 Separadores 19 Disco de corte 20 Manguito del husillo 21 Brida inter...

Page 36: ...e la m quina Retire la m quina de la pieza de trabajo Encienda la m quina Haga funcionar la m quina sin carga aproxima damente 1 minuto para permitir que la m quina se enfr e Extracci n de polvo fig G...

Page 37: ...ci n en el derecho nacional las herramientas el ctricas que dejen de funcionar deben recogerse por separado y desecharse de forma respetuosa con el medio ambiente CONDICIONES DE GARANT A Los productos...

Page 38: ...e ben illuminata Aree buie e disordinate favoriscono gli incidenti b Non usare arnesi elettrici in atmosfere esplo sive come vicino ai liquidi infiammabili gas o polveri Gli arnesi elettrici creano sc...

Page 39: ...icoloso e deve essere riparato c Scollegare la spina dalla sorgente di elettricit prima di fare qualsiasi regolazione cambiare gli accessori o conservare arnesi elettrici Tali misure di sicurezza prev...

Page 40: ...e attenzione alla presenza di eventuali tubi o cavi nascosti durante il taglio di scanalature nelle pareti Sostenere sempre l elettroutensile con entram be le mani Non utilizzare l elettroutensile sen...

Page 41: ...3 dB A Vibrazioni impugnatura principale 7 214 m s2 Vibrazioni impugnatura ausiliaria 5 843 m s2 Incertezza K 1 5 m s2 Indossare protezioni per l udito Livello delle vibrazioni Il livello di emission...

Page 42: ...cessario Montare la flangia interna 21 il collare del l alberino 20 il nuovo disco da taglio 19 i distanziatori 18 e il nuovo disco da taglio 17 Serrare saldamente la flangia esterna 15 utilizzando l...

Page 43: ...natura ausiliaria 11 Regolare la larghezza di scanalatura Procedere in uno dei seguenti modi Abbassare l elettroutensile nella parete e regolare la profondit di scanalatura procedura consigliata L ele...

Page 44: ...iali I rimedi dei rivenditori saranno limitati alla ripara zione o sostituzione di unit o parti non conformi Il prodotto e il manuale per l utente sono soggetti a modifiche I dati tecnici possono esse...

Page 45: ...t kac gibi koruyucu donan m lar ki isel yaralanma riskini azaltacakt r c Kas ts z al may nleyin Bir elektrik kayna n ve veya pil tak m n ba lamadan aleti kald rma dan ya da ta madan nce elektrikli al...

Page 46: ...bilir e Hasarl veya zerinde de i iklik yap lm bir batarya veya aleti kullanmay n Hasarl veya zerinde de i iklik yap lm bataryalar yang n patlama ya da yaralanma riskiyle sonu lanan beklenmedik davran...

Page 47: ...leri a s ndan uy gun minimum 1 5 mm2 kal nl a sahip uzatma kablolar kullan n Bir uzatma kablosu makaras kullan yorsan z kabloyu daima tam olarak a n 2 MAK NE B LG S Kullan m amac Kanal a ma makinesi d...

Page 48: ...ini 3 gev etin ve taban indi rin 7 Siperi 6 kart n Mili 14 kilitlemek i in mil kilitleme d mesini 5 bas l tutun D flan 15 flan anahtar 16 kullanarak gev etin Gev etmek i in saat y n nde evirin S kmak...

Page 49: ...lle tutun kinci elinizi ilave tuta ma n 11 zerinde tutun Kanal geni li ini ayarlay n A a daki ad mlardan birini yerine getirin Makineyi duvara do ru indirin ve kanal derin li ini ayarlay n nerilir Kan...

Page 50: ...len onar m ve veya de i iklikler Normal a nma ve eskime Cihaz n k t ve yanl kullan lmas veya cihaza yanl bak m yap lmas Orijinal olmayan yedek par alar n kullan lmas Bu irket taraf ndan a k ya da z mn...

Page 51: ...verantwoordelijkheid dat dit product voldoet aan de conform Richtlijn 2011 65 EU van het Europees Parlement en de Raad van 8 juni 2011 betreffende beperking van het gebruik van bepaalde gevaarlijke s...

Page 52: ...2019 VONROC WWW VONROC COM 1908 27...

Reviews: