background image

FAX version 911373_00(4) Page 7 of 9

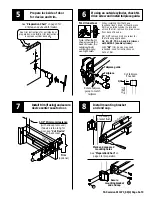
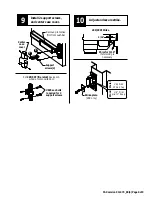
Cylinder Spacer

Rim Cylinder

Assembly

Cylinder Bracket

#8-32 X 5/16”

PPHMS

Cylinder Mounting Screws

(do not over-tighten)

#8-32 x 5/16”

PPHMS

99-2 (DOUBLE CYLINDER)

1. Remove center case cover.
2. Mount rim cylinder to cylinder bracket

as shown.

3. Mount cylinder and bracket

assembly to center case with two
#8-32 screws as shown.

OPTIONAL EQUIPMENT

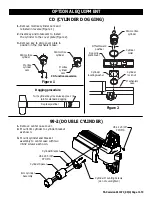
1. Remove mortise cylinder cam and

reinstall in reverse (Figure 1).

2. Insert key and rotate cam to install

the cylinder to the cover plate (Figure 2).

3. Remove key to slide cover plate in

position in the mechanism case.

Std. mortise

cylinder

Mortise

cylinder

cam

Std. mortise

cylinder

Mortise

cylinder

cam

CD function conversion

Figure 1

Figure 2

Std. mortise

cylinder

Cylinder

collar

Dogging

plate cover

Offset toward

pushbar

Cylinder

locating washer

Cylinder

lock nut

Mechanism

case

Turn cylinder key clockwise approx. 1/8

turn for standard dogging

Dogging procedure

Depress pushbar

CD (CYLINDER DOGGING)

Summary of Contents for 98 Series

Page 1: ... Fire Rim Exit Device CD98 CD99 Cylinder Dogging Rim Exit Device 98 2 99 2 Double Cylinder Rim Exit Device EL98 EL99 Electric Latch Retraction Rim Exit Device Index Screw chart 2 Preparation chart 3 Device installation 4 5 Optional equipment 6 7 Cut device 8 499F strike installation 8 Special tools needed 5 64 hex wrench 10 24 tap 5 8 spade drill 99 F wood door Drill bits 25 1 8 1 4 5 16 3 8 13 32...

Page 2: ... X 1 7 8 990 Trims 1 3 4 door 990 Trims 2 1 4 door A Coverscrew F 8 18X3 8 Threadcutting Packaged with trim 10 24X1 10 X 1 1 4 Wood screw Surface mount metal Surface mount wood Metal frame Woodframe 10 24X3 4 10X1 1 2 Woodscrew E 10 24X3 4 10 24X1 1 8 10X1 1 4 Woodscrew C Surface mountor Sex bolts 2 1 4 door Surface mount wood Sex bolts 1 3 4 door 10 16X3 8 Threadcutting End cap screw D ...

Page 3: ... cylinder applications Mark with template and cut out Metal door cut device side Wood door cut thru Door cut outs For trim applications with working lever thumbpiece or knob Mark with template and cut out cut device side only Center case 4 holes Surface mount Sex bolts or 990 trims 25 Drill 10 24 tap 1 8 Drill pilot 1 deep 1 4 Drill device side 13 32 Drill trim side 13 32 Drill thru Metal Wood Met...

Page 4: ...trike on C and mark the two slotted holes L Draw horizontal device and strike center line C L For 499F strike see back cover of this instruction L Roller against door Template align on C and against strike L C L A See Screw Chart on page 2 for screw types and sizes C L Mark 6 holes Mark vertical C L For double doors with a mullion and strike already installed use existing strike center line 25 Dri...

Page 5: ... device Mark and prepare 2 mounting holes See Preparation Chart on page 3 for preparation C D 5 Cut tailpiece if needed 1 2 Door surface 6 Tailpiece Tailpiece guide Rotate tailpiece guide to match tailpiece If using an outside cylinder check NL drive screw and install tailpiece guide When installing trim that has a functional lever knob or thumb piece AND an outside cylinder to lock and unlock the...

Page 6: ...e Shim for 3 16 if shimming is necessary 299 299F Strike Center case cover Support screws 2 3 16 Strike plate 299 only E F Remove protective film from pushbar For 98F 99F fire rated devices on wood or composite door 825 sex bolts required for 2 support screws 25 Drill 10 24 tap 1 8 Drill pilot 1 deep Metal Wood ...

Page 7: ...mortise cylinder cam and reinstall in reverse Figure 1 2 Insert key and rotate cam to install the cylinder to the cover plate Figure 2 3 Remove key to slide cover plate in position in the mechanism case Std mortise cylinder Mortise cylinder cam Std mortise cylinder Mortise cylinder cam CD function conversion Figure 1 Figure 2 Std mortise cylinder Cylinder collar Dogging plate cover Offset toward p...

Page 8: ...nt C Adjust solenoid if dogging rod is too long see Figure 4 1 Remove end cap c and dogging cover d 2 Loosen cap screw e 3 Hold plunger g depressed in solenoid housing h Note Push hard against plunger g to overcome an internal spring in solenoid housing h 4 Turned threaded bushing f in to shorten dogging rod i so latch bolt fully retracts 5 Tighten cap screw e Note Cap screw e must be tightened ag...

Page 9: ...easure amount to cut off device Anti rattle clip 2 Minimum 499F STRIKE INSTALLATION Prepare and install screws through 2 strike slots 1 3 4 25 Drill 10 24 tap 2 places C L Roller against door C L Install strike hook and additional strike screws 2 Template aligns as shown 3 1 16 Strike hook If using a mullion holes may be predrilled C L Template align on C and against strike L If 5 8 diameter wire ...

Reviews: