background image

(D4)/D6-IPS, starboard

1.  Oil filter, drive-unit
2.  Water shut off valve, drive-unit (only D6)
3.  Turbocharger
4.  Crankcase ventilation filter
5.  Air filter
6.  Aux stop
7.  Compressor
8.  Engine control unit
9.  Generator
10. Oil filler cap
11. Volvo Penta IPS, 

Servo Unit Steering (SUS)

Orientation

1

2

3

4

5

6

7

9

10

8

11

18

Presentation

Summary of Contents for IPS 350

Page 1: ...OPERATOR SMANUAL VOLVO PENTA IPS 350 400 450 500 600 ...

Page 2: ... manuale Dit instructieboek kan worden besteld in het Nederlands De bestelcoupon vindt u achter in het instruc tieboek Denne instruktionsbog kan bestilles på dansk Bestillingskupon findes i slutningen af in struktionsbogen Tämän ohjekirjan voi tilata myös suo menkielisenä Tilauskuponki on ohjekirjan lopussa Este manual de instruções pode ser encomendado em português O talão de requerimento encontr...

Page 3: ...ou to read this operator s manual thoroughly and consider the advice we give on operation and maintenance before your maiden voyage so that you will be ensured of fulfilling your expectations Please pay attention to the safety instructions contained in the manual As owner of a Volvo Penta marine engine we would also like to welcome you to a worldwide network of dealers and service workshops to ass...

Page 4: ...ering 52 Running aground 53 Docking joystick 54 Stopping the engine 59 60 Stopping 59 Laying up 59 Cold weather precautions 60 Maintenance schedule 61 62 Maintenance 63 79 Engine general 64 Lubrication system 67 Freshwater system 70 Seawater system 73 Fuel system 77 Electrical system 80 Drive unit 85 Propellers 87 Laying up Launching 89 91 Inhibiting 89 Bringing out of winter storage 90 Painting t...

Page 5: ...a dealer for assistance This symbol is used in the book and on the engine to make you aware of safety information Always read these safety precautions very carefully In the operator s manual warning texts have the following priority WARNING If these instructions are not followed there is a danger of personal injury extensive damage to the product or serious mechanical malfunction IMPORTANT Used to...

Page 6: ...e the engine is started and after operating the boat after the engine has been stopped This will help you to quickly detect fuel coolant or oil leaks and spot anything else unusual that has or is about to happen Maneuvering Avoid violent and unexpected changes in course and gear engagement This could cause someone on the boat to lose their balance and fall over or overboard A rotating propeller ca...

Page 7: ...e cover as well Get in touch with your boat dealer for help in obtain ing the best solution for your boat Checklist Safety equipment Life jackets for all passengers communication equipment emergency rockets approved fire extinguisher first aid equipment life belt anchor paddle torch etc Replacement parts and tools impeller fuel filters fuses tape hose clamps engine oil propeller and tools for any ...

Page 8: ...nt may then be required in order to maintain the correct balance and make the engine safe to han dle Never carry out work on an engine suspended on a hoist Before starting the engine Reinstall all protective parts removed during service operations before starting the engine Check that no tools or other items have been left on the engine Never start a turbocharged engine without installing the air ...

Page 9: ... cock open or a coolant hose disconnected open the cool ant filler cap carefully and slowly to release pressure before removing the cap completely Note that the coolant may still be hot and can cause burns Lubrication system Hot oil can cause burns Avoid skin contact with hot oil Ensure that the lubrication system is not under pressure before commencing work on it Never start or operate the engine...

Page 10: ...o our environment Environmental performance for Volvo Pen ta IPS500 IPS400 The Volvo Penta IPS500 IPS400 has been developed as a complete system with excellent environmental performance as one of the main design targets The very high efficiency of the Volvo Penta IPS system gives greatly reduced overall emissions per nautical mile Sound emissions are also extremely low com pared with traditional i...

Page 11: ...actured of that type correspond to the certified engine This places special requirements for maintenance and service as follows The maintenance and service intervals recom mended by Volvo Penta must be observed Only by Volvo Penta approved replacement parts may be used The service of injection pumps and injectors or pump settings must always be carried out by an authorized Volvo Penta workshop The...

Page 12: ...sign on behalf of the engine manufacturer or his authorised representative Signature and title or an equivalent marking Date and place of issue yr month day 2007 04 26 Göteborg This declaration of conformity is issued under the sole responsibility of the manufacturer I declare on behalf of the engine manufacturer that the engine s mentioned above complie s with all applicable essential requirement...

Page 13: ...at it is available in event of the boat being stolen Engine Product designation 1 Serial number 2 Product number 3 Drive unit Product designation 4 Gear ratio 5 Serial number 6 Product number 7 The numbers refer to the position of the identification numbers on the information decal Location of information decal and identification plates Introduction Engine plate Warranty decal IMO decal Exhaust Em...

Page 14: ... care All this is combined with the usual benefits of a tra ditional inboard such as a robust high strength con struction excellent corrosion resistance and the pro pellers under the hull Maneuvering and handling The reasons for the amazing maneuverability are The Volvo Penta IPS drive units are steerable turning and pointing the entire thrust in the desired direction This results in much higher e...

Page 15: ...her made from a specially formulated nickel alu minum bronze alloy or stainless steel Propulsion unit bearings couplings etc are all robustly dimensioned to cope with the unexpected and ensure a really long and trouble free service life EVC handles all communication and monitoring in cluding shift throttle and steering Several safety func tions in the system minimize the risk of damage to engine o...

Page 16: ...on Fine filter with water separator Air inlet and exhaust system Belt driven compressor with silencer of absorption type on both inlet and output port Air filter with replaceable insert Crankcase gases vented into the air inlet Exhaust elbow or exhaust riser Freshwater cooled turbo charger Cooling system Thermostatically regulated freshwater cooling Tubular heat exchanger with separate large vol u...

Page 17: ...the engine and transmission from overload To protect the engine at too high coolant or charge air temperatures and boost pressure as well as oil pres sure the monitoring system reduces the amount of fuel reduced engine output until the current values are normalized The engine monitoring system also has a diagnostic system which helps users and service technicians to determine the cause of malfunct...

Page 18: ...sted to suit the actual boat speed for optimised comfort and boat handling For reliability the steering system is built with redun dancy on several levels Engine speed and gear shift Speed and gear shift contol is handled electronically with dual function electronic controls Multiple helm stations Up to four helm stations can easily be installed plug in The EVC system provides different options fo...

Page 19: ...strument serial communication bus Multi sensor Boat speed depth and water temp Boart speed depth and water temperature canbe dis played on the EVC system tachometer if a multi sen sor is installed on the boat The sensor is connected to the multilink cable If instruments speed depth water temp are used they must be connected to the instru ment serial communication bus Boat speed Boat speed can be s...

Page 20: ... off valve drive unit only D6 3 Turbocharger 4 Crankcase ventilation filter 5 Air filter 6 Aux stop 7 Compressor 8 Engine control unit 9 Generator 10 Oil filler cap 11 Volvo Penta IPS Servo Unit Steering SUS Orientation 1 2 3 4 5 6 7 9 10 8 11 18 Presentation ...

Page 21: ...hut off valve drive unit 22 Oil filler cap drive unit 23 Automatic fuse 24 Expansion tank 21 D4 IPS port 12 Sea water filter 13 Sea water pump 14 Fuel filter 15 Oil dipstick engine 16 Oil bypass filter 17 Oil filter 18 Charge air cooler 19 Cooling water intake 20 Oil dipstick drive unit 21 Water shut off valve drive unit 22 Oil filler cap drive unit 23 Automatic fuse 24 Expansion tank 12 14 15 16 ...

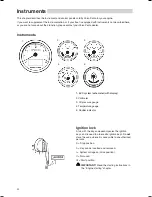
Page 22: ... EVC system tachometer with display 2 Voltmeter 3 Oil pressure gauge 4 Temperature gauge 5 Rudder indicator Ignition lock A tab with the key code accompanies the ignition keys and is used to order extra ignition keys Do not store the code where it is accessible to unauthorized persons S Stop position 0 Key can be inserted and removed I System voltage on drive position II Not used III Start positio...

Page 23: ...he en gine The starter key on the main helm station must be in position I driving position for the engine to start The engine can only be stopped if the control panel is activated IMPORTANT Read the starting instructions in the Engine starting chapter 21 Instruments ...

Page 24: ... the oil pressure in the engine is too low Stop the engine at once Check the oil level in the engine Please refer to Maintenance Lubrication to check and top the oil up Also check that the oil filters are not blocked Please refer to Maintenance Lubrication system Please refer to the In case of emergency chapter and you will find detailed information about recom mended action in the Diagnostic func...

Page 25: ...mage Coolant temperature red indication The coolant temperature lamp lights up when the cool ant temperature is too high Stop the engine if this lamp lights up during operation Check the coolant level Please refer to Mainte nance Fresh water system Check that the sea water filter is not blocked Please refer to Maintenance Sea water system Also check the impeller in the sea water pump Please refer ...

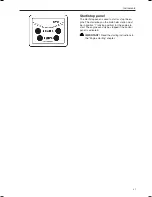
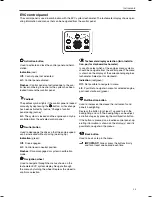
Page 26: ...on a serious fault has occured Please refer to the In case of emergency chapter and you will find detailed information about recom mended action in the Diagnostic function section Orange alarm indication fault If the orange alarm indication is shown during opera tion a fault has occured Please refer to the In case of emergency chapter and you will find detailed information about recom mended actio...

Page 27: ... lock the control panel and helm station Indication red Off Control panel not activated Lit Control panel activated Flashes Control panel not activated due to the con trol lever not being in neutral or the system has been locked from another control panel Padlock The padlock symbol lights if the control panel is locked manually by depressing the button or if exchange has been activated by routine ...

Page 28: ...r restart the engines NOTE Both engines must be running when using the docking function LED indication above the button White Lit Port engine 1 Starboard 2 engine are is running Off Port engine 1 Starboard 2 engine are is shut off Flashing and accompanied with a buzzer The engine s has stopped without a stop request Silence the buzzer with the ALARM ACKNOWLEDGE BUTTON and restart the engine s ALAR...

Page 29: ...UB MENU To enter a SUB MENU push NAVIGATION WHEEL Speed Optional Boat speed Requires multisensor or GPS Water temp Optional Water temperature Requires multisensor Depth Optional Water depth Requires multisensor Trip menu Optional Shows trip information Requires the following Multisensor or NMEA 0183 NMEA 2000 compatible component plotter GPS paddle wheel etc Fuel level sender Trip computer softwar...

Page 30: ...IN MENU Push BACK BUTTON to return to MAIN MENU without setting a new favorite Units are user selectable See section Units TRIP RESET Reset all trip data FUEL REMAINING Fuel remaining l Gal FUEL ECONOMY Instantaneous fuel rate per dis tance l nm l km l mile Gal nm Gal km Gal mile FUEL RATE Instantaneous fuel rate per hour l h Gal h DISTANCE TO EMPTY Distance to empty based on instantaneous fuel ra...

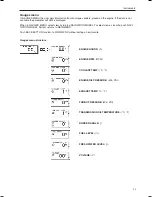
Page 31: ...g NAVIGATION WHEEL To select view as favorite push NAVI GATION WHEEL System returns to MAIN MENU Push BACK BUTTON to return to MAIN MENU without setting a new favorite VOLTAGE V ENGINE HOURS h ENGINE RPM RPM COOLANT TEMP C F ENGINE OIL PRESSURE kPa PSI EXHAUST TEMP C F TURBO PRESSURE kPa PSI TRANSMISSION OIL TEMPERATURE C F RUDDER ANGLE FUEL LEVEL FRESH WATER LEVEL Gauges menu structure 29 Instrum...

Page 32: ...SUB MENU To enter a SUB MENU push NAVIGATION WHEEL Push BACK BUTTON to return to MAIN MENU INFO BEEP Set info beep sound level for the built in buzzer in EVC tachometer DEPTH ALARM Settings for depth alarm functions UNITS Choose which units to display Set US or met ric and units for distance nm km miles FUEL TANK CALIBRATION Calibration of the fuel tank CHASSIS ID Shows information about the EVC s...

Page 33: ...lue can be adjusted at a resolu tion of 0 1 m or 1 ft Once adjustment value is reached the data is stored by pushing NAVIGATION WHEEL Depth alarm pop up The depth alarm pop up will appear when the depth is less than the depth alarm setpoint The pop up shows the actual depth Acknowledge depth alarm by pushing NAVIGATION WHEEL The depth alarm pop up will re appear every 30 sec onds until the depth i...

Page 34: ...L and confirm by pushing NAVIGATION WHEEL DISTANCE 1 Activate helm station by pushing the ACTIVATION BUTTON 2 Select SETTINGS from MAIN MENU by turn ing NAVIGATION WHEEL Push NAVIGATION WHEEL to enter SETTINGS MENU 3 Select UNITS and push NAVIGATION WHEEL 4 Select DISTANCE and push NAVIGATION WHEEL 5 Set distance unit km nm or miles and confirm by pushing NAVIGATION WHEEL LANGUAGE 1 Activate helm ...

Page 35: ...orrect 1 Activate helm station by pushing the ACTIVATION BUTTON 2 Select SETTINGS from MAIN MENU by turn ing NAVIGATION WHEEL Push NAVIGATION WHEEL to enter SETTINGS MENU 3 Select FUEL TANK CALIBRATION and push NAVIGATION WHEEL 4 Select FUEL MULTIPOINT CALIBRATION by turning NAVIGATION WHEEL Push NAVIGATION WHEEL to enter FUEL MULTIPOINT CALIBRA TION NOTE The fuel multipoint calibration procedure ...

Page 36: ...NAVIGATION WHEEL to enter FULL TANK CALIBRATION 4 Fill fuel tank and push NAVIGATION WHEEL Push BACK BUTTON to return to SETTINGS MENU Fuel alarm pop up The fuel level alarm pop up will appear when the fuel level is lower than fuel alarm setpoint The pop up shows the percentage of fuel remaining Acknowledge fuel alarm by pushing NAVIGATION WHEEL Fuel level alarm pop up will re appear every 10 min ...

Page 37: ...adjustment value is reached the data is stored by pushing NAVIGATION WHEEL Information message Start attempt with gear engaged The engine control lever must always be in neutral be fore starting If not this pop up will be shown Approximated trip data This pop up will be shown every time after start up if FUEL FULL TANK CALIBRATION is performed Retrieving faults The EVC system is retrieving faults ...

Page 38: ...de functions in the same way as the display in the tachometer EVC System Tacho meter Before the display is used it may be necessary to modify the way that the display shows operating in formation to comply with user requirements You can see the settings that can be changed in the section about the configuration menu Structure of the display functions Button 1 Engine 10 different fuel informa tion ...

Page 39: ...em the pop up window will flash CONNECTION LOST When opera ting information has been registered reset the pop up window disappears Start image This is the starting image that is shown on the display for a brief period after starting If the unit gives a constant audible warning after star ting the self test has failed The unit will still work but may behave in an unexpected manner Symbols for opera...

Page 40: ...on when display settings are chan ged Configuration menu structure System Information Language 8 available Bleep ON OFF Engine PORT STARBOARD TWIN SINGLE Engine series D1 D2 D2 Settings GLOBAL LOCAL Display Units Settings System Engine 2500 rpm 9000 r min in stages of 500 rpm Speed On off Speed 10 KNOT 100 KNOT in stages of 10 in appropriate units Graph interval 2MIN 10MIN 30MIN 60MIN 2 H 4 H 8 H ...

Page 41: ...buttons on the free standing con trol panel In display mode SYSTEM INFORMATION there are several functions Display of operating information information mes sages and alarm note The display is adapted to suit the size of the panel in the tachometer Settings for displaying operating information in this display mode All calibrations Detailed instructions for the functions in display mode SYSTEM INFOR...

Page 42: ...e LITER GAL Imperial GAL Fuel consumption time is adjusted to suit the volume unit L H GAL H IGAL H Temperature C CELSIUS F Fahrenheit System Menu SYSTEM is intended to provide the necessary functions and information for service technicians Demo Switches between demo mode ON OFF The unit is in normal operation mode when Demo is OFF Com Viewer Shows the latest messages received on the communication...

Page 43: ...ether with a trip computer and fuel level gauge The fuel level gauge are displayed if there is a tank sender in stalled Note Trip information is only displayed if following are installed Multisensor or NMEA 0183 NMEA 2000 compa tible component plotter GPS paddle wheel etc Fuel level sender Software for trip computer order and download from VODIA website The trip computer shows various types of inf...

Page 44: ... setting mode is reached by pressing button 5 fur thest right when you are in the display mode MULTI Please refer to the illustrations below Note The type of operating information available depends on the electrical system in the boat and the sensors that the boat is equipped with Optional sen sors include depth gauge water temperature speed trim angle and rudder angle Note This applies to the gra...

Page 45: ...to one of the following values in the configuration menu 2 min 10 min 30 min 1 h 2 h 4 h 8 h The interval on the Y axis is automatically adjusted for best indication Display mode Trip button 3 This display mode shows Fuel used after last zeroing Instantaneous fuel consumption amount of fuel used per hour If speed information is available in stantaneous fuel consumption can also be calcula ted in r...

Page 46: ...s disengaged The lever now only controls engine speed When the lever is moved back to the neutral position it will automatically re engage This is confirmed by the green indication which gives constant light WARNING Take care not to engage the drive unit unintentionally Electronic lever control Operation Both the shift function and engine speed control are controlled using the lever control N Neut...

Page 47: ...ing the friction brake 1 Stop the engine 2 Mover the control lever forwards so that the groove in the hub of the control lever is accessible 3 Position a screwdriver in the groove and remove the plug 4 Adjust the friction brake 8 mm wrench Clockwise heavier lever action Counter clockwise lighter lever action 5 Reinstall the plug 45 ...

Page 48: ...fan if one is installed and let it run for at least four minutes Check that the amount of fuel aboard is enough for your planned voyage Check the oil level Open the sea water cock s two for D6 one for D4 on the drive unit position A open and posi tion B closed Put the drive unit in neutral by moving the control levers to neutral at all control positions General information about starting The engin...

Page 49: ...n button for at least one second When the button is released the indication lights up to confirm that the control position is activated NOTE If the indicator flashes the control position has not been activated because the control levers are not in the neutral position or the system has been locked from another control panel If the boat has more than one control panel the sys tem can be locked so t...

Page 50: ...0 sek Overheating protection If the starter motor is engaged for its maximum activa tion time 30 seconds the starter motor circuit is cut automatically to protect the starter motor from over heating Leave the starter motor to cool for at least five minutes if possible before making a new start attempt Read the instruments and warm the engine up Allow the engine to idle for the first ten seconds an...

Page 51: ...bathers or in areas where you could reasonably expect that people could be in the water Reading the instruments Read all instruments and displays directly after starting and then regularly during your voyage EVC system tachometer Shows user selected boat and engine information Oil pressure The oil pressure gauge should normally indicate between 3 5 bar It will indicate a somewhat lower value when ...

Page 52: ...a dealer for advice Acknowledging alarms and messages There are several types of alarms and messages that can appear as a pop up in the tachometer display NOTE Some alarms for fault are also accompanied by a buzzer First silence the buzzer by pushing the NAVIGATION WHEEL on the control panel 1 Read the alarm message pop up 2 Acknowledge the pop up by pushing the NAV IGATION WHEEL on the control pa...

Page 53: ...s up in confirmation Unlock the system by pressing the activation button for one second This can only be done from an activated control panel Synchronizing engine speed When driving with twin engines both the operating economy and comfort will be increased when the en gines are operating at the same engine speed rpm When the synchronization function is activated the engine speed rpm of the starboa...

Page 54: ...n move the control lever to reverse with a rap id distinct movement and increase engine speed IMPORTANT If the boat has twin engines it is important that both should be running during reversing maneuvers to avoid the risk of water entry via the exhaust pipe into the stationary engine 1 2 3 Steering A boat with a Volvo Penta IPS drive unit has more pro gressive steering than a boat with a conventio...

Page 55: ...ion of the autopilot along with other user information is described in the autopilot suppliers documentation NOTE The system can refuse activation if the steer ing wheel is turned at the same time as an attempt is made to activate the autopilot The autopilot does not work when traveling back wards The steering wheel is braked while the autopilot is in control AUTO position Disconnection The autopi...

Page 56: ...the docking sta tion is activated Before the docking function can be enabled The engines must be running The control levers must be in neutral The joystick must be in the center position The station from where you are going to dock must be activated 1 Push the docking button A on the joystick 2 A beep indicates that the docking function is ena bled The LED above the docking button lights up The sy...

Page 57: ...ng function 2 Enable the boost mode by pushing the boost but ton B on the joystick 3 A beep indicates that the boost mode is enabled The LED above the button lights up Disabling the boost mode 1 Disable the boost mode by pushing the boost but ton B on the joystick 2 Two beeps indicate that the boost mode is disa bled The LED above the button goes out 3 The system is now in normal docking function ...

Page 58: ... Remember that the side thrust is considerably greater than with a conventional bow propeller The boat will continue to move in the selected direction even after the joystick has been re leased Compensate for this movement by moving the joystick in the opposite direction IMPORTANT The joystick and it s functions are only to be used when docking In all other cases the wheel and control lever s shou...

Page 59: ...Turn Rotate Diagonally 57 Operation ...

Page 60: ...tons starts to flash 3 Move the joystick sideways to one of its end posi tions Correct the boat s incorrect movement by turning and or moving the joystick as illustrated in examples A D NOTE Combinations of the examples shown can oc cur NOTE Let the boat move for quite a long distance during the calibration routine Hold the joystick in posi tion 4 When the boat is moving directly sideways push the...

Page 61: ...topped the drive units will automati cally be positioned in straight forward position Auxiliary stop If the engine cannot be stopped in a normal procedure it is possible to stop the engine via auxiliary stop mounted on the side of the engine After stopping the engine IMPORTANT Make sure that the starter key is turned off is in 0 position or removed before main switches are switched off Otherwise t...

Page 62: ...aned with emery paper to re move any oxidation IMPORTANT Do not use a wire brush or other steel tools when cleaning as these may damage the gal vanic protection Cold weather precautions To prevent freezing damage the seawater system must be drained and the freshwater system coolant must have sufficient antifreeze protection Refer to the cooling system section in chapter Maintenance IMPORTANT A poo...

Page 63: ... cost and ex pense by an authorized Volvo Penta distributor dealer or workshop before the expiry of the 12 months Warranty Period Further directions can be found in the Warranty and Service Book MAINTENANCE SCHEDULE WARNING Before you do any maintenance work read the Maintenance chapter carefully This contains advice on doing the work in a safe and correct manner IMPORTANT Maintenance points marke...

Page 64: ...tion Drive unit Oil and oil filter Change page 85 Drive unit Check corrosion protection anode page 86 Drive unit antifouling coating Repair as required page 91 Every second year Coolant Change page 70 Every 600 hours at least every 5 years Turbo Inspection cleaning as required not shown Drive unit check for function and wear not shown Propeller shaft check straightness Steering Every 1200 hours at...

Page 65: ...before starting the engine and after stopping when the engine has been turned off This will help you to quickly detect abnormalities that have occurred or are about to occur Look especially carefully for oil fuel and coolant leaks loose bolts worn or slack drive belts loose connections damaged hoses and electric cables This inspection takes only a few minutes but can prevent serious operating dist...

Page 66: ...e care not to allow impurities to enter the engine Fit the new air filter and the air filter cover Changing crankcase ventilation filter Unscrew the lid and remove the old filter Clean the filter cover housing if necessary Take care not to al low impurities to enter the engine Fit the new filter 64 Maintenance Engine general ...

Page 67: ...working in pairs must be replaced together Adjusting changing drive belts The standard generator and water pump are driven by a poly V belt for optimum function and service life Change tension the belt as follows 1 Undo the bolts 1 on the tensioning roller bracket Remove and change the belt if necessary 2 Tension the belt to apply a torque of 70 Nm on the tensioning roller square fitting 2 Secure ...

Page 68: ...ect Ensure therefore that the dipstick is fully screwed in to read off the oil level correctly Top up the oil as re quired use the dip stick tube to fill For oil quality and capacity See the Technical Data chapter IMPORTANT The oil level should always be within the MAX and MIN range marked on the dipstick Oil change Run engine to normal operating temperature Remove the oil dipstick Remove the plug...

Page 69: ...e the en gine is started for the first time IMPORTANT Do not check the oil level directly after the engine is shut down The oil in the en gine needs time run down to the oil pan before a correct oil level check can be performed Wait 15 minutes if the engine has been run up to normal operating temperatures Wait one hour if the engine only has been run at idle IMPORTANT The oil level should always b...

Page 70: ...3 Change the oil filter and bypass filter at each oil change please refer to chapter Changing oil filter and bypass filter 4 Fill up with new oil through the filling hole on the top of the engine NOTE Fill 1 5 liters 0 4 US gals less than the to tal oil volume since there always is a small amount of oil left in the oil pan Please refer to the Techni cal Data chapter for oil volume 5 Start the engi...

Page 71: ...ass filter 1 and the oil filters 2 with a suitable extractor 4 Check that the mating surfaces on the filter brack ets are clean and that no residue from the old seals remains 5 Moisten the seals on the new filters with engine oil 6 NOTE Screw the filters on by hand until the rub ber seals just touch the mating surface on the filter brackets Then tighten a further 1 2 to 3 4 turn 7 Start the engine...

Page 72: ...PORTANT Coolant must be used all year round This applies even if there is never any risk for frost to ensure that the engine has an adequate protection against corrosion Future warranty claims on the engine and additional equipment may be rejected if an unsuitable coolant has been used or if the instructions concerning coolant mixing have not been followed NOTE The anti corrosive agents become les...

Page 73: ...and will give reduced freezing protection IMPORTANT Coolant must be mixed with pure water use distilled de ionized water The wa ter must fulfill the requirements specified by Volvo Penta see Water quality IMPORTANT It is extremely important that the correct concentration of coolant is added to the system Mix in a separate clean vessel before adding into the cooling system Ensure that the liquids m...

Page 74: ...tinue to drain the coolant from the drain nipple 2 on the engine block NB Leave the old coolant to a facility for destruction 1 2 Checking coolant level WARNING Do not open the engine coolant system filler cap when the engine is still hot ex cept in an emergency Steam or hot coolant may spray out Turn the filler cap slowly counter clockwise and let any pressure escape from the system before remov ...

Page 75: ...er system The seawater system is the boat s external cooling system On engines with drives the seawater pump draws in water via the drive unit through the control system oil cooler to the seawater pump after which the water passes the seawater filter before being pumped through the fuel cooler intercooler engine oil cooler and heat exchanger Finally the water is pumped into the exhaust pipe elbow ...

Page 76: ...hedule Otherwise there is a risk the filter will clog and the engine will over heat Draining seawater system Use a suitable receptacle while draining Open the drain nipple 1 by carefully screwing the nipple Use a no 17 block spanner if the nipple sticks Drain all coolant and screw in the nipple by hand Move the hose and then continue to drain the coolant from the drain nipple 2 Remove hose 3 and h...

Page 77: ...crificial anodes and replace them if they are less than 50 of their original size Other wise clean the sacrificial anodes with sandpaper to remove the layer of oxide before refitting them IMPORTANT Clean with sandpaper Use no steel tools as this will impair electrical protection 5 Fit the sacrificial anodes Make sure there is good contact between the anode and the metal goods 6 Close the drain nip...

Page 78: ...WARNING Approaching a running engine is dangerous Watch out for rotating components and hot surfaces IMPORTANT The impeller will be dam aged if it runs dry 4 Set the gear control lever in the neutral position Check that nobody is near the propellers Start the engine Let it run at fast idle a few minutes Stop the engine 5 For inhibiting fill a bucket with antifreeze mixture 50 50 freshwater and ant...

Page 79: ...e fuel valve valves 2 Clean the filter bracket and put a suitable vessel under the filter 3 Remove the cables from the water trap 1 4 Unscrew the filter use a filter wrench if needed 5 Clean the sealing surfaces of the filter bracket Make sure the filter is absolutely clean and the sealing surfaces are undamaged Moisten the sealing rings with engine oil including the inner rubber seal located insi...

Page 80: ...uel filter If the pop up water in fuel on the tachometer display or the lamp on the optional alarm display comes on there is too much water in the water separator on the fuel filter Proceed as follows to rectify this 1 Stop the engine and take the starter key out of the starter switch 2 Remove the cable from the water separator 1 3 Place a suitable receptacle under the fuel filter and carefully un...

Page 81: ...r by slackening off screw 1 Replace insert and reinstall cover Open fuel cock Vent fuel system Deposit the old filter insert at a properly designated disposal site Start the engine and check for leaks WARNING Approaching a running engine is dan gerous Watch out for rotating components and hot surfaces 1 79 Maintenance Fuel system ...

Page 82: ...the engine is running the gen erator can be seriously damaged For the same reason charging circuits must never be switched over while the engine is running IMPORTANT Never break the circuit with the main switches while the engine is running Fuses 12 24 volt system and drive unit The engine and the drive unit are fitted with automatic circuit breakers 1 engine and 2 drive unit The circuit breakers ...

Page 83: ...ry terminal When disconnecting the battery disconnect the lead black first and then the lead red Cleaning Keep batteries dry and clean Oxidation or dirt on the battery and battery terminals can cause short circuits voltage drop and discharge especially in damp weather Clean the battery terminals and leads to remove oxidation using a brass brush Tighten the cable terminals well and grease them with...

Page 84: ...be charged If the boat has not been used for some time charge the battery and then trickle charge it see manufacturer s recommendations A poorly charged battery will be damaged and may burst in cold weather IMPORTANT Follow the instructions supplied with the battery charger carefully To avoid elec trolytic corrosion when an external charger is connected always disconnect the battery leads before c...

Page 85: ...ety ground must always be connected to the connection cabinet s ground earth terminal ashore The safety ground should not be connected to the negative connection on the output side 12 24V i e it must be galvani cally separated Shore power units transformer rectifier battery chargers etc must be intended for marine usage and the high tension circuit must be galvanically separated from the low tensi...

Page 86: ... and the fuse block and the terminal and the terminal block for the boat s electrical equipment The main switch for the auxiliary battery must cut off all power consuming equipment connected to that battery and be turned off when power is no longer needed All equipment connected to the auxiliary battery should have separate switches To simultaneously charge two independent bat tery circuits fit a ...

Page 87: ...ect oil lev el check can be done Check the oil level every day before starting the engine Open the oil filler cap 2 slowly so that the overpres sure disappers Remove the dipstick 1 by turning it anti clockwise Dry off the dipstick and reinstall it in the drive unit screw it into place Remove the oil dipstick again and check the oil level The correct oil level is inside the marked area If necessary...

Page 88: ...h Use no steel tools e g wire brush as this will impair electrical protection Changing the corrosion protection All anodes are secured with screws or with nuts Undo the screw or the nuts holding the anode Clean the contact surface and fit the new anode Tighten the new anode so that there is a good electrical contact Checking corrosion protection between the housing and the clamping ring Check that...

Page 89: ...t reduced engine speeds Propellers Drive unit Note A special tool A for removing and fitting the propellers is supplied together with the drive unit see figure Dismantling 1 Take the starter key out of the starter switch 2 Remove the spinner 1 using the special tool 1 3 Undo the locking ring with the accompanying spe cial tool by unscrew the four socket cap screws 2 Remove nut B and locking ring 3...

Page 90: ...l tool and four socket cap screws 4 Torque 24 28 Nm 17 7 20 65 lbf ft 3 Install the forward propeller on the propeller shaft Tighten nut A by hand and install locking ring 3 Tighten the locking ring with the accompanying special tool and four socket cap screws 2 Torque 24 28 Nm 17 7 20 65 lbf ft 4 IMPORTANT Tighten the screw D until it bottoms Otherwise it will not be possible to change propeller ...

Page 91: ...place oil filter IMPORTANT Be careful when cleaning with a high pressure water spray The spray must not be pointed toward the propeller shaft seal hoses etc Clean the seawater filter Clean and inhibit the seawater system Remove the impeller from the seawater pump Store the impeller in a sealed plastic bag in a cool place Check the condition of the engine coolant anti freeze Top up if required Drai...

Page 92: ...dition of rubber hoses and tighten hose clamps Check engine coolant level and antifreeze protec tion Top up if necessary Connect the fully charged batteries Paint the hull please refer to Painting the under water hull Check the sacrificial anode on the drive unit If there is less than 2 3 of the anode left it must be replaced Clean with emery cloth just before the boat is launched IMPORTANT Do not...

Page 93: ...arine environ ment Avoid the use of such agents Most countries have introduced legislation controlling the use of anti fouling agents Check the legislation that applies where the boat is to be used NOTE Always abide by these regulations In many cases it is completely forbidden to use them on plea sure boats for example in freshwater Tin based agents TBT must not be used For boats that are relative...

Page 94: ... Risk of arcing and explo sion 1 Check that the rated voltage of the help start bat tery is the same as the system voltage of the en gine 2 Connect the red jumper cable to the positive pole of the flat battery and then to the positive pole of the help start battery 3 Connect the black jumper cable to the negative pole of the help start battery and then to a place some distance from the flat batter...

Page 95: ...n is for manual engagement of the drive unit for forward travel Manual engagement forward gear 1 Stop the engine and remove the start key from the key switch 2 Note the valve to which the cable marked Pri mary lower soleniod is connected Then undo both connectors from the solenoid valves NOTE P is forward and S is backward 3 Remove the cap nut from the valve which was connected to the Primary cabl...

Page 96: ...owing procedure must be carried out with the engines stopped 2 Connect the switch and fit the crank tool 1 Remove the plug 1 Disconnect the cable by pressing down the lock 2 and at the same time wiggle the connector 3 Press down the switch button and keep it pressed and turn the crank tool carefully to an end position When end position is reached stop turning The end position feels like a torsion ...

Page 97: ...straight forward 5 Remove crank tool Disconnect the switch by pressing down the lock 2 and at the same time unplugg the switch by slowly wiggle it please refer to procedure in step 1 Fit the plug 6 Reconnect the cable you disconnected in step 1 95 In case of emergency ...

Page 98: ...ngine mounting 17 Too little coolant 18 Blocked seawater intake pipe filter 19 Circulation pump drive belt slipping 20 Defective impeller 21 Defective incorrect thermostat 22 Lubricating oil level too high 23 Generator drive belt slipping 24 Stored diagnostic fault codes NOTE The codes can only be read and erased by a service techni cian Symptom and possible cause Pop ups are shown in the tachomet...

Page 99: ...t temperature or drive unit Reaction Engine power is reduced till the rel evant value is normalized 3 The diagnostic function has discovered a serious malfunction which will cause serious damage on the engine or the drive unit Reaction Engine power is reduced 4 The diagnostic function has discovered a serious malfunction which makes it impossible to control the engine or the drive unit Reaction Th...

Page 100: ... issues are not considered in this section Acknowledge the alarm 1 Press NAVIGATION WHEEL The buzzers will be come silent 2 Press NAVIGATION WHEEL The pop up will dis appear and normal display window will be shown Limited engine RPM If there is a fault in the system which will not immedi ately damage the engine or drive unit this pop up is shown NOTE The pop up will also be shown when only one eng...

Page 101: ...eering wheel please refer to chap ter In case of emergency section Alignment of the drive unit It is possible to steer the boat using the control levers please refer to chapter Operation section Steering Acknowlege the alarm and take the recommended measures Please also refer to the Fault register chapter Limited steering If there is steering function on only one driveline side this pop up is show...

Page 102: ...lso a combination of errors unabling propulsion or control of propulsion through control levers on both sides It is adviced to shut down the engines on both sides and try to restart them again If the errors remain after re start tow the boat to service provider Acknowlege the alarm and take the recommended measures Please also refer to the Fault register chapter 100 In case of emergency ...

Page 103: ...ac knowledged Danger pop up If the Danger pop up is shown during operation a se rious fault has occured NOTE Acknowledge the alarm and stop the engine at once Information regarding cause of fault and measures to take is found in chapter Fault register Warning pop up If the Waring pop up is shown during operation a fault has occured NOTE Acknowledge the alarm and stop the engine at once Information...

Page 104: ... in chapter Fault register Erasing faults in faults list Any fault pop up in the diagnostic function are auto matically erased every time the starter key is turned to the stop position S NOTE Stop the engine and check that the ignition key s is are in position 0 in all control positions When system voltage is switched on again the diag nostic function checks to see whether there are any faults in ...

Page 105: ...se refer to Maintenance Seawater system Check the impeller in the sea water pump Please refer to Maintenance Seawater system Check that no leakage occurs Please contact a Volvo Penta workshop if the fault remains Fault register Description R Explanation Reaction Action WARNING Read the safety precautions for maintenance and service in the Safety information chapter before starting work Explanation...

Page 106: ...to Maintenance Seawater system Check the impeller in the seawater pump Please refer to Maintenance Seawater system Check that no leakage occurs Check that no leakage occurs in auxiliary equipment connected to the engine cooling system Please contact a Volvo Penta workshop if the fault remains Coolant temperature R Explanation Ccoolant temperature too high Reaction Engine power is reduced Action Ch...

Page 107: ...ad seas the system can incorrectly sense that the engine oil level is too low If this happens acknowledge the fault and check the points below for safety reasons Reaction Engine power is reduced Action Check the oil level in the engine Please refer to Maintenance Lubrication system to check and top the oil up Check the oil filters Please refer to Maintenance Lubrication system Check that no leakag...

Page 108: ... if the fault remains Crankcase pressure R Explanation Crankcase pressure too high Reaction Engine power reduced Action Check that the crankcase ventilation is not blocked Please refer to Maintenance Engine general Please contact a Volvo Penta workshop if the fault remains Exhaust temperature R Explanation Exhaust temperature too high Reaction Engine power is reduced Action Please contact a Volvo ...

Page 109: ... engine Emergency stop Please contact a Volvo Penta workshop if the fault remains Primary battery R Explanation Poor battery or charging Reaction Action Check battery fluid level Check belt tension Please contact a Volvo Penta workshop if the fault remains Secondary battery R Explanation Poor battery or charging Reaction Action Check battery fluid level Check belt tension Please contact a Volvo Pe...

Page 110: ...nel use an alternative control panel Please contact a Volvo Penta workshop if the fault remains Lever calibration O Explanation Incorrect lever calibration Reaction It is not possible to choose active helm station Action Restart engine s Please contact a Volvo Penta workshop if the fault remains Check EVC system O R Explanation Internal fault in the EVC system Reaction Engine power is reduced Acti...

Page 111: ...s Check steering wheel O Explanation Fault in steering wheel unit Reaction Engine power is reduced Action Restart both engines Please contact a Volvo Penta workshop if the fault remains Limited engine rpm R Explanation Fault in steering system Reaction Engine power is reduced on both sides Action Restart both engines Please contact a Volvo Penta workshop if the fault remains Limited steering R Exp...

Page 112: ...ides No steering Action Restart both engines Please contact a Volvo Penta workshop if the fault remains No gear throttle and steering R Explanation Fault in steering system Reaction No steering No propulsion Action Restart both engines Please contact a Volvo Penta workshop if the fault remains 110 Fault register ...

Page 113: ... 1141641 9 Cooling system Thermostats open fully open 82 C 92 C 82 C 92 C Fresh water system volume app 13 liter 3 4 US gals 16 5 liter 4 4 US gals Electrical system System voltage 12V 12V 24 V Starter motor battery capacity 2 x 88Ah 800cca 2 x 88Ah 800cca Alternator rated power max 14V 115A 14V 115A 28V 80A Starter motor rated power 12V 3 6kW 12V 3 6kW 24V 5kW Lubrication system Oil volume incl o...

Page 114: ... When oil quality specifications are joined by or Type 1 2 and 3 either engine oil specification can be used When oil quality specifications are joined by and Type 2 and 3 the engine oil must fulfill both requirements 2 ACEA E7 has replaced ACEA E5 but if available ACEA E5 can be used 3 If sulphur content is 1 0 by weight use oil with TBN 15 Drive unit Oil volume 14 liters 3 7 US gals Oil volume b...

Page 115: ...Notes 113 ...

Page 116: ...Notes 114 ...

Page 117: ...als Fax an Document Distribution Center Order Department ARU2 Dept 64620 SE 405 08 Göteborg Schweden Fax 46 31 545 772 Die Bestellung kann auch über das Internet erfolgen http www volvopenta com manual coupon Ja ich will kostenlos eine Betriebsanleitung in deutscher Sprache erhalten Publikationsnummer 7748003 Name Anschrift Land 42200 615001 155099900192 Notez que l offre est valable pendant 12 mo...

Page 118: ...ción y posteriormente solamente mientras duren las existencias Franquear o enviar fax a Document Distribution Center Order Department ARU2 Dept 64620 SE 405 08 Göteborg Suecia Fax 46 31 545 772 El pedido puede hacerse tam bién por internet http www volvopenta com manual coupon Sí gracias deseo recibir gratuitamente un libro de instrucciones en español Número de publicación 7748005 Nombre Dirección...

Page 119: ...er fax til Document Distribution Center Order Department ARU2 Dept 64620 SE 405 08 Göteborg Sverige Fax 46 31 545 772 Bestillingen kan også ske på internet http www volvopenta com manual coupon Ja tak jeg vil gerne gratis have en instruktionsbog på dansk Publikationsnummer 7748009 Navn Adresse Land 42200 615001 155099900192 Huomaa että tarjous on voimassa 12 kuukautta veneen toimituspäivä määrästä...

Page 120: ...Ýêäïóçò 7748015 íïìá Äéåýèõíóç þñá 42200 615001 155099900192 Observar que esta oferta é válida durante um período de 12 meses a contar da data de entrega do barco Após este período a oferta está dependente do número de exemplares disponíveis Envie o talão pelo correio ou um fax para Document Distribution Center Order Department ARU2 Dept 64620 SE 405 08 Göteborg Suécia Fax 46 31 545 772 A encomend...

Page 121: ... şu adrese postalayın veya fakslayın Dokument Distribution center Ordermottagningen ARU2 Avd 64620 SE 405 08 Göteborg Ýsveç Faks 46 31 545 772 Sipariþler Ýnternet üzerinden de verilebilir http www volvopenta com manual coupon Evet lütfen ücretsiz Türkçe kullanım el kitabı istiyorum Yayın numarası 7748017 Ýsim Adres Ülke 42200 615001 155099900192 ...

Page 122: ......

Page 123: ......

Page 124: ...7747996 English 06 2007 ...

Reviews: