8. Setting up
a) Charge the battery
•
Lift the cover flap marked
to access the
micro USB port
(7)
.
• Using the included cable, connect one end
to the micro USB port and the other end to a
suitable USB-A power source.
• The LED charging indicator
(6)
and the display
(1)
will show the battery status. Charging (red)/fully
charged (green)
b) MicroSD
•
Lift the cover flap marked
to access the
microSD card slot
(9)
.
• Insert the card in the direction shown on the
cover. It should “click” into place.
•
Replace the cover.
You may need to restart the device for
the SD card to register. When using an
SD card the first time please format it. For
further details see sections 11. e) “Settings”,
“Format SD” and 16. “Technical data”.
9. Getting started
a) Power on/off
Press and hold the power button
(10)
to turn the
power on or off.
b) Temperature calibration
The inherent temperature drift of the thermal sensor
can affect the accuracy of measurements.
To calibrate the sensor, turn the power on
(10)
then
press the left button ◄
(3)
. The display will show
“
calibrating
” to indicate that the temperature has
been calibrated.
39
Summary of Contents for 2524231
Page 4: ...14 Pflege und Reinigung 25 15 Entsorgung 26 16 Technische Daten 27 4 ...
Page 11: ...7 Bedien und Anzeigeelemente 1 2 A B C 3 4 5 7 8 6 9 10 11 D E F G H K L M I J 11 ...
Page 31: ...14 Care and cleaning 48 15 Disposal 49 16 Technical data 50 31 ...
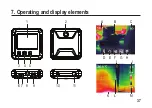
Page 37: ...7 Operating and display elements 1 2 A B C 3 4 5 7 8 6 9 10 11 D E F G H K L M I J 37 ...
Page 61: ...7 Éléments de commande et d affichage 1 2 A B C 3 4 5 7 8 6 9 10 11 D E F G H K L M I J 61 ...
Page 79: ...14 Onderhoud en reiniging 97 15 Verwijdering 98 16 Technische gegevens 99 79 ...
Page 85: ...7 Bedienings en display elementen 1 2 A B C 3 4 5 7 8 6 9 10 11 D E F G H K L M I J 85 ...
Page 101: ......
Page 102: ......
Page 103: ......

