background image

12

A.

Assemble all o-rings onto parts dry, without
lubrication. Then apply a thin film of sanitary
lubricant to exposed surfaces of the o-rings.

B.

Lubricate the rear seal area on the auger shaft with
a thin layer of sanitary lubricant. Install the rear
seal o-ring. Lubricate the outside of the rear seal o-
ring with sanitary lubricant.

C.

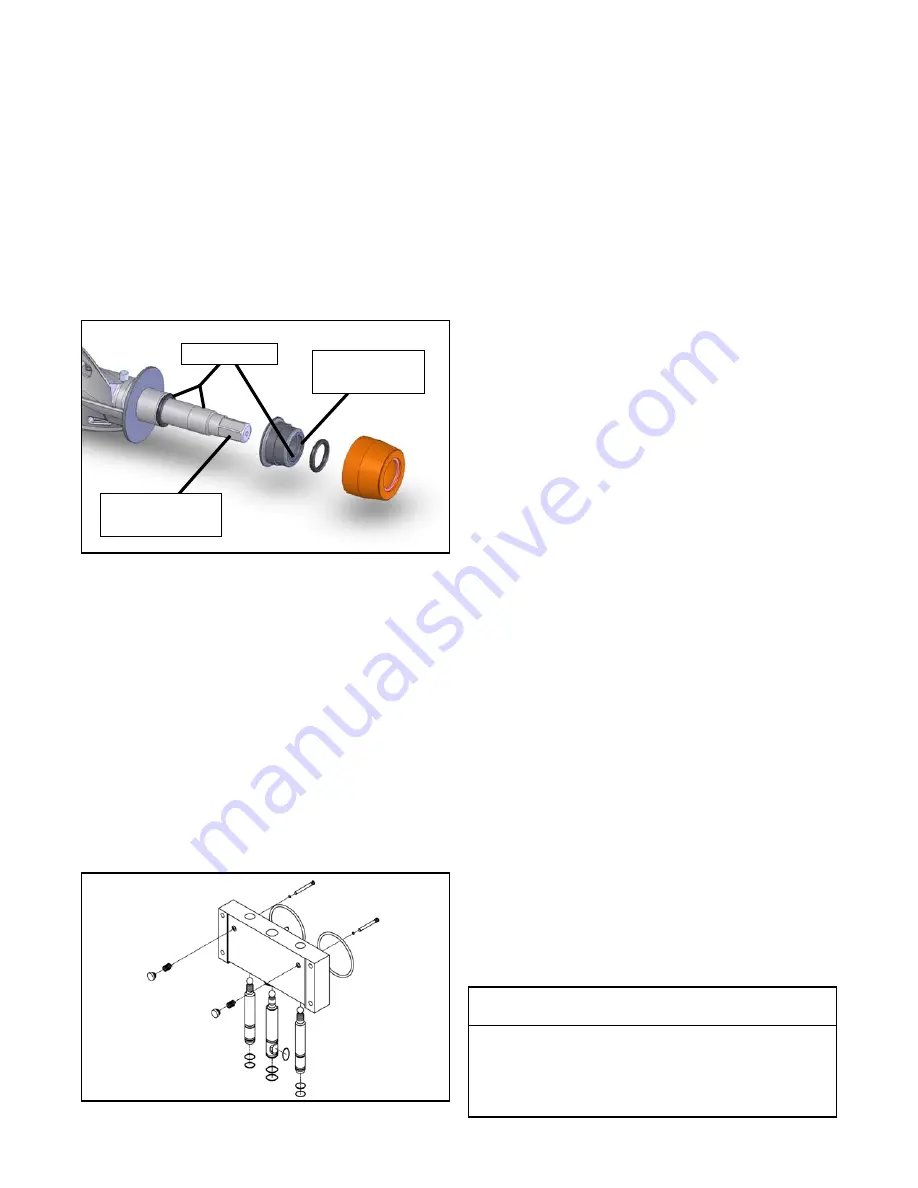
Install the stainless steel rear seal adapter into the
rear seal dry (without lubricant). Lubricate the
inside surface of the rear seal adapter, including
the adapter o-ring, and install it onto the auger
shaft. DO NOT lubricate the outside of the rear seal
adapter (Fig. 3-6).

D.

Lubricate the hex drive end of the auger with a small
amount of hex drive anti seize. A small container
of anti seize is shipped with the machine.

E.

Screw the springs onto the studs in the plastic
flights. The springs must be screwed into the
flights completely to provide proper compression.

F.

Install the two plastic flights onto the rear of the
auger and insert it part way into the freezing
cylinder.

G.

Install the remaining plastic flights, push the auger
into the freezing cylinder and rotate slowly until the
auger engages the drive shaft.

H.

Apply a thin layer of sanitary lubricant to the inside
and outside of the auger support bushing. Install
the bushing onto the auger support and install the
auger support into the front of the auger. Rotate
the auger support so that one leg of the support
points straight up.

H.

Assemble the air bleed valve o-ring onto the air
bleed valve. Position the o-ring into the groove
close to the wide part. Apply a thin film of sanitary
lubricant to the o-ring.

I.

Insert the air bleed valve into the back of the front
door. Install the compression spring onto the air
bleed valve then screw the knob on finger tight.

J.

Apply a thin layer of sanitary lubricant to the o-rings
on the spigot body and install the spigot body
through the bottom of the front door.

K.

Apply a thin film of sanitary lubricant to the door
seal o-ring and fit it into the groove on the rear of
the front door.

M.

Place the front door assembly on the mounting
studs and the push front door against the machine
carefully.

N.

Secure the front door to the machine by placing
the knobs on the studs and tightening until finger
tight. Do not overtighten. Proper o-ring seal can
be observed through the transparent front door.

3.9 SANITIZING

Sanitizing must be done after the machine is clean and just
before the machine is filled with mix. Sanitizing the night
before is not effective. However, you should always clean
the machine and parts after using it.

NOTE

The United States Department of Agriculture and
the Food and Drug Administration require that all
cleaning and sanitizing solutions used with food pro-
cessing equipment be certified for this use.

When sanitizing the machine, refer to local sanitary regu-
lations for applicable codes and recommended sanitizing
products and procedures. The frequency of sanitizing
must comply with local health regulations. Mix sanitizer
according to manufacturer’s instructions to provide a 100
parts per million strength solution. Mix sanitizer in quanti-
ties of no less than 2 gallons of 90°F to 110°F (32°C to
43°C) water. Allow sanitizer to contact the surfaces to be
sanitized for 5 minutes. Any sanitizer must be used only in
accordance with the manufacturer’s instructions.

CAUTION

Risk of Product Damage

Avoid prolonged contact of sanitizer with machine
parts. Sanitizer may cause corrosion of stainless
steel parts if there is prolonged contact.

Figure 3-7 Front Door

Figure 3-6 Rear Seal Assembly

Hex Drive

Anti Seize

Petrol-Gel

Place O-Ring

Inside Insert

Summary of Contents for STOELTING O431RC

Page 1: ...Model O431RC OPERATORS MANUAL Manual No 513664 Rev 2 ...

Page 2: ......

Page 3: ...s built prior to date of change DO NOT ATTEMPT to operate the machine until instructions and safety precautions in this manual are read completely and are thoroughly understood If problems develop or questions arise in connection with installation operation or servicing of the machine contact Stoelting Stoelting Foodservice Equipment 502 Highway 67 Kiel WI 53042 1600 U S A Main Tel 800 558 5807 Fa...

Page 4: ...pecific safety information the following safety defini tions are provided to assist the reader The purpose of safety symbols is to attract your at tention to possible dangers The safety symbols and their explanations deserve your careful attention and understanding The safety warnings do not by themselves eliminate any danger The instructions or warnings they give are not substitutes for proper ac...

Page 5: ... 3 Important Information Regarding Cleaning and Sanitizing 9 3 4 Disassembly of Freezer Parts 10 A Disassembly of Front Door 10 B Disassembly of Auger 11 3 5 Cleaning Disassembled Parts 11 3 6 Sanitizing Freezer Parts 11 3 7 Cleaning the Freezer 11 3 8 Assembling Freezer 11 3 9 Sanitizing 12 3 10 Initial Freeze Down and Operation 13 A Adding Mix 13 B Preparing the IntelliTec Control 13 C Initial F...

Page 6: ...4 8 Overrun Adjustment 19 4 9 Mix Pump Hose Reposition 20 4 10 Mix Pump Hose Replacement 20 4 11 Cab Temperature Adjustment 21 4 12 Drive Belt Tension Adjustment 21 4 13 Condenser Cleaning Air Cooled Freezers 22 4 14 Preventative Maintenance 22 4 15 Extended Storage 22 5 Troubleshooting 5 1 Error Codes 23 5 2 Troubleshooting Error Codes 23 5 3 Troubleshooting Freezer 25 5 4 Troubleshooting Mix Pum...

Page 7: ...e of commercial soft serve or non dairy mix available including ice milk ice cream yogurt andfrozendietarydesserts TheO431RChasarear openingrefrigeratedcabinetwithrearcontrols Thismanualisdesignedtoassistqualifiedserviceperson nel and operators in the installation operation and main tenance of the Stoelting O431RC pressure machine SECTION 1 DESCRIPTION AND SPECIFICATIONS Figure 1 1 Model O431RC Fr...

Page 8: ...Air Cooled Water Cooled approximately 17A approximately 15A 1 Phase 220 240 VAC 50Hz or 3 Phase 380 415 VAC 50Hz Water cooled units require 1 2 N P T water and drain fittings Model O431 RC 37 3 4 95 9 cm 67 7 8 172 4 cm 1 Phase 208 240 VAC 60Hz 19 1 8 48 6 cm Machine NEMA L6 30P NEMA L6 30P Two 3 4 hp with crate 27 68 6 cm 78 198 1 cm 48 121 9 cm 650 lbs 294 8 kg 500 lbs 226 7 kg Two 1 gallon 3 79...

Page 9: ...ATION WARNING Installation must be completed by a qualified electrician refrigeration specialist Incorrect installation may cause personal injury severe damage to the machine and will void factory warranty Installation of the machine involves moving the machine close to its permanent location removing all crating setting in place assembling parts and cleaning A Uncrate the machine SECTION 2 INSTAL...

Page 10: ...mp Be careful not to twist the mix hose 7 Turn the pump on 8 Allow the remaining 6 15cm of tubing to feed through pump until the hose adapter prevents further feeding 9 Turn the pump off CAUTION Risk of Product Damage Air Mix Tee must remain below the black cover clamp If the Tee is above the pump mix may drain into the air compressor resulting in pump damage 10 Connect the free end of the mix pum...

Page 11: ...s in the mix container is important The bag that is connected nearest the outlet of the manifold will drain last and should be placed at the backofthemixcontainer Themixlowlevelindicatorrelies on proper bag placement 1 Connect3 8 9 5mm IDplasticfoodgradetubing to a bag adapter Secure with hose clamps 2 Slide the hose clip over free end of 3 8 9 5mm ID plastic food grade tubing Attach the free end ...

Page 12: ...cure with a large hose clamp 3 Push the manifold adapter with spring and valve into the left port nearest the manifold outlet of the mix inlet manifoldandsecurewith retaining clip See Figure 2 5 4 If using two mix bags repeat steps 1 to 3 for the middle port 5 Install a manifold plug intoeachemptyinletand secure with a retaining clip 6 Placethemixbag s into the mix container 7 Connectthebagadapter...

Page 13: ...he location of the operating controls on the machine For the information regarding error codes displayed on the control panel refer to the troubleshooting section of this manual A MAIN FREEZER POWER SWITCH The Main Freezer Power switch is a two position rocker switch that supplies power to the IntelliTec control freez ingcylindercircuitsandlowercabinetrefrigerationsystem When the switch is placed ...

Page 14: ...F ON switch to the OFF position or press the CLEAN button again If the machine is left in CLEAN for more than 20 minutes an error code E4 will be displayed on the display panel Place the Freezing Cylinder OFF ON switch in the OFF position and back in the ON position to clear this error J DRIVEMOTOROVERLOAD The internal drive motor overload will trip if the drive motor is overloaded It will reset a...

Page 15: ...layer of soil material milkstone Thorough cleaning pro cedures that involve milkstone removal are critical for operators of frozen dessert machines SANITIZING Kills bacteria Can be effective on clean surfaces only NOTE Using a SANITIZER on an unclean surface will not guarantee a clean and safe frozen dessert machine PROPER DAILY MAINTENANCE The Only Way to Assure Food Safety and Product Quality Pr...

Page 16: ...eallowedtofallbelow100 ppm chlorine New solutions should be mixed once old solutions become ineffective 3 4 DISASSEMBLY OF MACHINE PARTS WARNING Moving machinery can grab mangle and dismem ber Place the Main Freezer Power Off On switch in the OFF position before disassembling for cleaning or servicing Before using the machine for the first time complete machinedisassembly cleaningandsanitizingproc...

Page 17: ... parts per million strength solution Mix sanitizer in quantities of no less than 2 gallons of 90 to 110 F 32 C to 43 C water Any sanitizer must be used only in accordance with the manufacturer s instructions B Place all parts in the sanitizing solution for 5 minutes then remove and let air dry completely before assembling in machine 3 7 CLEANING THE MACHINE The exterior should be kept clean at all...

Page 18: ...screw the knob on finger tight J Applyathinlayerofsanitarylubricanttotheo rings on the spigot body and install the spigot body through the bottom of the front door K Apply a thin film of sanitary lubricant to the door seal o ring and fit it into the groove on the rear of the front door M Place the front door assembly on the mounting studsandthepushfrontdooragainstthemachine carefully N Secure the ...

Page 19: ...em peratures out of that range may cause refrigeration problems and product quality issues A ADDING MIX 1 Sanitize the machine immediately before use 2 Make sure the Freezing Cylinder OFF ON switch is in the OFF position 3 Fill the mix container in the cab with at least 2 5 gallons of mix 4 Attach the mix inlet probe to the container and place the container in the refrigerated cab 5 The mix pump s...

Page 20: ... machine is overdrawn the result is a soft product or a product that will not dispense at all If this occurs allow the machine to run for approximately30secondsbeforedispensingmore product Adispenserateadjustorislocatedunder the header panel to the immediate right of the spigothandle Turningtheknobcounterclockwise will decrease the dispense rate 38 Do not operate the machine when the MIX LOW messa...

Page 21: ...thermometer in the frozen product to get an accurate reading Old mix or mix that has been stored at too high a temperature can result in a finished product that is unsat isfactory To retard bacteria growth in dairy based mixes thebeststoragetemperaturerangeisbetween33 to38 F 0 5 to 3 3 C 3 13 OPERATION OF MIX PUMP The mix pump switches are located on the back panel When a pump switch is placed in ...

Page 22: ...e sprayed with Haynes Sanitary Lu bricant for ease of removal WARNING Hazardous Moving Parts Revolving pump head can grab mangle and cause serious crushing injury The Main Power Off On switch must be placed in the OFF position for clean ing and power must be disconnected when disas sembling or servicing CAUTION System Under Pressure Never disconnect hoses from the machine or the pump without first...

Page 23: ...all buttons on the control panel are disabled Follow the instructions below to lock the control panel A Press and hold the PUSH TO FREEZE button for at least 5 seconds B While still holding the PUSH TO FREEZE button press the CLEAN button once C Release both buttons An asterisk will appear on the bottom line of the display indicating that the control is in the lock out mode NOTE Repeat stepsA B an...

Page 24: ...counts down the number of cycles in the current Serve Mode The starting value is dependantupontheCyclessettingontheIntelliTec control F and amps Suction line temperature on the freezing cylinder and drive motor amps are available on the same screen to assist with setup and troubleshooting Aux Temp F This reading provides the ambient temperature around the IntelliTec control board Supply V VAC The ...

Page 25: ...the IntelliTec control differ from the System Settings sheet itisrecommendedtorevertthosesettingstofactory defaults Refriger The options available for this setting are None 1 Hopper 2 Hopper and Cabinet Changing this setting changes how the control handles the storage refrigeration cycle The left control must alwaysbesettoCabinetandtherightcontrolmust be set to None CabCutIn F If the Refriger valu...

Page 26: ...solution through pump B Turn the pump off and relieve any pressure by opening the spigot C Grasp the pickup hose end of the mix pump hose withonehandandturnthepumpon Pulldownon the pickup hose end until 12 to 14 inches of tubing has fed through the pump then turn the pump off Fig 4 3 D Loosen the small clamp at the pick up hose adapter and disconnect the mix pump hose E Cut7 1 2inchesofftheendofth...

Page 27: ...mes to navigate to the Storage menu D Press the up arrow button once to navigate to the CabCutIn value Record this value IMPORTANT Before making changes to any settings record the original values If the setting changes do not achieve desired results return settings to their original val ues E Press SET button to enter edit mode F Press the up arrow button to increase the numbertothevaluerequired T...

Page 28: ...thoroughly with warm detergent Rinse in clear water and dry all parts Do not sanitize NOTE Do not let cleaning solution stand in freezing cylin der or mix pump during the shutdown period B Remove disassemble and clean the front door auger shaft and mix pump Leave disassembled during the shutdown period C Place the plastic auger flights in a plastic bag with a moist paper towel This will prevent th...

Page 29: ...oduct breakdown Another common cause results from a restriction preventing mix from entering the freezing cylinder Check the mix in the cabinet If the level mix is low add mix If there is a possibility that the mix is broken down clean andsanitizethemachineandreplacethemixwith fresh product Icecrystalsintheliquidmixcontainercanclogthe mix inlet system and prevent mix from entering the freezing cyl...

Page 30: ...tact your Authorized Stoelting Distributor for further assistance Error Code 9 High Pressure Cutout High Pressure Cutout Errors E9 are usually caused by a dirty or inefficient condenser In air cooled condenser models check for proper air clearance around the machine In water cooled condenser models check for proper water flow If the error persists contact your Authorized Stoelting Distributor for ...

Page 31: ...ng counter clockwise 5 Change rotation to clockwise 1 Seal missing or installed wrong 1 Install correctly See Section 3 8 2 Rear seal o ring missing broken or not lubricated 2 Inspect for breakage and lubricate properly See Section 3 8 3 Worn or scratched shaft 3 Replace shaft 1 Spigot parts are not lubricated 1 Lubricate See Section 3 13 2 Chipped or worn o rings 2 Replace o rings 3 O rings on sp...

Page 32: ...rload to reset 3 Hoses assembled incorrectly 3 Refer to diagram for correct hose connections 4 Mix pump hose service life is exceeded 4 Reposition replace mix pump hose See Section 4 9 5 Mix pump hose not connected to machine 5 Connect mix pump hose to machine 6 Ice crystals in mix 6 Completely thaw mix prior to use 7 Mix bag drawn against adapter 7 Ensure bag is clear of pick up tube 8 Foreign ob...

Page 33: ...on 4 2 for hose replacement Pump is noisy squeaking 1 Air mix tee above black cover clamp 1 Air mix tee must be below black cover clamp 2 Air leak 2 Tighten all hose clamps 3 Mix hose on wrong air mix tee fitting 3 Refer to diagram for correct hose connections 4 Pressure control manifold o ring leak 4 Check o ring and manifold replace as required POSSIBLE CAUSE REMEDY Dispensed product air pops Mi...

Page 34: ...28 ...

Page 35: ...Hazardous Moving Parts 2 324509 Decal Cleaning Instructions 1 324566 Decal Wired According To 1 324584 Decal Adequate Ventilation 3 2 324594 Decal Attention Heat Sensitive 2 324686 Decal Danger Automatic Start 2 324803 Decal Domed Stoelting Logo Large Header Panel 1 324804 Decal Domed Stoelting Swirl Header Panel 1 324825 Decal Main Freezer Power 1 324826 Decal Cab Off 1 324827 Decal Freezing Cyli...

Page 36: ... O Ring Middle Center Spigot Black 5 Pack 1 624678 5 O Ring Rear Seal Rear Seal Adapter Black 5 Pack 4 625133 O Ring Front Door Red 2 667868 Seal Rear Auger Orange 2 694200 Spring Air Bleed Valve 2 694255 Spring Auger Flight 10 744273 Tray Drip 1 744276 Tray Drain 1 2183083 Auger Shaft 2 2183106 Valve Air Bleed 2 2183110 Door w Pins Air Bleed Valve 1 2187880 Adapter Rear Seal 2 3158086 Spigot Body...

Page 37: ...ing 1 4 ID Clear Air Line 25 Increments Per Inch 13 2 756079 Tubing 3 8 ID Clear Mix Line 25 Increments Per Inch 24 2 2 2 756088 Tubing 1 2 ID Clear Mix Line 25 Increments Per Inch 6 2 756204 Tubing 1 4 ID Pump 50 Box Only Per Inch 756204 40 Tubing 1 4 ID Pump Pre Cut 40 Piece 8 762256 Check Valve Mix Outlet 2 1183096 Check Valve Mix In Line Inner 2 1183187 Check Valve Mix In Line Outer 2 2177274 ...

Page 38: ...32 ...

Page 39: ...ese obligations remedies are subject to the conditions that Buyer a signs and returns to Stoelting upon installation the Start Up and Training Checklist for the affected equipment b gives Stoelting prompt written notice of any claimed breach of warranty within the applicable warranty period and c delivers the affected equipment to Stoelting or its designated service location in its original packag...

Page 40: ...ted to hoses piping or electrical equipment e Labor and travel charges due to return trips or waiting if the Authorized Stoelting Provider is prevented from promptly starting service work upon arrival This exception includes labor charges incurred for limited access facilities including but not limited to government and military buildings and airports f Failure damage or repairs due to faulty inst...

Reviews: