background image

9

Getting Connected

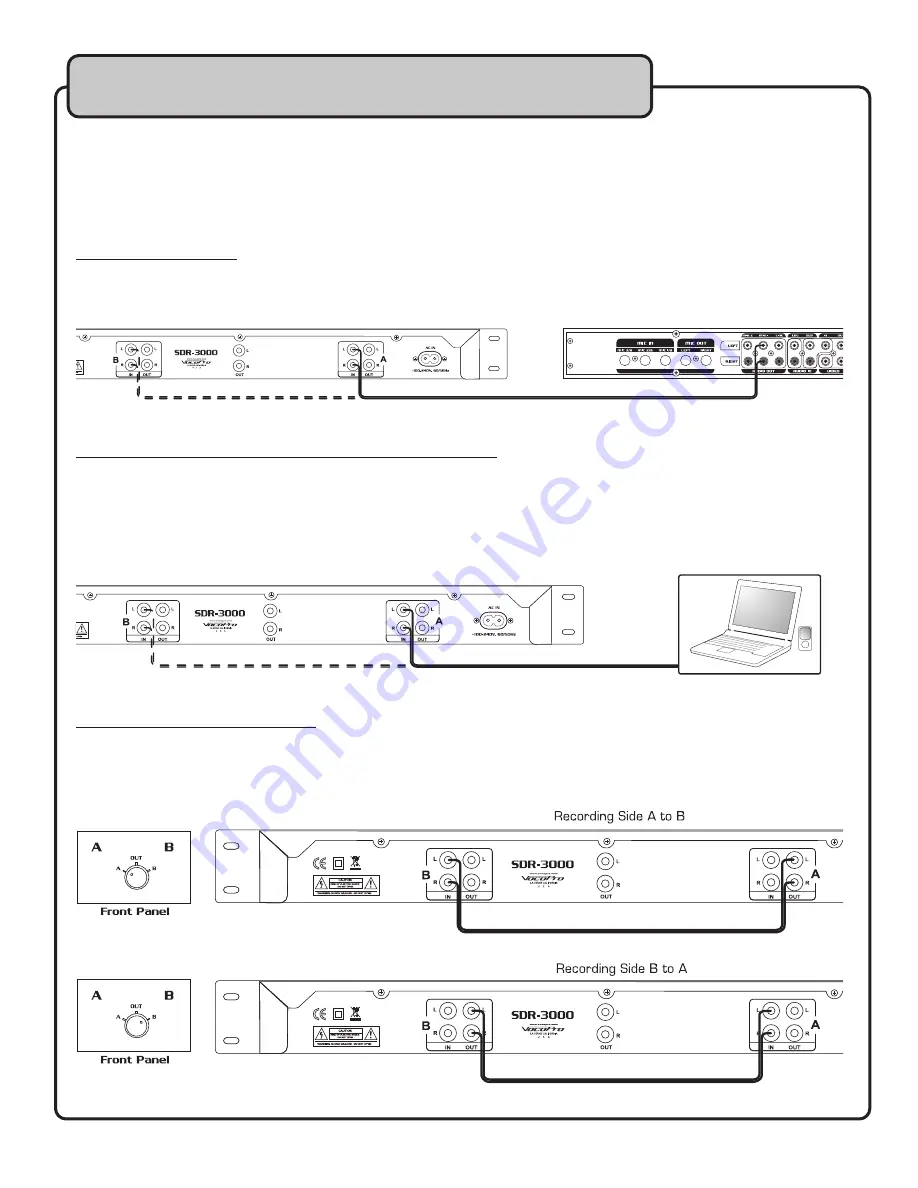
Inputs

The SDR-3000 can record any audio signal from RCA outputs. Most commonly, users will be 

running the output from a mixing device. Other connections can include direct output from a 

computer or mp3 player, and even making a copy from the other side of the SDR-3000. Follow 

the instructions below for making the connections.

Connecting to a mixer:

1) Connect a paired RCA audio cable from the RCA outputs on your mixer to the RCA inputs 

on either side A or B on the SDR-3000.

Connecting directly to a computer or portable audio device:

1) Using a stereo RCA to 3.5mm audio cable, connect the 3.5mm end to the audio output on 

your computer or portable audio device, and connect the RCA ends to the inputs on either 

side A or B on the SDR-3000.

NOTES: If your computer has a different audio output jack, use the appropriate cable. Some 

computer audio outputs are labeled with a headphone symbol.

Connecting from side A to side B:

1) Using a stereo RCA to RCA cable, connect one end to the audio outputs (on the side of your 

choice). Connect the other end to the other side’s audio input jacks.

OR

OR

Laptop or Mp3 player

Summary of Contents for SDR-3000

Page 1: ...O W N E R S M A N U A L SDR 3000 Dual Digital USB SD Recorder...

Page 2: ...2 FCC Information 3 Listening for a Lifetime 4 Safety Instructions 5 Welcome 6 Before Getting Started 7 Getting Started 8 Features 11 Operations 15 Troubleshooting 18 Table of Contents...

Page 3: ...eep it in a safe place for future reference 2 Install your unit in a cool dry clean place away from windows heat sources and too much vibration dust moisture or cold Avoid sources of hum transformers...

Page 4: ...dial and leave it there Pay attention to the different levels in various recordings Taking a minute to do this now will help to prevent hearing damage or loss in the future After all we want you liste...

Page 5: ...hould be connected to a power supply only of the type described in the operating instructions or as marked on the appliance 11 Grounding or Polarization Precautions should be taken so that the groundi...

Page 6: ...ided for other relevant information Model Number Serial Number Date of Purchase Place of Purchase Welcome VocoPro 1728 Curtiss Court La Verne CA 91750 Toll Free 800 678 5348 TEL 909 593 8893 FAX 909 5...

Page 7: ...rate and mixed audio outputs Its slim rack mountable construction will fit neatly into standard rack cases Features Records audio directly to SD card or USB drive via line in jacks Dual recorder desig...

Page 8: ...ck that you have received all the required components This is also the time to check the main unit for damage If any damage is noticed promptly report this to your shipping carrier Save the shipping b...

Page 9: ...her side A or B on the SDR 3000 Connecting directly to a computer or portable audio device 1 Using a stereo RCA to 3 5mm audio cable connect the 3 5mm end to the audio output on your computer or porta...

Page 10: ...ON ON MIC 1 MIC 2 MIC 3 MIC 4 CROSSFADER VIDEO TOGGLE VIDEO 1 CD 3 AV 3 VIDEO 2 VIDEO 3 PH 3 CD 2 AV 2 CD 1 AV 1 PH 1 LINE STEREO 1 SIGNAL SIGNAL SIGNAL STEREO 2 ASSIGN CROSSFADER VIDEO TOGGLE ASSIGN...

Page 11: ...clipping RED audio clipping 6 LCD display Displays system information current operations and settings 7 SD CARD slot Insert SD slot for recording and playback 8 USB port Insert USB thumb drive for re...

Page 12: ...nter record mode and start recording During recording this button can be used to pause playback see Operations section for instructions on recording 18 STOP button Use this button to stop recording pl...

Page 13: ...nnect the audio output from your audio source to these jacks 2 OUT jacks Connect the audio output from these jacks to the audio inputs on external mixers amplifiers or other devices 3 POWER Connect th...

Page 14: ...ALL F Indicates repeat mode REP repeat one REP ALL repeat all tracks on the SD USB REP F repeat all tracks within a folder 7 PLAY PAUSE Indicates when playback is in progress or paused 8 FOLDER This s...

Page 15: ...til it clicks 3 Use the USB SD button to select SD 4 Remove an SD card by pushing the card forward until it clicks and pushes out NOTE The SDR 3000 cannot accept cards larger than 4GB or SDHC cards In...

Page 16: ...of the SDR 3000 2 With the source signal playing increase the REC LEVEL KNOB until the REC CLIP LED starts to blink red 3 Slightly reduce the record level until the REC CLIP LED is a constant green n...

Page 17: ...next folder When the last folder is reached it will cycle back to folder 001 i e FOLDER 001 002 003 004 005 REC 001 etc Record Folder The SDR 3000 stores all recorded files in a folder called RECORD W...

Page 18: ...ound is distorted Check the incoming signal from the source device If this is a mixer check the outputs and make sure they are not too high Check the recording level see Operations section No audio ou...

Page 19: ...19 Notes...

Page 20: ...SDR 3000 Owner s Manual VocoPro 2011 v1 1207 www vocopro com...

Reviews: