background image

12

Connecting to a TV with a VCR

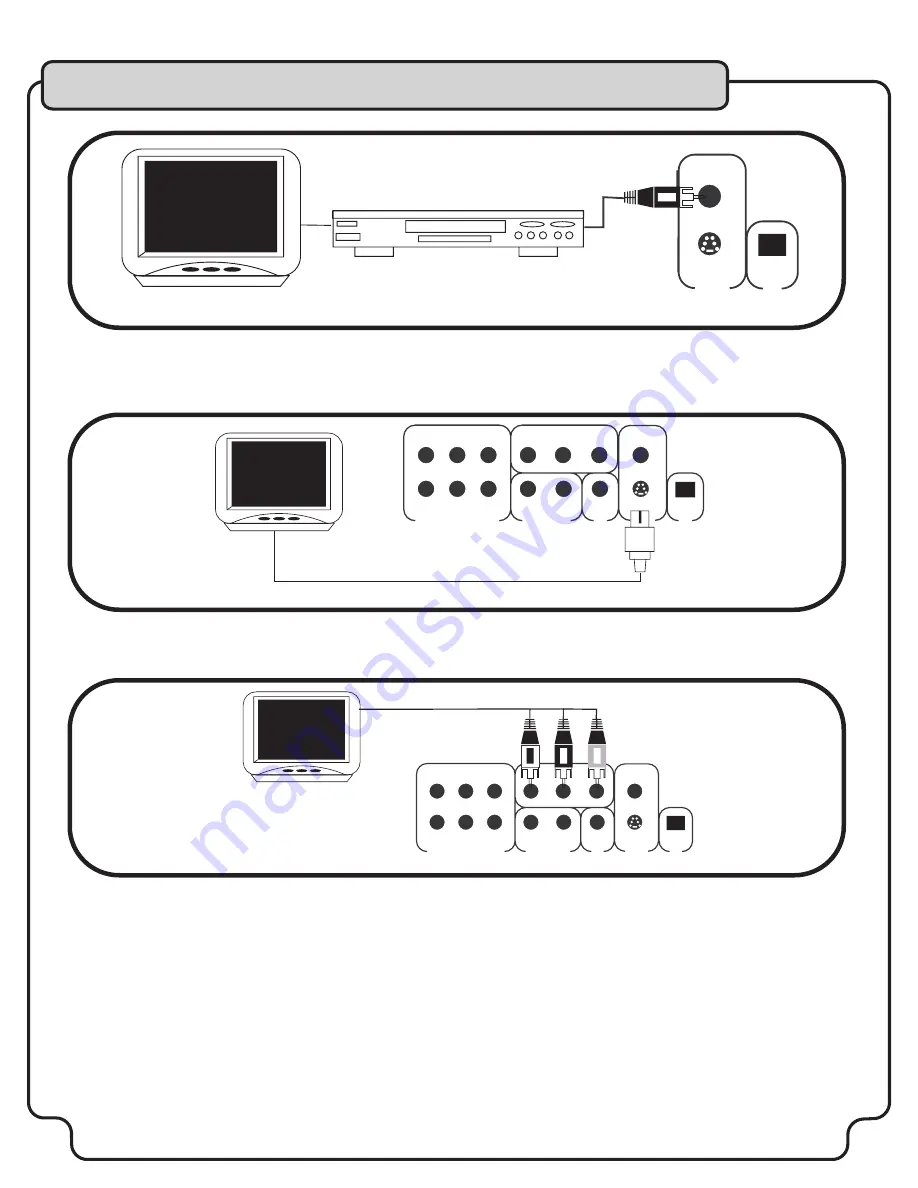
You can also use a VCR to connect video to a TV with no RCA video input. You will need an RCA cable and a 75-ohm “coaxial” type cable. 

Using the RCA video cable, connect one end to the VIDEO OUTPUT jack on the DVX-780K and connect the other end of the cable to the 

VIDEO INPUT of a VCR. Then, using the 75-ohm “coaxial” type cable, connect one end to the RF OUTPUT of the VCR, and connect the 

other end to the 75-ohm TV ANTENNA INPUT jack.  Refer to PREFRENCES, page 19, #5 for instructions on setting VIDEO OUTPUT.

Connecting to a TV with S-Video

Using an S-Video cable, connect one end to the DVX-580G’s S-VIDEO OUTPUT jack and connect the other end to the S-VIDEO IN jack on 

your television.

Refer to PREFRENCES, page 19, #5 for instructions on setting VIDEO OUTPUT.

Connecting to a TV with Component Video

Using 3 appropriate Component Video cables (usually color coded red, blue and green), connect a set of plugs to the COMPONENT 

VIDEO OUT jacks (Y Cb Cr) on the DVX-780K and plug the other set of plugs to your COMPONENT VIDEO IN jacks (Y Cb Cr) on your 

television. 

On some TV’s the component video input jacks may be labeled (Y Pb Pr). You will need to press the MODE button on the remote control 

to toggle between non-interlaced (HDTV) and interlaced (STANDARD) video output. You can only use the MODE button when there is no 

disc inserted in the disc tray.  Refer to PREFRENCES, page 19, #5 for instructions on setting VIDEO OUTPUT.

Getting Started

Connexting to a TV with a VCR

VIDEO OUT

VIDEO IN

S-VIDEO

OPTICAL

VIDEO

SL

SR

CENTER

L

R

COAXIAL

S-VIDEO

OPTICAL

SUB

Y

Cb

Cr

VIDEO

FR

FL

S-VIDEO IN

Connexting to a TV with Component Video

SL

SR

CENTER

L

R

COAXIAL

S-VIDEO

OPTICAL

SUB

Y

Cb

Cr

VIDEO

FR

FL

S-VIDEO IN

COMPONENT VIDEO

Summary of Contents for DVX-780K

Page 1: ...Digital Key Controller for changing the key of the music to t your vocal range via remote or front panel Built in Dolby Digital AC 3 and Dolby DTS decoders for cinema sound quality Full function remo...

Page 2: ...other appliances including amplifiers that produce heat 10 Power Sources The appliance should be connected to a power supply only of the type described in the operating instructions or as marked on t...

Page 3: ...eep it in a safe place for future reference 2 Install your unit in a cool dry clean place away from windows heat sources and too much vibration dust moisture or cold Avoid sources of hum transformers...

Page 4: ...1728 Curtiss Court La Verne CA 91750 Toll Free 800 678 5348 TEL 909 593 8893 FAX 909 593 8890 VocoPro Company Email Directory Customer Service General Information info vocopro com Tech Support techsup...

Page 5: ...dial and leave it there Pay attention to the different levels in various recordings Taking a minute to do this now will help to prevent hearing damage or loss in the future After all we want you liste...

Page 6: ...Dolby Pro Logic ampli er 13 Connecting to DTS receiver decoder 14 Connecting to both analog and digital audio 14 Connecting to a SCART jack for European TV 14 SETTING UP PREFERENCES General setup 15...

Page 7: ...discs Your new DVX 780K is designed with your multi purpose home entertainment in mind a player that can do it all You will see that creating DivX discs which compile volumes of your recordings and vi...

Page 8: ...sc tray status and time display a Disc type b Number of tracks or les total c Track number or le currently playing d Time display can be toggled between SINGLE track CHAPTER ELAPSED SINGLE CHAPTER REM...

Page 9: ...mpletely STOP playback While in AUTO STOP MODE playback pauses and the Vocopro splash screen appears Pressing PLAY will resume playback and exit AUTO STOP MODE 19 STEP Press this button to enter STEP...

Page 10: ...proximately 23 ft If this distance decreases it is time to replace the batteries NOTES When operating the remote control point the top of the remote control toward the player Keep the line of sight be...

Page 11: ...Follow the instructions provided with the RF modulator to connect the DVX 780K to your TV General model shown as an example Getting Started SL SR CENTER L R COAXIAL S VIDEO OPTICAL SUB Y Cb Cr VIDEO F...

Page 12: ...ting VIDEO OUTPUT Connecting to a TV with Component Video Using 3 appropriate Component Video cables usually color coded red blue and green connect a set of plugs to the COMPONENT VIDEO OUT jacks Y Cb...

Page 13: ...interference If your Dolby Digital Receiver does not have a built in AC 3 decoder and has 5 1 channel RCA inputs you can use the 5 1 channel output jacks on the DVX 580G Either method will provide for...

Page 14: ...l output jacks on the DVX 580G Either method will provide for DTS decoding Refer to PREFRENCES page 19 5 for instructions on setting VIDEO OUTPUT Connecting both Analog and Digital Audio To do this yo...

Page 15: ...atch the program from different angles See Advanced operations section for more information on this ANGLE MARK is only applicable to discs which offer changing viewing angle 4 Setting OSD LANGUAGE Thi...

Page 16: ...center speaker 3 REAR ON LS Left surround and RS right surround channels active OFF Standard stereo 4 SUBWOOFER Switch on for subwoofer speaker output 5 CENTER DELAY Center signal output can delay for...

Page 17: ...PCM When using stereo ampli er to play Dolby digital discs select this mode 3 LPCM OUTPUT Choose between 48KHz or 96KHz With Karaoke discs CD Gs it is suggested that you use 48KHz With 96KHz output ma...

Page 18: ...To use this feature DOWNMIX must be OFF 6 DIVX R REGISTRATION Go here to nd registration code for www divx com Video On Demand services Your registration code is 9vvokl Please USE this code to registe...

Page 19: ...OUTPUT PASSWORD DEFAULTS SETUP MP3 MAIN PAGE SET TV STANDARD PREFERENCE PAGE TV TYPE ENGLISH AUDIO FRENCH SPANISH CHINESE JAPANESE GERMAN INDONISIA RUSSIAN SUBTITLE DISC MENU PARENTAL VIDEO OUTPUT PAS...

Page 20: ...led in standby mode any subsequent operation will cancel it and get you back to a menu Discs will continue to spin while the MENU screen is displayed When you are nished using the unit turn the power...

Page 21: ...the desired track number using the number pad on the remote control and then ENTER SETUP RETURN ENTER Displaying subtitles and choosing language Press the SUBTITLE button Each time the SUBTITLE button...

Page 22: ...o cancel REPEAT mode Press the PLAY button or cycle through the REPEAT options until REPEAT OFF is initiated Programmed Playback Press PROGRAM in stop mode You can select up to 99 tracks to program Th...

Page 23: ...itself a false album or track which cannot by played on the unit may be displayed on a TV screen Notes on creating MP3 discs When converting audio data to MP3 create MP3 les with a sampling frequency...

Page 24: ...PEAT mode Repeats all les within a selected folder until operation is stopped 5 DISC SCAN mode Plays the rst 10 seconds of all les on the disc Use the direction keys to select the MP3 le you want to s...

Page 25: ...At the bottom of the screen select OUTPUT PATH to your new folder as the destination 4 Select all tracks and click on CONVERT 5 Select EXTRACT TO BIN 6 Set default in QUICK OPTION to STEREO Do not cl...

Page 26: ...75 NTSC 0 3 Vp p 75 PAL 1 Mini Din 4 pin YUV Video Output Y 1 0 V rms z 75 ohms Unbalanced Cr 0 7 Vp p 75 Unbalanced Cb 0 7 Vp p 75 Unbalanced 3 RCA Jacks Audio System MPEG 1 2 Linear PCM Audio Dolby...

Page 27: ...www vocopro com...

Reviews: