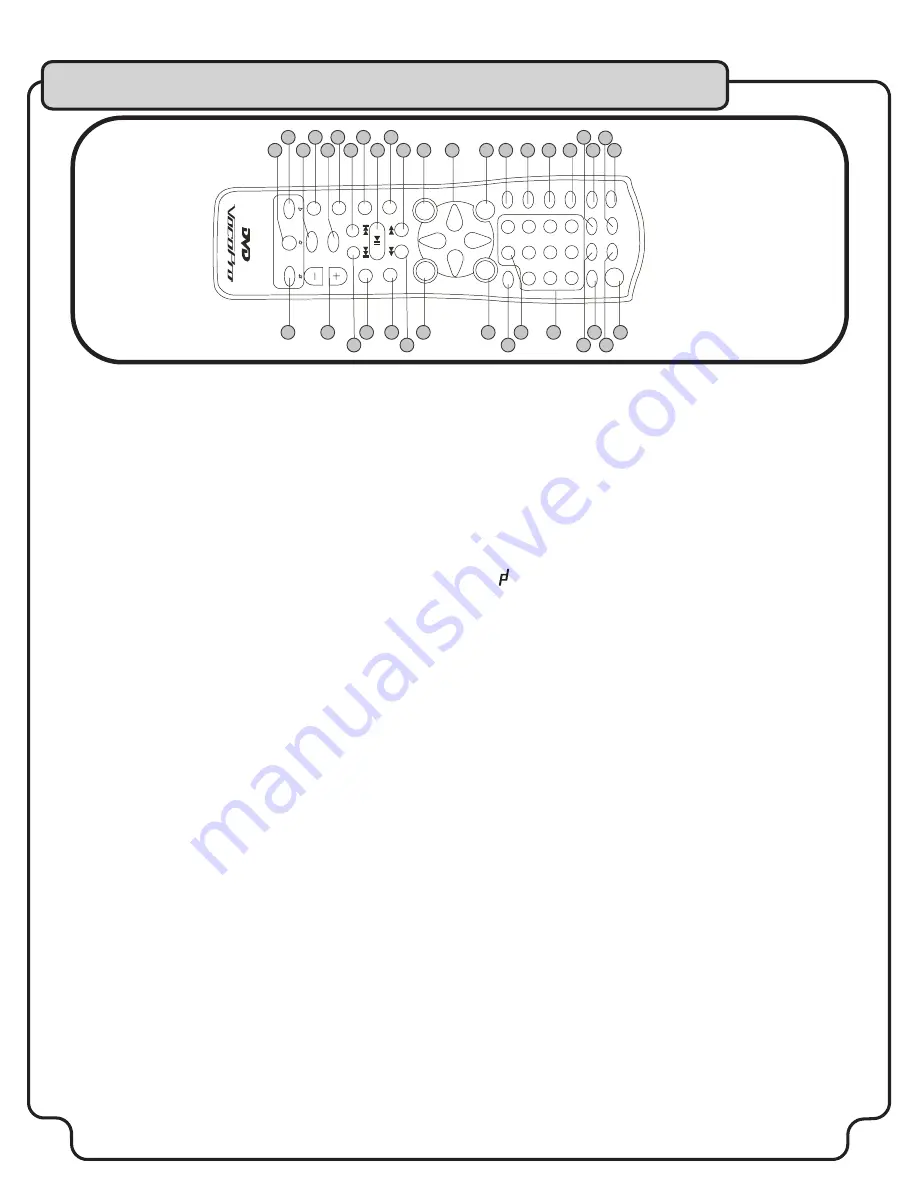
background image

9

Remote Control

1  

OPEN/CLOSE

 button - Press to OPEN and CLOSE the disc tray.

2. 

PROGRAM

 button - Press to access the PROGRAM selection 

window.
3. 

DISPLAY

 button - To access OSD playback displays menu. The 

different OSD display modes available depend on the type of disc being 

played. 
4. 

L/R

 - Will allow you to select between five playback modes for CDGs 

and VCDs: LEFT VOCAL, RIGHT VOCAL, MONO LEFT (for Vocal Cancel), 

MONO RIGHT and STEREO mode. In STEREO mode, audio playback is 

standard L/R audio.  In MONO LEFT mode the right, guide vocal chan-

nel is removed, and replaced with a duplicate, insturmental left chan-

nel. In MONO R mode, the left channel is removed, and replaced with a 

duplicate right channel of all vocals.   
5. 

N/P

 - Press to toggle between NTSC and PAL video settings. Select 

NTSC for North American base video systems and PAL for European 

based video systems.
6.  

SUBTITLE

 - Press to access the SUBTITLE selection window.

7.  

ANGLE

 - For use only with multi angle coded discs, for example 

some recorded performances such a sports events, concerts or theatri-

cal programs.  Pressing the button will select various angles of view. 
8.  

RESUME

 - Returns you to track listing menu from any SETUP 

subdirectory. 
9.  

SETUP

 - Press to access the main setup MENU.

10.  

DIRECTION

 keys - Use these buttons to navigate through the 

various menu selections 
11.  

ZOOM

 - Increases the size of the lyrics display during TRACK 

playback, or the SCENE view on DVD. 
12.  

REVERSE

 - Rewinds through current TRACK, or SCENE.  Each 

time button is pressed, speed will increase; for example, 2X, 4X, 6X,

8X.
13.  

REPEAT 

- Press once to access the REPEAT selection window, 

press twice to select TRACK REPEAT mode and press a third time to 

select DISC REPEAT mode.  
14. 

 PLAY / PAUSE

 button - Press to initiate disc PLAYBACK or 

PAUSE disc playback.
15.  

A-B button

 - This feature creates a segment of a TRACK/

SCENE to  “loop” or repeat. Press once to set the A-MARKER where the 

loop will begin. Press a second time to set the B-MARKER where the 

loop will end. The loop will start immediately after you set the B-MARK-

ER. Press a third   time to CANCEL the A-B loop and resume normal 

play.
16.  

PREVIOUS

 -  Returns to the PREVIOUS track, scene or file. 

17.  

SLOW

 - Press to execute a SLOW motion playback of a DVD or 

Video CD.

18.  

STOP

 button - Press this button once to PAUSE playback and 

enter AUTO STOP MODE. Press twice to completely STOP playback. 

While in AUTO STOP MODE, playback pauses and the Vocopro splash 

screen appears. Pressing PLAY will resume playback and exit AUTO 

STOP MODE.
19.  

STEP

 - Press this button to enter STEP mode playback. In STEP 

mode, playback is paused and the track/scene advances only a single 

each time STEP is pressed.  To exit STEP mode, hit the ENTER/PLAY 

button.
20.  

MUTE

 button - Press to SILENCE audio playback. Video playback 

is not affected while using the menu feature.
21.  

b (FLAT)

 Key Control button - Will LOWER key of music output 

a ½ step.
22.  

   (NATURAL)

 Key Control button - Will return music output to 

its original, or NATURAL key.
23.  

POWER

 button - Press to turn machine ON/OFF.

24.  

CLEAR 

- Cancels PROGRAM function. 

25.  

V-MODE

 -  To select video signal output selections for S-VIDEO,              

INTERLACED TV, COAXIAL or Y,CB,CR. 
26.  

AUDIO

 - For use with DVD only to select languages or switch to 

5.1 channel output.
27.  

NUMBER

 pad - Press to select a track or file for direct play-

back. 
28.  

VIEW

 - When using VCDs, this button will give you 4 options: IN-

TRO, DISC, TRACK and EXIT.  The 3 menus will show up to 9 TRACKS 

or sections to view.  
29.  

TIME

 - Press this button to view the CURRENT DISC/TRACK 

POSITION and/or to manually input a TIME MARKER to start playback 

from.  
30.  

RETURN 

- For use with VCDs, this button will return to previ-

ous menu or page
31.  

ENTER

 - To make menu selections, play selected tracks

32.  

FORWARD

 - Advances through current TRACK or SCENE. 

Each time button is pressed, speed will increase.  It is also possible to 

advance to the next TRACK if button is pressed several times. 
33. 

 TITLE

 - Press to access the TITLE MENU of a DVD, VCD or 

media disc. Press again to return back to disc playback. If the TITLE 

MENU button is pressed during disc playback,  playback is paused. 

Upon exiting the TITLE MENU, playback is resumed.   
34.  

MENU

 - Press to access a DIGEST or TITLE WINDOW of a 

DVD, VCD or media disc. Press again to return back to disc play-

back. If the MENU button is pressed during disc playback, playback is 

paused.  Upon exiting the MENU window, playback is resumed. 
35.  

NEXT 

- Advances to the NEXT track, scene or file.

36.  

VOLUME -/+ 

keys - Press this button to RAISE or LOWER the 

master music VOLUME.
37.  

# (SHARP)

 Key Control button - Will RAISE key of music output 

a ½ step.

E

J

E

C

T
P

R

O

G

C

L

E

A

R

P

O

W

E

R

D

IS

P

L

A

Y

L

IR

A

U

D

IO

V-

M

O

D

E

N

IP

S

U

B

T

IT

LE

A

N

G

LE

R

E

S

U

M

E

1

2

3

4

5

6

9

8

7

0

V

IE

W

T

IM

E

SETU

P

RET

URN

ZOO

M

ENT

ER

R

E

P

E

AT

T

IT

LE

A

-B

M

E

N

U

S

LO

W

V

O

L

S

TO

P

S

T

E

P

M

U

T

E

D

ig

lta

l K

e

C

o

n

tr

o

l

1

2

3

4

5

6

7

8

9

10

11

13

23

12

14

15

16

17

18

19

20

21

22

24

25

26

27

29

28

30

31

32

33

34

35

36

37

Summary of Contents for DVX-780K

Page 1: ...Digital Key Controller for changing the key of the music to t your vocal range via remote or front panel Built in Dolby Digital AC 3 and Dolby DTS decoders for cinema sound quality Full function remo...

Page 2: ...other appliances including amplifiers that produce heat 10 Power Sources The appliance should be connected to a power supply only of the type described in the operating instructions or as marked on t...

Page 3: ...eep it in a safe place for future reference 2 Install your unit in a cool dry clean place away from windows heat sources and too much vibration dust moisture or cold Avoid sources of hum transformers...

Page 4: ...1728 Curtiss Court La Verne CA 91750 Toll Free 800 678 5348 TEL 909 593 8893 FAX 909 593 8890 VocoPro Company Email Directory Customer Service General Information info vocopro com Tech Support techsup...

Page 5: ...dial and leave it there Pay attention to the different levels in various recordings Taking a minute to do this now will help to prevent hearing damage or loss in the future After all we want you liste...

Page 6: ...Dolby Pro Logic ampli er 13 Connecting to DTS receiver decoder 14 Connecting to both analog and digital audio 14 Connecting to a SCART jack for European TV 14 SETTING UP PREFERENCES General setup 15...

Page 7: ...discs Your new DVX 780K is designed with your multi purpose home entertainment in mind a player that can do it all You will see that creating DivX discs which compile volumes of your recordings and vi...

Page 8: ...sc tray status and time display a Disc type b Number of tracks or les total c Track number or le currently playing d Time display can be toggled between SINGLE track CHAPTER ELAPSED SINGLE CHAPTER REM...

Page 9: ...mpletely STOP playback While in AUTO STOP MODE playback pauses and the Vocopro splash screen appears Pressing PLAY will resume playback and exit AUTO STOP MODE 19 STEP Press this button to enter STEP...

Page 10: ...proximately 23 ft If this distance decreases it is time to replace the batteries NOTES When operating the remote control point the top of the remote control toward the player Keep the line of sight be...

Page 11: ...Follow the instructions provided with the RF modulator to connect the DVX 780K to your TV General model shown as an example Getting Started SL SR CENTER L R COAXIAL S VIDEO OPTICAL SUB Y Cb Cr VIDEO F...

Page 12: ...ting VIDEO OUTPUT Connecting to a TV with Component Video Using 3 appropriate Component Video cables usually color coded red blue and green connect a set of plugs to the COMPONENT VIDEO OUT jacks Y Cb...

Page 13: ...interference If your Dolby Digital Receiver does not have a built in AC 3 decoder and has 5 1 channel RCA inputs you can use the 5 1 channel output jacks on the DVX 580G Either method will provide for...

Page 14: ...l output jacks on the DVX 580G Either method will provide for DTS decoding Refer to PREFRENCES page 19 5 for instructions on setting VIDEO OUTPUT Connecting both Analog and Digital Audio To do this yo...

Page 15: ...atch the program from different angles See Advanced operations section for more information on this ANGLE MARK is only applicable to discs which offer changing viewing angle 4 Setting OSD LANGUAGE Thi...

Page 16: ...center speaker 3 REAR ON LS Left surround and RS right surround channels active OFF Standard stereo 4 SUBWOOFER Switch on for subwoofer speaker output 5 CENTER DELAY Center signal output can delay for...

Page 17: ...PCM When using stereo ampli er to play Dolby digital discs select this mode 3 LPCM OUTPUT Choose between 48KHz or 96KHz With Karaoke discs CD Gs it is suggested that you use 48KHz With 96KHz output ma...

Page 18: ...To use this feature DOWNMIX must be OFF 6 DIVX R REGISTRATION Go here to nd registration code for www divx com Video On Demand services Your registration code is 9vvokl Please USE this code to registe...

Page 19: ...OUTPUT PASSWORD DEFAULTS SETUP MP3 MAIN PAGE SET TV STANDARD PREFERENCE PAGE TV TYPE ENGLISH AUDIO FRENCH SPANISH CHINESE JAPANESE GERMAN INDONISIA RUSSIAN SUBTITLE DISC MENU PARENTAL VIDEO OUTPUT PAS...

Page 20: ...led in standby mode any subsequent operation will cancel it and get you back to a menu Discs will continue to spin while the MENU screen is displayed When you are nished using the unit turn the power...

Page 21: ...the desired track number using the number pad on the remote control and then ENTER SETUP RETURN ENTER Displaying subtitles and choosing language Press the SUBTITLE button Each time the SUBTITLE button...

Page 22: ...o cancel REPEAT mode Press the PLAY button or cycle through the REPEAT options until REPEAT OFF is initiated Programmed Playback Press PROGRAM in stop mode You can select up to 99 tracks to program Th...

Page 23: ...itself a false album or track which cannot by played on the unit may be displayed on a TV screen Notes on creating MP3 discs When converting audio data to MP3 create MP3 les with a sampling frequency...

Page 24: ...PEAT mode Repeats all les within a selected folder until operation is stopped 5 DISC SCAN mode Plays the rst 10 seconds of all les on the disc Use the direction keys to select the MP3 le you want to s...

Page 25: ...At the bottom of the screen select OUTPUT PATH to your new folder as the destination 4 Select all tracks and click on CONVERT 5 Select EXTRACT TO BIN 6 Set default in QUICK OPTION to STEREO Do not cl...

Page 26: ...75 NTSC 0 3 Vp p 75 PAL 1 Mini Din 4 pin YUV Video Output Y 1 0 V rms z 75 ohms Unbalanced Cr 0 7 Vp p 75 Unbalanced Cb 0 7 Vp p 75 Unbalanced 3 RCA Jacks Audio System MPEG 1 2 Linear PCM Audio Dolby...

Page 27: ...www vocopro com...

Reviews: