VNS G-202 Operation Manual Download Page 8

G-202 User Manual V 1.03                                                                                                      Document: G-202102 

------------------------------------------------------------------------------------------------------------------------------------------------ 


8.3  Procedures for 3D Display Setting in GeoBox 


If still can’t verify “R” & “L” characters in both eyes, please check below again: 

1.  Is the screen for 3D display? 

2.  Are the Glasses and polarizer filters the same types and paired for the RH & LH eyes? 

3.  G-202 for RH eye should connect to RH eye projector and LH G-202 should connect to LH eye projector. 

Please check from [Output Format] menu and make sure to have correct settings. If the connection is 

incorrect, please use [Output Frame] setting to change the connection for RH/LH eyes. Don’t change the 

connection cables. Otherwise geometry settings should be re-aligned again. 

4.  Is the Blue Ray player set to [Auto 3D] or [1080p @24Hz] mode to deliver 3D signal out? 

5.  If Side by Side or Top-Bottom 3D formats are used, please check the aspect ratio in video source output 

to make sure G-202 will receive full screen image. 

6.  Is there any DVI/HDMI or signal source compatibility issue and only one projector shows image? 

7.  Are the DVI/HDMI cables qualified and the length not too long? 

8.  If video distributor is used, please make sure it can support HDMI 1.4 3D signals. 


9.  [Anyplace]: Warp and Geometry Correction of the Image 

Each function in OSD menu may not be functional simultaneously. [4 Corner] adjustment can replace 

[Keystone] function. When [Warp] Menu is activated, [4 Corner] function will be disabled. In curved display 

application, please use [Shift] menu under [Warp] to adjust 4 corner positions. 

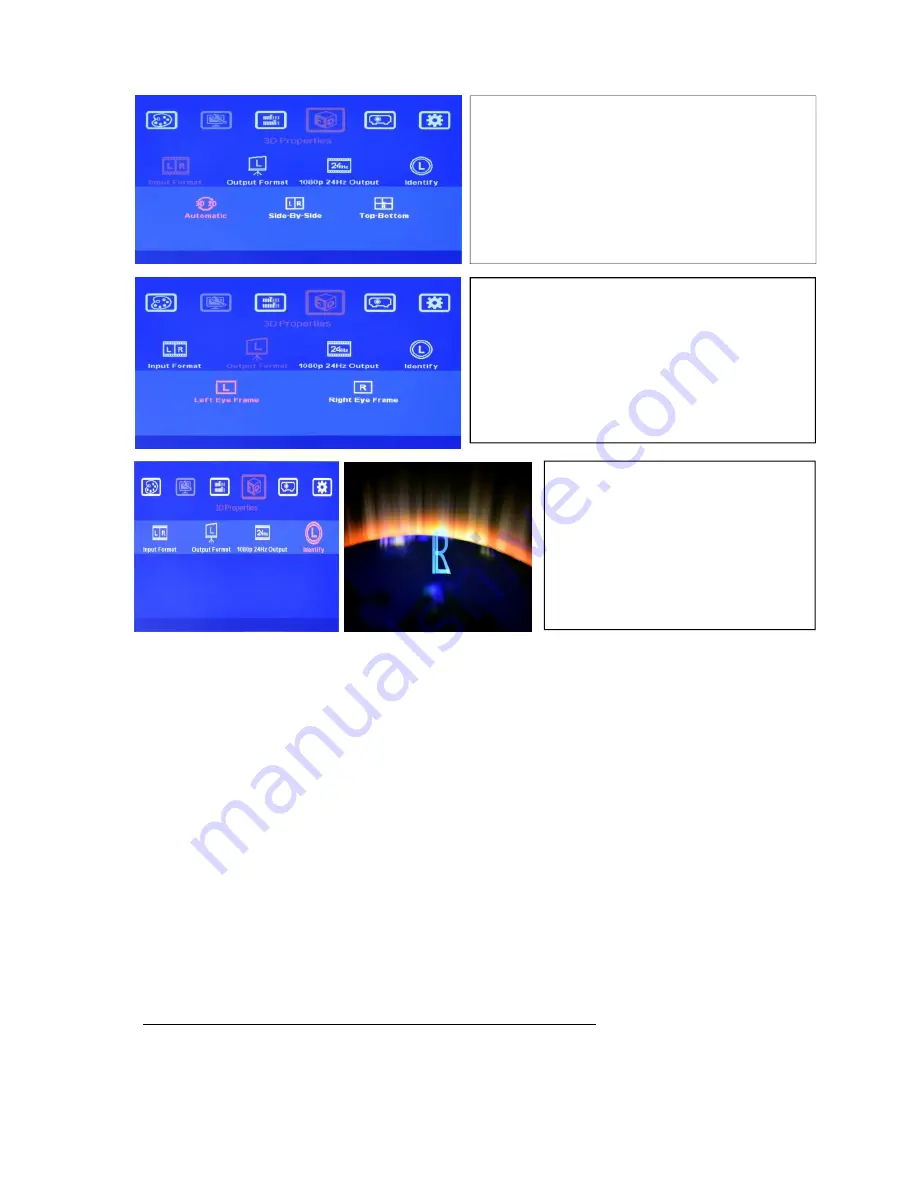
1. After image alignment, to activate [3D Properties] 

menu and select [Input Format]. 

2. Select [Automatic] if the 3D signal is standard 3D 

formats from Blue Ray player or sources with 3D 

index inside the signal. 

3. Select [Side By Side] or [Top-Bottom] based on 

user’s 3D input source. 

4. Line Interleave 3D will be auto detected. 

1.  Activate [Identify] menu to show “R & 

L” characters on the screen 

simultaneously to verify the final 3D 

settings in the system.   

2.  RH eye should see only “R” and LH 

eye should see only “L”. 

1. To activate [Output Format] and set RH eye 

AF5D-20 with [Right Eye Frame] and LH eye 

AF5D-20 with [Left Eye Frame] output format. 

2. If the input is 1080p 24Hz and the projectors can 

support this signal, please select [Enable] in 

[1080p 24Hz Output] menu in both RH/LH 

AF5D-20 to get the best 3D performance 

3.  

Summary of Contents for G-202

Page 1: ...r Manual V 1 03 Document G 202102 1 G 202 Operation Manual Single channel warping box with edge blending Technical support E mail support vnstw com Tel 886 2 8751 2785 ext 301 Cell 886 935 678 033 Ver...

Page 2: ...9 2 Image Rotation 9 9 3 4 Corner Adjustment 9 9 4 Image Edge Blending 10 9 5 Image Curved Display 11 9 5 1 Corner Curve Adjustment 11 9 5 2 Edge Curve Adjustment 12 9 5 3 Center Curve Adjustment 12...

Page 3: ...or consequential damages expenses or loss of revenue inconvenience or interruption in operation experienced by the customer Warranty service shall not automatically extend the warranty period FCC CE s...

Page 4: ...I D output port to support DVI and HDMI with audio output 8 Decode 3D signal into RH or LH for passive 3D display required 2 units of G 202 9 User friendly OSD and IR remote control No PC software is...

Page 5: ...menu is not activated Once the OSD menu is activated these keys will be served as OSD functional keys 3 8 In order to avoid interference among multiple GeoBox during the installation user can use OSD...

Page 6: ...ode function under Image Properties Menu is not activated It can adjust brightness contrast color hue saturation and sharpness of the image 6 Image Setup for PC graphics from VGA input Image Setup men...

Page 7: ...see the scene for right eye and the left eye can only see the scene for left eye A 3D screen is also required to preserve the polarization of the image for 3D display It is possible to use optic spec...

Page 8: ...d and the length not too long 8 If video distributor is used please make sure it can support HDMI 1 4 3D signals 9 Anyplace Warp and Geometry Correction of the Image Each function in OSD menu may not...

Page 9: ...d screen User can activate Rotation under Anyplace 9 3 4 Corner Adjustment 4 Corner can adjust each corner position independently and is necessary for the alignment in multiple projector applications...

Page 10: ...nt press OK select next corner press OK then Grid pattern will appear again automatically and then start further adjustment Before 4 Corner adjustment After 4 Corner adjustment 9 4 Image Edge Blend 9...

Page 11: ...ack level difference between Transition area and Non transition area Eliminate the banding effect via Shift blending position Fine tune color from projectors or AG 202 if necessary 9 4 7 Application c...

Page 12: ...Edge Right Edge Top Edge Bottom Edge and Reset Example Curve adjustment in all Corners Example After applying 4 Edges curve adjustment User can adjust the curve in each edge of the image independently...

Page 13: ...and 200 pixels in vertical position if the output resolution is under 1400x1050 In full HD output resolution the adjusting range is H 200 V 150 pixels Shift function is to adjust the corners of the i...

Page 14: ...Mask will affect 3D display in Side by Side or Top Bottom 3D input Format Please don t apply Edge Mask in 3D display 10 OSD Miscellaneous Functions Options 10 1 System Information Information Order fu...

Page 15: ...ry time OSD key is pressed Default OSD will respond slowly at the beginning but will increase the speed of the response when OSD key is pressed continuously In Information menu it will show the inform...

Page 16: ...me Out 10 5 Setting 10 5 1 Audio Mute OSD Button Repeat Rate It controls the speed of the response of the OSD button while user presses OSD button continuously OSD Menu Time Out OSD menu will disappea...

Page 17: ...Audio Mute Mute Off will enable audio output Mute On will disable audio output Mute hot key in remote controller is available Box ID is the identification No of each GeoBox GeoBox ID No is from 1 99...

Page 18: ...ough DVI Loop Back port with native raw signal without processing by G 202 and the other projector should be connected to G 202 output port 11 4 To do geometry adjustment in the first projector to let...

Page 19: ...d pattern Yes Image Rotation Image rotation to _128 degrees under 1400x1050 output resolution Yes Edge Mask Image edges masked with black background up to 250 pixels Yes Edge Blending Matrox VGA card...

Page 20: ...ler Yes Cabled IR Receiver Extender up to 20 meters Option Box ID for easy independent control through IR RS 232 or Ethernet Yes Embedded RS 232 with DB 9 connector Yes ASCII control protocol over RS...

Page 21: ...Document G 202102 21 13 Revision History Revision Date Originator Comments V 1 01 2012 12 20 Steve Wang First revision V 1 02 2013 03 08 Steve Wang Add case study V1 03 2013 05 10 Steve Wang Support r...

Reviews: