1
2
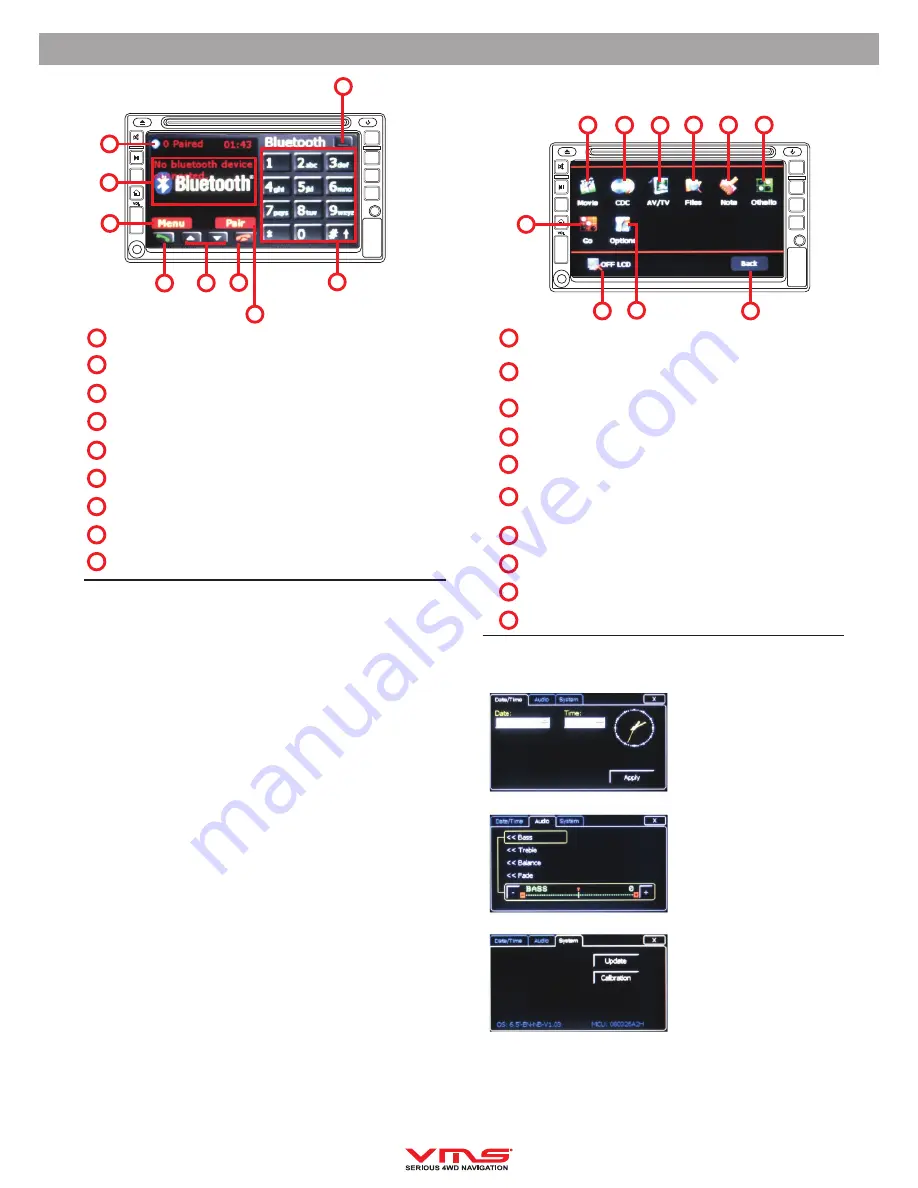
ANSWER / DIAL
- Answer or dial a call
SCROLL UP / DOWN
- Scroll up or down
REJECT / CANCEL
- Reject or cancel a call
PAIR
- set bluetooth into Pairing mode
KEYPAD
MINIMISE
- Minimise bluetooth
# DEVICES
- Number of devices paired to this unit
INFO DISPLAY
- Displays phone information
MAIN MENU
- bluetooth menu
3
4
5
6
Paring Your Phone
To use the bluetooth handsfree function, you must first pair your
Bluetooth compatible phone to the unit.
1. Turn on Bluetooth on your phone.
2. Select
PAIR
in the Bluetooth Menu.
3. On you phone, select “Search for New Devices”.
4. Once the phone has found “A2265” select it.
5. You will be promoted to enter the password, input “1234”
6. Follow the instructions on the phone.
6. Once connected, you will see your phone’s ID in the INFO
DISPLAY
You may pair up to 6 phones with the A.V.N.C. To pair another phone, follow the above steps.
Switching between Different Phones Paired
1. Select
MENU
>
Bluetooth
>
Device list
4. Select the phone you wish to connect
5. Select
Options
>
Connect
Once connected, this phone will be automatically paired from now on.
Sending Your Contact List
Most phones allow its contact list to be exported. Please refer to your
phone’s user manual for further details.
1. Select Menu > Bluetooth > Receive vCard
2. Send your contacts from your phone.
Answering a Call
When an incoming call is received, the Bluetooth menu takes priority
over all other functions.
1. When the Bluetooth screen appears, press the
ANSWER
button.
Dialing a Call
You may manually dial the number then press the
DIAL
button,
OR
you may pick a contact in your contact list by selecting
MENU
>
CONTACTS
. Once the contact is selected, press the
DIAL
button.
Rejecting a Call
To reject a call, press the
REJECT
BUTTON.
System Menu
A.V.N.C quick user manual
12
Bluetooth Phone
PUSH ENT
PEN
FM-AM
DVD
NAVI
AV
VOL
+
-
3
5
1
2
6
7
8
9
4
7
8
9
PASSWORD
1234
PUSH ENT
PEN
FM-AM
DVD
NAVI
AV
VOL
+
-
9
8
7
6
5
4
1
2
10
3
1
2
3
4
5
6
7
TURN OFF LCD
- Turns off the screen (NIGHT MODE)
SYSTEM OPTIONS
- System options such as Time & Audio
Adjustments
BACK
- Back to System Menu
OTHELLO
- Starts Othello the game
NOTEPAD -
Starts Notepad
FILE BROWSER
- Browse the file on the SD card or USB
memory
AV
- Starts the AV channel
CDC
- Starts the CDC channel
MOVIE PLAYER
- Playback of MP4 movies
GO
- Starts Go the game
8
9
10
SYSTEM TIME
System Time can be adjusted in
the system menu. Please Note
that this time is synchronised to
the GPS.
AUDIO SETTINGS
Audio settings such as Bass,
Treble, Balance & Fade can be
adjusted by pressing the +/-
buttons on the touchscreen.
SYSTEM OPERATION MENU
UPDATE
- Allows system
firmware to be updated
CALIBRATION
- Calibrates the
touchscreen
System Options


