background image

v11.03-  Depósito  legal  y  Copyright  2011. Todos  los  derechos  reservados.

PRO LIFTS S.L.

5.  MAINTENANCE.

5.1 –

  Periodically check the condition of the

cable. If a cable is torn or broken it should be
replaced immediately. Do not use the lift if the
cable is not perfect. Only use torsion resistant
steel cable DIN 3060.

5.2 –

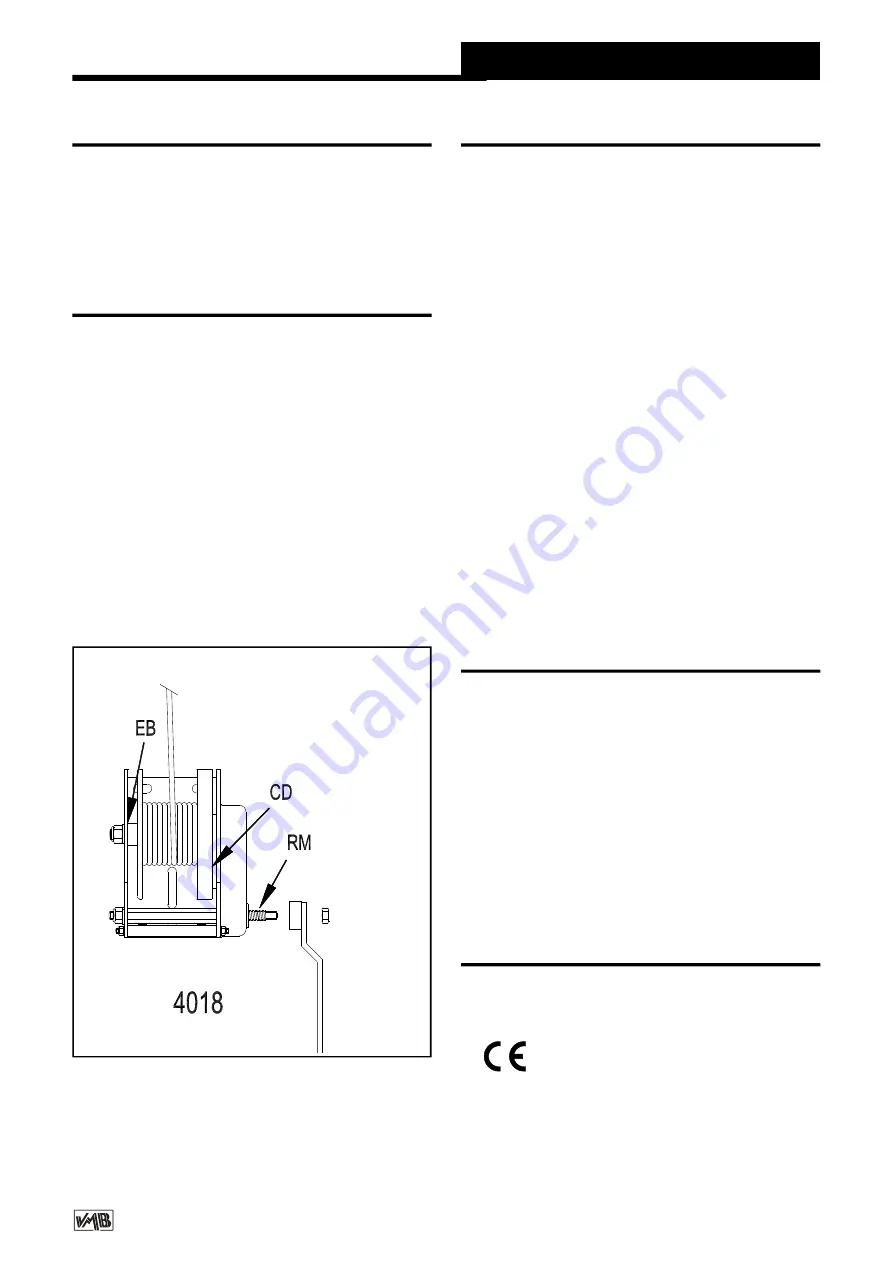
  The lift is supplied completely greased

from  the  factory.  Never  the  less,  we
recommend you periodically grease (depending
on amount used) the teeth of the winch (

CD

),

end point of the handle (

RM

), bar (

EB

) (Fig. 

8

)

and the profile nylon drums.

ATTENTION:  Do not grease or lubricate the
break mechanism.

The  brake  discs  have  been  greased  with  a
special heat and pressure resistant grease. Do
not use other products.

Quick  Operation  Guide

ENGLISH

7.  CERTIFICATIONS

-

EC Machinery Directive

89/392/ECC and 98/37/ECC

- BGV C1 (GUV-VC1) / BGG 912 (GUV-G912)

6.  GUARANTEE.

The warranty period for this lift is 3 years from
the date of purchase.
PRO LIFTS S.L. promises, that from the date of
purchase  and  during  the  warranty  period  to
resolve  any  faults  that  may  occur  produced
through defect material or fabrication.
Damage  caused  by  inproper  use,  product
modification, terciary manipulation or acciden-
tal fire are not covered by this warranty.

5.3 – 

 All lifts should undergo an annual technical

inspection carried out by an authorized VMB
dealer to check the certifications and general
condition of all the lift’s elements and security
systems involved in the lift’s use.

5.4 –

 Only use original spare parts to guarantee

a continued security level.
The user loses all rights to warranty if any spare
parts other than originals are used or carries
out any modification or alteration to the towerlift.

5.5 –

 To request a spare part please indicate

the corresponding code which can be found in
this manual.

VMB Tecnical Assistance

      [email protected]

Place the bars in their transport compartment.
Remove the outriggers, releasing the locks and
place in their transport position (

S

). Turn and

tighten the fixing screws (

J

). The lift  can be

transported horizontally by adding the 

RH-4 kit

.

Figura 8

Summary of Contents for TL-A450

Page 1: ...TL A450 E ELEVADOR LINE ARRAY MANUALDEINSTRUCCIONES LINE ARRAY LIFT INSTRUCTIONMANUAL QuickOperationGuide GB V 11 03 D TRAVERSENLIFT BEDIENUNGSANLEITUNG...

Page 2: ...rio y cat logo anexo de piezas de repuesto es propiedad de PRO LIFTS S L Queda prohibida su reproduccion total o parcial por cualquier medio que la tecnolog a actual permita Dep sito legal y Copyright...

Page 3: ...v11 03 Dep sito legal y Copyright 2011 Todos los derechos reservados PRO LIFTS S L...

Page 4: ...v11 03 Dep sito legal y Copyright 2011 Todos los derechos reservados PRO LIFTS S L...

Page 5: ...nd which guarantee the load will not fall and provide com plete security ATTENTION Do not use this towerlift if you have not read and understood the instructions 2 TECHNICAL IINFORMATION 2 1 Towerlift...

Page 6: ...o adjust vertical positioning 2 16 All lift elements are finished in polyester satin black 2 17 360 Wheels for ease of transport to work place 3 SAFETY PRECAUTIONS 3 1 The TL A450 isdesigned for lifin...

Page 7: ...Array before checking it is correctly attached to the lift Kgs 3 6 If there is excessive wind place the lift on firm ground and attach slings to add stability Never attach a sling to a vehicle or any...

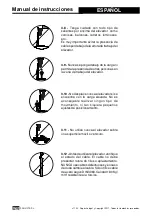
Page 8: ...3 9 Never stand below the raised mate rial and do not allow others to stand beneath or around the working area of the lift 3 12 Before using the lift check the condition of the cable The cable should...

Page 9: ...mechanism in the winch The break discs have been especially greased with a special anti heat pressure material Other products must not be used so as to avoid the break not working effectively 3 14 The...

Page 10: ...stabilisers Q turning the handels so that the spirit level is centred F 4 4 Let go of transport security B remove the forks and place them horizontally Place the lifting carriage at the required heigh...

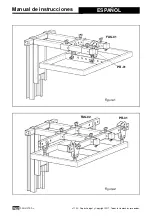
Page 11: ...v11 03 Dep sito legal y Copyright 2011 Todos los derechos reservados PRO LIFTS S L Quick Operation Guide ENGLISH Fig 2 Fig 1 FAS 01 FAS 02 PR 01 PR 01...

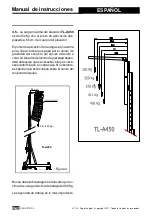
Page 12: ...03 Dep sito legal y Copyright 2011 Todos los derechos reservados PRO LIFTS S L Quick Operation Guide ENGLISH Fig 3 TL A450 TL A450 B A FAS 01 BC 075L FAS 02 MR PAS MO 30 GS 500 PAT 01 PR 01 MR SPI PAS...

Page 13: ...The loading point capacity can be found on the vertical line which marks the centre of gravity of the Line Array wich is to be flow The situation of the centre of gravity depends upon the chosen Line...

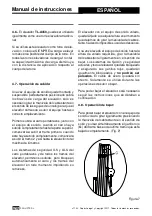
Page 14: ...to first turn the winch handle slightly clockwise and at the same time push the red ALS lock in G Fig 7 This releases the blocking systems Then turn the handle anti clockwise whilst maintaining theAL...

Page 15: ...LIFTS S L promises that from the date of purchase and during the warranty period to resolve any faults that may occur produced through defect material or fabrication Damage caused by inproper use prod...

Page 16: ...o para po der angular los recintos ac sticos los gra dos precisos para lograr una perfecta co bertura de sonorizaci n 2 DATOS TECNICOS 2 1 Torre elevadora modelo TL A450 2 2 Dise ada especialmente par...

Page 17: ...Platillos estabilizadores ajustables en las patas con apoyos antideslizantes de caucho inyectado 2 14 Fijaci n de las patas con gatillos de seguridad 2 15 Nivel de burbuja para ajustar la posici n ver...

Page 18: ...oyada y centrada en los soportes elevadores adecuados de forma que el peso de la carga s lo act e en sentido vertical 3 3 Comprobar que las patas est n correctamente montadas y sujetas por sus pasador...

Page 19: ...a se ponga debajo de la carga ni permita la presencia de otras personas en la zona de trabajo del elevador 3 8 Tenga cuidado con todo tipo de salientes por encima del elevador como cornisas balcones l...

Page 20: ...al resistente al calor y la presi n No deben ser utilizados otros productos para evitar influir negativamente en el funcionamiento del freno 3 14 La carga m nima para el funciona mientodel frenodelcab...

Page 21: ...justo bajo los brazos de carga Sobre los brazos de carga se colocar n los soportes FAS 01 en el caso de volar un equipo con fijaci n central por uno o dos puntos de vuelo fig 1 En el caso de que el so...

Page 22: ...v11 03 Dep sito legal y Copyright 2011 Todos los derechos reservados PRO LIFTS S L Manual de instrucciones ESPA OL Figura 2 Figura 1 FAS 01 FAS 02 PR 01 PR 01...

Page 23: ...Dep sito legal y Copyright 2011 Todos los derechos reservados PRO LIFTS S L Manual de instrucciones ESPA OL Figura 3 TL A450 TL A450 B A FAS 01 BC 075L FAS 02 MR PAS MO 30 GS 500 PAT 01 PR 01 MR SPI P...

Page 24: ...a se encuentra en la l nea vertical que pasa por el centro de gravedad del conjunto del equipo de audio a volar Lasituaci ndelcentrodegravedaddepen der del equipo quese necesite volar y es nece sario...

Page 25: ...o bajar Para poder bajar el elevador ser necesario seguir las instrucciones que se detallan a continuaci n Manual de instrucciones ESPA OL 4 7 Operaci n de subida Una vez el equipo de sonido quede mon...

Page 26: ...los tramos del elevador bajen Si una vez bajado completamente cualquiera de los tramos seguimos girando la manivela del cabrestante en el sentido de bajar sin pulsar el gatillo rojo correspondiente p...

Page 27: ...s del producto manipulaci n por terceros o siniestro natural o accidental 5 4 Solamente deben utilizarse piezas de repuesto originales para garantizar una continuada seguridad de uso El usuario pierde...

Page 28: ...ung Beachten Sie die technischen Daten und befolgen Sie alle Instruktionen f r den richtigen und sicheren Gebrauch Diese Gebrauchsanweisung sollte jederzeit zug nglich sein und bei demTowerlift aufbew...

Page 29: ...t nur auf harten und ebenen Fl chen aufstellen und anhand der Wasserwaage F vertikal ausrichten Bei Bedarf mittels des Stelltellers Q durch Drehen der Spindelkurbel H in entsprechender Richtung die Tu...

Page 30: ...alsdasLineArrayanheben bevor nicht sichergestellt ist dass es korrekt am Lift befestigt ist 3 5 Niemals dasamTowerliftundindieser Anleitung vorgegebene Maximal Gewicht berschreiten 3 6 Bei st rkerem W...

Page 31: ...sowie neben oder in der N he der Arbeitsfl cheaufhalten 3 10 Den Lift nicht bewegen wenn dieser unterLastundausgefahrenist 3 11 Niemals den Lift auf einem beweglichen Untergrund oder Fahrzeug nutzen 3...

Page 32: ...Mindestlast spricht die Bremse nicht an 3 15 DenLastdruckbremsen Mechanismus weder schmieren noch len Die Scheibenbremse ist mit einem speziellen Anti DruckhitzeMaterialgeschmiert Andere Produkte d r...

Page 33: ...Den Towerlift auf den Transportrollen T abgest tzt auf einer ebenen und festen Arbeitsfl che aufstellen Bei Freiluftanwendungenist dieGefahrvon Wind vorherrschen bersteigt die Windgeschwindigkeit 30k...

Page 34: ...v11 03 Dep sito legal y Copyright 2011 Todos los derechos reservados PRO LIFTS S L Bedienungsanleitung DEUTSCH Bild 2 Bild 1 FAS 01 FAS 02 PR 01 PR 01 GS 0 8 GS 0 8 MO C2 MO C2 FAS 01...

Page 35: ...03 Dep sito legal y Copyright 2011 Todos los derechos reservados PRO LIFTS S L Bedienungsanleitung DEUTSCH Bild 3 TL A220 TL A220 B A FAS 01 BC 075L FAS 02 PAT 02 MO C2 GS 0 8 MR PAS PR 01 MR SP1 PAS...

Page 36: ...nn an der senkrecht durch den Gravitationspunkt verlaufenden Linie des zu h ngenden Line Arrays ermittelt werden Die Position des Gravitationspunktes centre of gravity ist abh ngig vom jeweiligen Line...

Page 37: ...glichen den Lift auszufahren und gleichzeitig automatisch den Schlitten und die Segmente zu sichern sodass sie keinesfalls zur ckfallen k nnen Der Lift mit demangebrachten LineArray wird jederzeit fe...

Page 38: ...as n chste Segment eingefahren wird Wird bereits eine andere ALS Sicherung gedr ckt als die des herunterfahrenden Segmentes wird dieses an der Stelle blockieren und sp ter nicht weiter einzufahren sei...

Page 39: ...on Ersatzteilen ist stets dessen Bestellnummer anzugeben welche den St cklisten Bl ttern dieser Anleitung zu entnehmen ist VMB Service Deutschland Tel 04442 92900 Fax 04442 929090 Bedienungsanleitung...

Page 40: ...v11 03 Dep sito legal y Copyright 2011 Todos los derechos reservados PRO LIFTS S L A E D...

Page 41: ...v11 03 Dep sito legal y Copyright 2011 Todos los derechos reservados PRO LIFTS S L C F G E...

Page 42: ...v11 03 Dep sito legal y Copyright 2011 Todos los derechos reservados PRO LIFTS S L A B B...

Page 43: ...v11 03 Dep sito legal y Copyright 2011 Todos los derechos reservados PRO LIFTS S L C F D...

Page 44: ...v11 03 Dep sito legal y Copyright 2011 Todos los derechos reservados PRO LIFTS S L F2 F5 F3 C C F2 F3 F1 F1 F5 F4 F4 F4...

Page 45: ...v11 03 Dep sito legal y Copyright 2011 Todos los derechos reservados PRO LIFTS S L F1...

Page 46: ...v11 03 Dep sito legal y Copyright 2011 Todos los derechos reservados PRO LIFTS S L G...

Page 47: ...v11 03 Dep sito legal y Copyright 2011 Todos los derechos reservados PRO LIFTS S L F4 F7 F7 F4 F7 F4 F4 F4 F7 F4...

Page 48: ...v11 03 Dep sito legal y Copyright 2011 Todos los derechos reservados PRO LIFTS S L F4 F4 F4 F4 F4...

Page 49: ......

Reviews: