VZN T5 SERIES
13
P/N 1011066 Rev. G 12/13
INSTALLATION (continued)
Rinsing the Ultra Filter Cartridge
The Ultra Filter Cartridge comes pre-installed in the VZN
system. The Ultra Filter Cartridge must be rinsed before the
system is used to remove any air and protective solution.
NOTE: Ultra Filter Cartridge must be rinsed to drain
before use. Rinsing to drain removes storage solution
and air. Do NOT rinse into carbon if present. Carbon life
and/or performance may be affected.
NOTE: Make sure the Carbon Element and TAC Cartridge,
if present, are NOT installed. These should only be
installed after the Ultra Filter Cartridge has been rinsed.
1. Direct water from the Rinse Ball Valve to a drain.
2. Close the Outlet Ball Valve.
3. Close the Inlet Ball Valve.
4. Open the Rinse Ball Valve.
5. Slowly turn on the water supply to the VZN system.
6. Slowly open the Inlet Ball Valve. Air and water will come
out of the Rinse Ball Valve.
7. Press the
FLUSH
button. The Drain Valve will open and
air and water will come out of the drain line. Repeat six
times to ensure all air and storage solution are flushed
out of the Ultra Filter Cartridge.
8. Continue to allow water to run at full flow out of the
Rinse Ball Valve for at least 15 minutes.
9. After 15 minutes, close the Rinse Ball Valve and allow
the system to sit for 15 minutes without any water
flow to release any trapped air from the Ultra Filter
Cartridge.
10. Inspect the unit for any leaks, repairing as needed.
11. After 15 minutes, open the Rinse Ball Valve and wait for
five minutes to flush out any remaining air.
12. Close the Rinse Ball Valve and disconnect the garden
hose.
13. Press the
FLUSH
button to open the Drain Valve.
Repeat six times to ensure any remaining air is flushed
out of the system.
14. Open the closest downstream tap or faucet.
15. Slowly open the Outlet Ball Valve and allow water to run
through the system and out the faucet for five minutes.
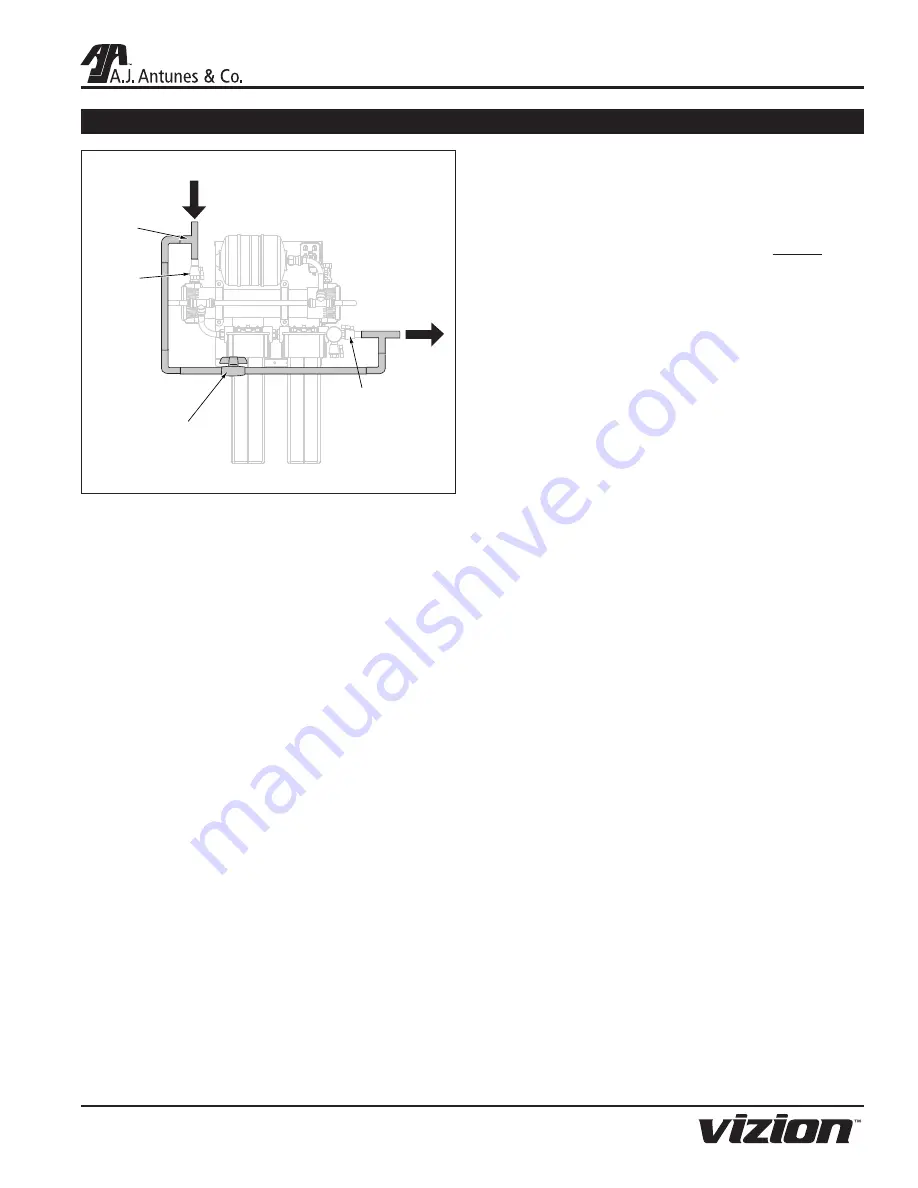
Water
Flow
Inlet Ball
Valve
(Manual)
Fully
Ported
Ball Valve
Tee
Water
Flow
Outlet Ball
Valve
(Manual)
Figure 7. Install Bypass
Installing a Bypass
It is recommended that an optional bypass be installed to help
with replacing cartridges and servicing the system. Installation
of a bypass can be done easily as the Inlet and Outlet Ball
Valves are already installed.
1. Install tees on the end of the plumbing leading to the
Inlet and Outlet Ball Valves.
2. Connect the two tees by installing plumbing and a fully
ported (preferably 3/4”) Ball Valve.
3. When the system is in use, open the Inlet and Outlet
Ball Valves and close the Bypass Ball Valve.
4. When servicing is needed, close the Inlet and Outlet Ball
Valves and open the Bypass Ball Valve.
Starting the Controller
1. Select the proper AC plug for your electrical outlet and
install it onto the power supply.
2. Plug the appropriate end of the power cord into the
controller.
3. Plug the other end of the power cord into the electrical
outlet. The LEDs on the controller will light up.
4. The controller automatically enters Flush Mode and the
Flush LED starts to flash.
5. When flushing is complete, the Flush LED will stop
flashing and one or more LEDs will remain lit, indicating
the unit has power and which interval is selected in the
controller.


