background image

VIZIO

®

 VP505XVT1A User Manual 


Version 8/21/2008 

13 


www.VIZIO.com


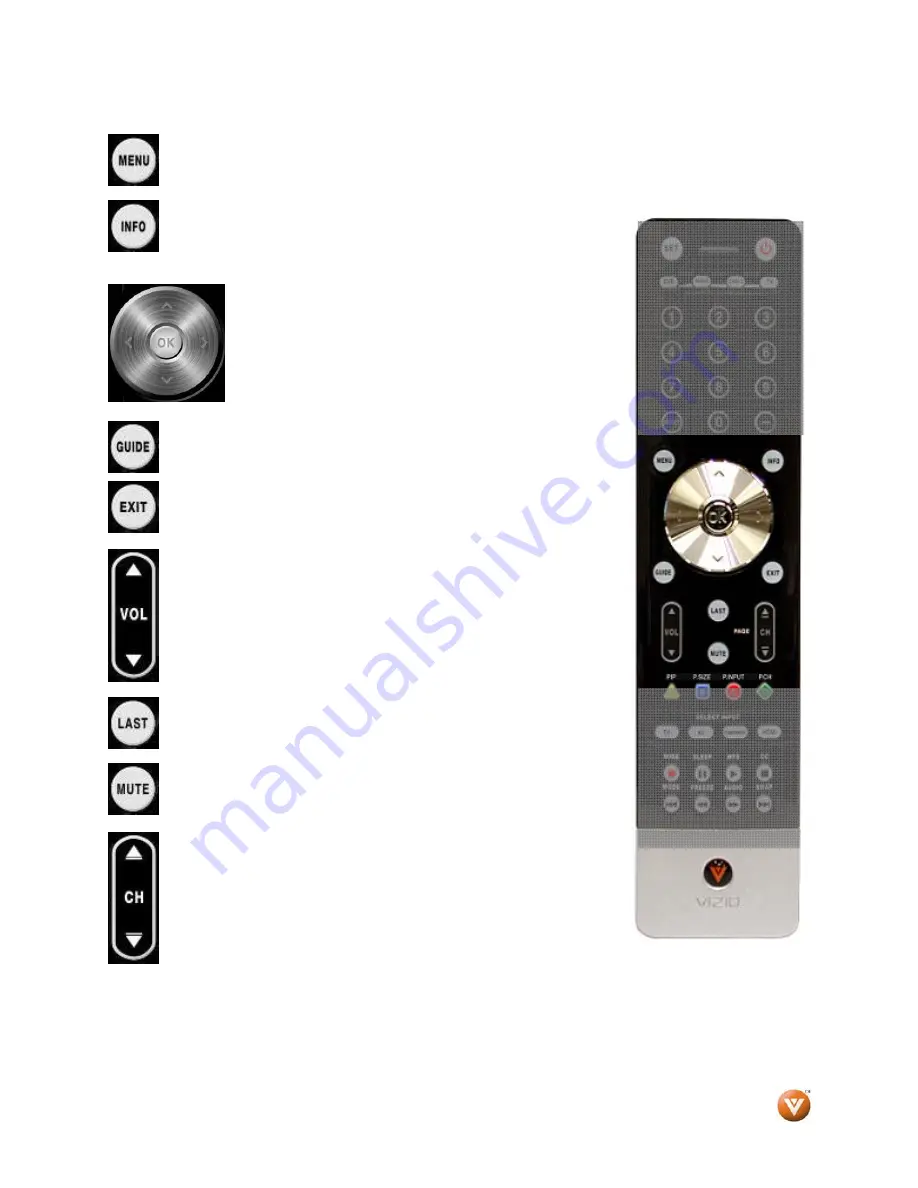
Use this button for the On-Screen Display (OSD) menus. 
 
 
This button turns the image and system information display on and 
off. 


Use the NaVigation Wheel to operate the On-Screen 
Display (OSD) after it has been activated by pressing the 
MENU button. 
Use the 

OK

 button to select your chosen option in On-

Screen Display (OSD) menus. 


GUIDE

 – This button displays program information.  

Note: this 

button is only functional for DTV. 


EXIT

 – This button exits the On-Screen Display (OSD) menus. 


VOL (+ or -)

 – These buttons turn the volume up or down. 


LAST

 – This button recalls the previously viewed channel. 


MUTE

 – This button turns the sound on and off. 


CH (+ or -)

 – These buttons change the channels up or down. 


Summary of Contents for VP505XVT - 50" Plasma TV

Page 1: ...nd to protect your investment beyond the standard warranty VIZIO offers on site extended warranty service plans These plans give additional coverage during the standard warranty period Visit our websi...

Page 2: ...at the safety purpose of the grounded plug When connected to a power outlet power is always into your FHDTV To totally disconnect the power unplug the power cord Use only with the cart stand tripod br...

Page 3: ...ing electrodes and requirements of the grounding electrode Lightning Protection For added protection of the TV during a lightning storm or when it is left unattended or unused for long periods of time...

Page 4: ...screen can easily be scratched or broken so please handle the product gently and never place the TV with the glass facing downwards on a surface without protective padding IMPORTANT Save the carton an...

Page 5: ...r smoke so as not to shorten the service life of the electronic components Install the TV in landscape orientation any 90 clockwise or counter clockwise installation may induce poor ventilation result...

Page 6: ...e base needs to be attached back to the TV Now the VP505XVT1A can fit securely to a mount sold separately by utilizing the mounting holes in the center of the back panel of the TV Please make sure to...

Page 7: ...2 2 5 2 Using Component Video 24 2 5 3 Using S Video AV S VIDEO 25 2 5 4 Using Composite AV Video Input 26 2 6 Connecting an external Receiver Amp 28 2 6 1 Optical Output of Audio received 29 2 7 Conn...

Page 8: ...ogramming 59 5 3 7 Access Code Edit 59 5 4 Understanding Viewing Features 60 5 4 1 Viewing Modes 60 Chapter 6 Picture In Picture PIP Mode 61 6 1 PIP Mode Adjustments 61 6 1 1 Adjusting Basic PIP Setti...

Page 9: ...button again to turn the VP505XVT1A off MENU This button activates the On Screen Display OSD menu CH Use these buttons to step the TV channels up or down While the OSD is active these buttons functio...

Page 10: ...s The white color band on the rear of the TV indicates this connection 6 RGB PC Connect the video and audio from a computer here The blue color band on the rear of the TV indicates this connection A 1...

Page 11: ...digital connector The white color band on the side of the TV indicates this connection 2 HDMI 4 Connect the fourth source for digital video such as a DVD multimedia player or set top box through this...

Page 12: ...Receiver Amp Home Theatre System This button selects a programmed cable TV set top box or a satellite TV set top box This button has been pre programmed to select the codes to operate the VIZIO FHDTV...

Page 13: ...en activated by pressing the MENU button Use the OK button to select your chosen option in On Screen Display OSD menus GUIDE This button displays program information Note this button is only functiona...

Page 14: ...AV S Video and AV Composite inputs Pressing of this button will select Component input Repeated pressing of this button will switch between HDMI 1 HDMI 2 HDMI 3 and HDMI 4 inputs This button cycles th...

Page 15: ...ol Range Point the remote control at the remote control sensor to transmit the commands Do not place any obstacles between the remote control and the receiver window The effective range of the remote...

Page 16: ...s the connection for standard NTSC TV using antenna or cable Best analog Blue RGB PC VGA This video input has separate red green and blue color components and separate horizontal and vertical sync sig...

Page 17: ...the power to the FHDTV and VCR 2 Connect the Output to TV RF Out or Antenna Out connector on the rear of your VCR to the DTV TV CABLE ANTENNA connector at the rear of the FHDTV 3 Turn on the power to...

Page 18: ...er to the FHDTV and HDTV Set Top Box 4 Select HDMI using the INPUT button on the remote or side of the FHDTV or directly by pressing the HDMI button on the Remote Control Note To maintain the display...

Page 19: ...t the other end to the audio connectors associated with the HDMI input white area at the rear of the FHDTV 4 Turn on the power to the FHDTV and HDTV Set Top Box 5 Select HDMI 2 using the INPUT button...

Page 20: ...the Pr red color connector on your HDTV Set Top Box to the corresponding Pr red color connector in the Component input green color area row of connectors nearest to you when viewing from the rear of...

Page 21: ...associated with the AV input yellow color area at the rear of the FHDTV 4 Turn on the power to the FHDTV and Set Top Box 5 Select AV using the INPUT button on the remote or side of the FHDTV or direc...

Page 22: ...Best 1 Turn off the power to the FHDTV and DVD player 2 Connect a HDMI cable to the HDMI output of your DVD player and the other end to the HDMI1 Input white color area at the rear of the FHDTV 3 Turn...

Page 23: ...and red connectors to the audio output connectors associated with the DVI output of the DVD player and connect the other end to the audio connectors by the HDMI input white area at the rear of the FHD...

Page 24: ...of the FHDTV 4 Connect the Pr red color connector on your DVD player to the corresponding Pr red color connector in the Component input green color area row of connectors nearest to you when viewing f...

Page 25: ...t yellow red area at the rear of the FHDTV 3 Connect an audio cable white and red connectors to the audio output connectors associated with the S Video output on your DVD player and connect the other...

Page 26: ...the rear of the FHDTV 3 Connect the R red color and L white color audio connectors on your DVD player to the corresponding R red color and L white color audio input connectors in the AV input yellow...

Page 27: ...tors cable to the audio output connectors associated with the S Video output on your VCR or Video Camera and connect the other end to the audio connectors associated with the AV input yellow red area...

Page 28: ...ver Amp 4 Then press the MENU button on the remote control to open the On Screen Display OSD menu 5 Press either or on the remote control to select the Audio Adjust menu 6 Press either or on the remot...

Page 29: ...U button on the remote control to open the On Screen Display OSD menu 5 Press either or on the remote control to select the Audio Adjust menu 6 Press either or on the remote control to select SPEAKERS...

Page 30: ...PC Computer 5 Select RGB using the INPUT button on the remote or side of the FHDTV Note a For the best picture quality when connecting a pc computer through RGB PC set your pc computer timing mode to...

Page 31: ...z Horizontal Frequency KHz Vertical Frequency Hz Horizontal Sync Polarity TTL Vertical Sync Polarity TTL PixelRate MHz 640x480 60 31 469 59 941 N N 25 175 640x480 72 37 861 72 810 N N 31 500 640x480 7...

Page 32: ...d giving you the first of six 6 screens with steps to follow to ready the TV for viewing your favorite programs and movies Press the button to select the desired Setup Menu language English Espa ol or...

Page 33: ...highlight Skip Scan and then press the button Note If you select Skip Scan next time that you decide to complete this procedure you will need to select the TV as input through the Input key and then g...

Page 34: ...e HDMI best or Component connection Note Composite AV and S Video Cables can only be used for SD 480i pictures c Turn on your Cable Box VCR External TV Tuner or Satellite Receiver and you will see a p...

Page 35: ...ss the EXIT key to exit the on screen display Menu Note If Initial Setup Procedure 4 had been done ensure that the correct program times are shown when pressing the Guide key Select a digital channel...

Page 36: ...n Use the or button to select the type of signal input Cable no box Service or Antenna Press either or button to highlight choice Press OK key to select choice The following screens will be displayed...

Page 37: ...ing steps Press the MENU key to return Tuner Mode screen Press or button to highlight Skip Channel Press button to review the Skip Channel table Press or button to scroll down or up through the table...

Page 38: ...ing broadcasts through a cable or satellite set top box connected by an HDMI cable select HDMI directly by pressing the HDMI button on the remote or by pressing the INPUT button on the remote or on th...

Page 39: ...ious channel or hold it depressed until the desired channel is reached Note Channel up and down will only operate in DTV and TV modes and only after channels have been scanned Wide Using this feature...

Page 40: ...e program schedule for the channel and the window will show the live program for that channel Press the GUIDE button to exit this feature 3 6 Information on FHDTV Status When you change TV channels or...

Page 41: ...enu will be shown on the screen Press the or button on the remote control or the VOL or VOL button on the side and scroll across the main menus at the top of the OSD screen Picture Screen Audio TV Spe...

Page 42: ...from Custom Standard Movie Game and Sports Press the OK key to accept the desired mode Once the adjustments are completed press either the MENU or EXIT button repeatedly to exit the OSD completely 4 2...

Page 43: ...out and if the contrast is too high you will not be able to see any detail in the bright parts of a picture Once the adjustments are completed press the MENU button repeatedly or the EXIT once to exit...

Page 44: ...default middle position is correct If people s faces look too orange try reducing the level of color Once the adjustments are completed press the MENU button repeatedly or the EXIT once to exit the O...

Page 45: ...if desired 4 2 8 Advanced Video Features Press the or button to highlight the Advanced Video feature Press the or button to select it A new menu will be displayed showing the advanced functions availa...

Page 46: ...Once the adjustments are completed press the MENU button repeatedly or the EXIT once to exit the OSD completely Adaptive Luma Press the button to highlight Adaptive Luma Large areas of darkness in a...

Page 47: ...ly to the signal or input being used A sample of a screen is shown below 4 3 1 Auto Adjust Press the or button to highlight the Auto Adjust option Press the or button to select it Press the OK key on...

Page 48: ...horizontal position of the picture This option is applicable mainly to signals feed through component input Once the adjustments are completed press the MENU button repeatedly or the EXIT once to exit...

Page 49: ...The Overscan option is a feature which allows expanding a picture to reduce or eliminate the black bars of the picture Press the or button to highlight the Overscan option Press the or button to sele...

Page 50: ...you wish to adjust 4 4 1 Volume Press the or button to highlight the Volume option Press the or button to select it and adjust the volume to the desired level Once the adjustments are completed press...

Page 51: ...ess the MENU button repeatedly or the EXIT once to exit the OSD completely 4 4 5 SRS TruSurround HD SRS TSHD To experience a clear and crisp sound out of the built in speakers Press the or button to h...

Page 52: ...ssed the On Screen Display OSD appears on the PICTURE adjustment page Press either or button to scroll across the main menu icons to the one showing the remote control in hand icon and the Special Fea...

Page 53: ...losed Caption will be displayed by changing the following parameters Font Size letters size Font Color letter color Font Opacity transparency of the letters Background Color color of the background ar...

Page 54: ...ton on the remote to change the PIP mode PIP Input When PIP or POP is selected Press the button to highlight the PIP input selection Press the or button to choose the input source for the sub screen T...

Page 55: ...ry settings Press the or button to toggle between OK and Cancel Press the OK key to accept your selection Once the adjustments are completed press the MENU button repeatedly or the EXIT once to exit t...

Page 56: ...Press the or button to scroll across to the icon showing the two figures picture Press the or button to highlight the different options under Parental Control menu The Password must be entered before...

Page 57: ...o activate this feature 3 Press the key to select Parental Lock Enable 4 Press the button to activate this option 5 The next screen will display two options in the menu Update DTV Rating If an update...

Page 58: ...All subratings D Sexual dialog L Adult language S Sexual situations V Violence FV Fantasy violence Press the or button to navigate through the TV rating options Press the OK button to block locked or...

Page 59: ...that does not have a rating Once the adjustments are completed press the MENU button repeatedly or the EXIT once to exit the OSD completely 5 3 7 Access Code Edit Press the button to highlight the Acc...

Page 60: ...tretched proportionately to fill the TV screen When watching a standard definition 4 3 source the picture will stretch horizontally and fill the screen people will look fatter than they are When watch...

Page 61: ...MI 3 9 9 9 9 HDMI 4 9 9 9 9 RGB 9 9 9 9 9 Indicates which inputs are available for PIP and POP modes 6 1 1 Adjusting Basic PIP Settings The PIP channel is independent of the main TV channel To change...

Page 62: ...able Box 2 Press the CABLE button on the remote control 3 Press and hold the SET button until the LED LIGHT flashes twice 4 Find the programming code for your Cable Box in the code list in the back of...

Page 63: ...twice 5 Point the remote control at the component and then alternate between pressing the POWER button and the component button on the remote control until the component turns off If the component sti...

Page 64: ...clean the display Wring water out of the cloth before cleaning to prevent water from penetrating into the housing Wipe the display with a dry cloth after cleaning 7 2 Troubleshooting Guide If the TV...

Page 65: ...he input source cable is attached securely and correctly to the back of your TV Make sure that the video input source is within the range of your TV Compare the video input source s specifications wit...

Page 66: ...that may result in unnecessary shipping charges billed to you Our trained support personnel can often resolve the problem over the phone For more information on warranty service or repair after the wa...

Page 67: ...cur in a particular installation If this equipment does cause harmful interference to radio or television reception which can be determined by turning the equipment off and on the user is encouraged t...

Page 68: ...deo Color temperature adjustments of 5400K 6500K 9300K Independent Red Green Blue adjustments for color temperature fine tuning Signal Compatibility 480i SDTV 480P EDTV 720P HDTV 1080i HDTV 1080P FHDT...

Page 69: ...720P or 1080 interlaced lines 1080i and Dolby digital surround sound HDTV provides 900 000 2 1 million pixels Integrated HDTV An HDTV that has the digital tuner built into the set It does not need a...

Page 70: ...t 43 Reset Picture Mode 46 Sharpness 44 Tint 44 DTV Special Features Digital Closed Caption 53 Language 52 PIP 54 Reset 55 Sleep Timer 52 DTV Tuner Setup MTS 52 Skip Channel 37 DVI Connecting your DVD...

Page 71: ...V Audio Adjustment 50 Parental Control 56 Picture Adjustment 42 47 TV Picture Adjust Advanced Video 45 Brightness 42 Color 43 Contrast 43 Reset Picture Mode 46 Sharpness 44 Tint 44 TV Special Features...

Page 72: ...71 Criterion 20000 20072 Crosley 20035 20081 20000 20149 Crown 20072 20278 Curtis Mathes 20060 20035 20162 11919 20240 20000 20041 20278 20432 20760 21035 Cybernex 20240 CyberPower 21972 Daewoo 20037...

Page 73: ...48 20039 20047 20240 20104 20209 20479 20000 20072 20278 20062 20046 20307 20479 Metz 20037 MGA 20240 20043 20060 20061 MGN Technology 20240 Microsoft 21972 Midland 20240 Mind 21972 Minolta 20042 2010...

Page 74: ...62 20807 20848 Shintom 20072 20039 20208 20240 20000 Shogun 20240 Siemens 20037 20104 Signature 20060 20035 20037 20048 20000 20149 20046 20479 Singer 20037 20240 20072 Sonic Blue 20616 20614 Sonograp...

Page 75: ...01497 GE 00144 Gehua 00476 General Instrument 00476 00810 00276 00003 00014 00012 Gibralter 00003 GMI 00883 GoldStar 00144 Hamlin 00009 00273 Hitachi 00014 00003 00008 00009 Insight 00476 00810 Jebsee...

Page 76: ...G 01414 01226 Magnavox 00724 00722 Maspro 01530 McIntosh 00869 Memorex 00724 Mitsubishi 00749 Motorola 00869 NEC 01270 01519 Netsat 00099 Next Level 00869 Optimus 00724 Panasonic 00247 00701 01508 Pay...

Page 77: ...20503 20539 Enzer 20770 ESA 20821 21268 Firstline 20651 Fisher 21919 20670 Funai 20675 21268 21334 Gateway 21158 21073 GE 20522 20717 20815 Go Video 20573 20744 20717 20715 20714 20783 20833 20869 21...

Page 78: ...2 20698 Samsung 20490 20573 21932 21075 20820 20744 20899 21044 Sansui 20695 Sanyo 20695 20670 20675 20873 21334 Schneider 20783 Schwaiger 20752 Sensory Science 21158 Sharp 20630 20752 20675 21256 216...

Page 79: ...Modulaire 30000 30032 30037 30087 30179 30180 30305 30393 30420 30468 MTC 30420 NSM 30157 Onkyo 30868 30101 Optimus 31063 30000 30032 30037 30420 30179 31075 30145 Panasonic 30029 30303 30388 30752 P...

Page 80: ...icavision 01272 Roku 01486 Samsung 01190 01490 Sensory Science 01126 Sharp 01010 Sony 01272 01324 01364 Stack 9 01272 Sylvania 01563 Systemax 01272 Tagar Systems 01272 Toshiba 01272 Touch 01272 Verato...

Page 81: ...Nova 31389 Onkyo 30135 30380 30842 31298 31320 31531 Optimus 31023 30074 30014 30121 30186 30502 30532 30670 31074 Oritron 31366 31497 Outlaw 30391 Panasonic 31308 31518 30309 30367 31288 31316 31548...

Page 82: ...3 Harman Kardon 30110 Hitachi 31273 Inkel 30027 Integra 30135 JBL 30110 JVC 30074 31263 Kenwood 31313 31570 30027 KLH 31428 Magnavox 31189 31269 30531 Marantz 31189 31269 30039 MCS 30039 Onkyo 30842 3...

Page 83: ...0765 Changcheng 10051 10661 Changhong 10156 10765 11156 10767 Ching Tai 10092 Chun Yun 10000 10180 10700 10092 10843 Chung Hsin 10180 10053 Cinema 10672 Cineral 10451 10092 Citizen 10054 10000 10451 1...

Page 84: ...10000 10180 10060 Harman Kardon 10054 Harvard 10180 Havermy 10093 Heathkit 10017 Helios 10865 Hello Kitty 10451 Hewlett Packard 11089 11494 11502 Hisense 10156 10748 10145 11156 Hitachi 10047 10054 10...

Page 85: ...30 10165 MGA 10150 10030 10178 11907 MGN Technology 10178 Micro Genius 10150 Midland 10047 10017 10051 10018 10135 Mitsubishi 10154 10250 10093 10236 10180 11250 10150 10030 10178 11917 10836 Monivisi...

Page 86: ...180 10150 10178 10030 10165 11904 RCA 11447 10047 10054 10000 10051 10093 10178 11958 11953 11948 11922 11919 11917 11547 11347 11247 11147 11047 10774 10679 10165 10135 10090 10018 Realistic 10047 10...

Page 87: ...93 11917 Sheng Chia 10093 Shivaki 10178 Seimens 10145 Signature 10047 10093 10030 10165 10187 Signet 11262 Simpson 10178 10030 10187 Singer 10060 10092 Solar Drape 10000 Sole 10813 Sony 10017 10154 11...

Page 88: ...h 10030 Victor 10250 10053 10650 Vidikron 10054 Vidtech 10178 Viewsonic 11755 10885 10864 11578 10857 Viking 10060 Wards 10047 10054 10017 10154 10000 10051 10093 10236 10178 10030 10166 11156 10866 1...

Page 89: ...VIZIO VP505XVT1A User Manual Version 8 21 2008 89 www VIZIO com Whirlpool 31332 Windmere 31215 X10 30167...

Page 90: ...Replacement parts or replacement units provided under this limited warranty are warranted for the remaining portion of the original warranty period or for ninety 90 days from warranty service or repla...

Page 91: ...R DESCRIBED ABOVE ANY IMPLIED WARRANTIES INCLUDING ANY IMPLIED WARRANTY OF MERCHANTABILITY AND FITNESS FOR A PARTICULAR PURPOSE SHALL BE LIMITED IN DURATION TO THE PERIOD OF TIME SET FORTH ABOVE VIZIO...

Page 92: ...problem with a display unit may be within the terms and conditions of the VIZIO Limited Product Warranty and that an on site repair may be performed the customer will be provided with an on site repai...

Page 93: ...VIZIO Limited Product Warranty and that a mail in repair may be performed the customer will be provided with a return authorization number and mail in repair instructions Proof of purchase is require...

Reviews: