Note:
VIZIO is not responsible for damages incurred by insecure wall-mounting hardware.
1. Choose a wall that is within reach of an electrical outlet and is smooth and sturdy.
2. Drill two holes 6 inches (152 mm) apart into the wall.
3. Insert a screw into each hole leaving 0.12 inches (3 mm) of the screw head exposed.
4. Line up the wall-mount slots on the bottom of your router with the screws and slide the router down until the screws fit snugly into the
wall-mount slots.
Chapter 2 Basic Controls and Connections
Front LEDs
Wireless
Lights when wireless is enabled.
Flashes when your router is sending or receiving data over the network.
WPS (Wi-Fi Protected Setup)
Lights when your router is setting up using WPS. Your router supports one WPS
session at a time so wait until the LED stops flashing before setting up another WPS
device.
Turns off if there is an error during the WPS setup process. Make sure your device(s) support WPS, and then try again.
See
WPS (Wi-Fi Protected Setup)
for information on connecting via WPS.
Internet
Lights when there is a working Internet connection.
Flashes to indicate network activity over the Internet port.
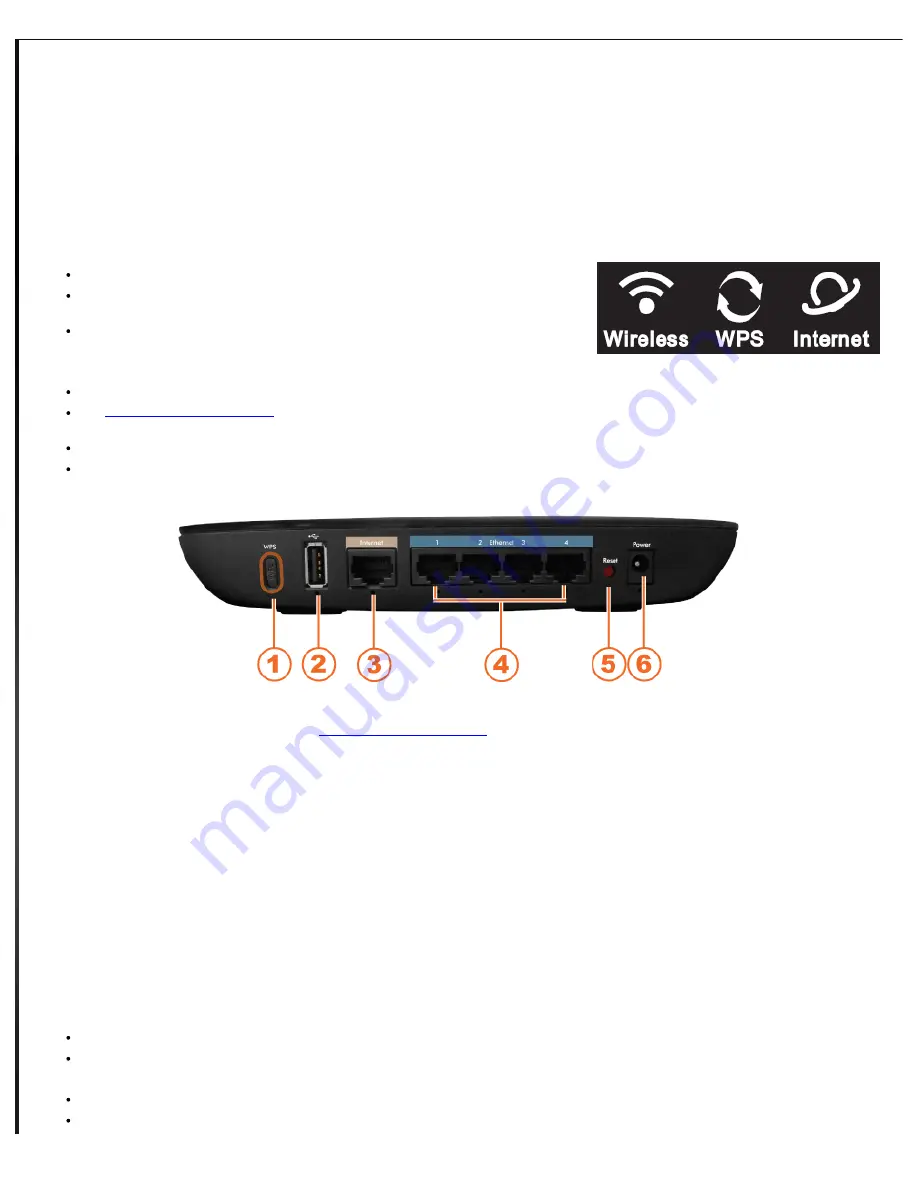
Rear Panel Connections
1. WPS (Wi-Fi Protected Setup) Button—Use to automatically configure wireless security for your wireless network if you have devices
that support WI-FI Protected Setup. See
WPS (Wi-Fi Protected Setup)
for information on connecting via WPS.
2. USB—Connect a USB storage device to this port.
3. Internet—Connect your high-speed cable or DSL Internet service to this port.
4. Ethernet 1, 2, 3, 4—Connect your router to computers on your wired network and other Ethernet devices to these ports. The LED under
the port lights when, your router is connected to the device. The LED flashes when there is network activity over that port. .
5. Reset—Press and hold for approximately ten seconds to reset your router to factory default settings. If you created any custom settings,
including a login name and password, they will be erased and replaced
with the factory default settings.
6. Power—Connect the power adapter to this port. The LED under the port
lights when your router is on. The LED flashes when your router goes
through a self-diagnostic mode during boot-up.
Chapter 3 Setting Up Your Router
What You Need
Your VIZIO Router, Power Adapter, and Ethernet cable (included)
High-speed Internet connection and access to your Internet modem
(contact your local provider if you need help with this)
Additional Ethernet cable (usually provided with your Internet modem)
A computer to run the Quick Setup App


