background image

VIZIO SV421XVT & SV471XVT User Manual 
 

 30  

www.VIZIO.com


Viewing Multimedia Content 

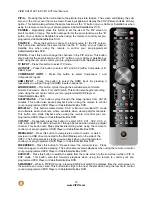
1.  Insert a USB device with digital content such as photos, music, and movies into the Multi Media 

port on the left-hand side of your HDTV. If a USB device is already connected, press the 

MEDIA


button on the remote control. A message will appear asking if you want to play multimedia 
content. 

2. Press 


or 

 to highlight 

OK

and then press 

OK

 to select it.  

3. Press 


or 

 to highlight the 

folder that contains the 

w

displayed, showing the
and files that are on yo

4

i
t

and then press 

OK

 to s

The f

5.  While pl

usic, 

rease 5x. The 

display at the bottom 

will show 

content you want to see or 
hear, and then press 

OK

 to 

select it. A sub-menu  ill be 

 folders 
ur USB 

device. 

. Press 


or 

 to highl ght the 

folder or file you want  o play, 

elect it. 

ile will being playi

aying videos or m

ng. 

fast forward or fast reverse by 
pressing 


or 

.  

a. Press 


or 

 twice, 

and the speed will 
inc

 or 

.  

hree 

b. P

times and the

ress 


or 

 t

 spee

will increase 20x
display at the bo
will show 

. The 

ttom 


or 

c. Press 


or 


to resum
playback. 

6. 

 finished, press 

EXIT


o return to the previo

 or repeatedly to return 

again 

e normal 

When
once t

us 

screen
to the main menu. 

Summary of Contents for SV421XVT - 42" LCD TV

Page 1: ...IO offers on site extended warranty service plans These plans give additional coverage during the standard warranty period Visit our website or call us to purchase a plan Write down the serial number...

Page 2: ...openings in the back and bottom of the cabinet are provided for ventilation To ensure reliable operation of your HDTV and to protect it from overheating be sure these openings are not blocked or cover...

Page 3: ...plug the power cord and contact your dealer immediately Do not try to repair your HDTV yourself Avoid using dropped or damaged appliances If your HDTV is dropped and the housing is damaged the interna...

Page 4: ...rting structure grounding of the lead in wire to an antenna discharge unit size of the grounding conductors location of antenna discharge unit connection to grounding electrodes and requirements of th...

Page 5: ...s should continue to work as before to receive low power Class A or translator television stations and with cable and satellite TV services gaming consoles VCRs DVD players and similar products For ad...

Page 6: ...ith DVI 20 Using Component Video Better 20 Using S Video Better 21 Using Composite Video Good 21 Using Coaxial Antenna Good 21 Connecting Coaxial RF 22 Using Your Antenna or Digital Cable for Standard...

Page 7: ...ting the Time Zone 37 Watching a TV Program 38 Adjusting Basic HDTV Settings 39 Program Information 39 CHAPTER 5 ADVANCED ADJUSTMENT OF HDTV 40 Using the On Screen Display OSD 40 Picture Menu 41 Pictu...

Page 8: ...O UNIVERSAL REMOTE CONTROL 53 Using a Cable or Satellite Box Remote 53 Programming other devices 53 Programming your DVD Player 53 Programming your Home Theater System 53 Programming your Cable or Sat...

Page 9: ...future shipping Package Contents VIZIO SV421XVT or SV471XVT VIZIO remote control VUR8M AA batteries for the remote control 2 Power cord Safety Strap Cleaning Cloth Quick Setup Guide Registration Card...

Page 10: ...f the electronic components Install your HDTV in a level landscape orientation with the VIZIO logo at the bottom to prevent poor ventilation and excessive component damage VIZIO offers professional in...

Page 11: ...n sense practice such as ensuring that children or adults do not climb up grabbing the top of the HDTV and pulling it onto themselves 1 Attach one end of the strap to the wall If you have a drywall fi...

Page 12: ...the next level CH Use these buttons to step up or down the TV channels While the OSD is active these buttons function as up and down controls in the OSD menus VOL Use these buttons to increase or dec...

Page 13: ...ons in your area visit www antennaweb org 5 AUDIO OUT a OPTICAL When digital TV is selected for viewing the audio associated with the programming will be available on the SPDIF Optical connector for c...

Page 14: ...ource Note The red and white audio connectors are shared between AV2 and COMPONENT2 2 COMPONENT2 YPb CbPr Cr with Audio L R Connect the secondary source for component video devices such as a DVD Playe...

Page 15: ...UT Repeatedly pressing this button will step you through the input sources in the following sequence TV AV1 AV2 Component1 Component2 RGB HDMI1 HDMI2 HDMI3 and HDMI4 Once you have stepped through the...

Page 16: ...ing the remote to control your pre programmed DVD Player or Cable Satellite Box DVR SLEEP PAUSE This button cycles through the sleep options from 30 120 minutes This button also pauses playback when u...

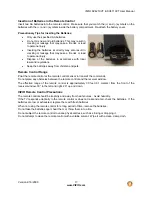
Page 17: ...emote Control Range Point the remote control at the remote control sensor to transmit the commands Do not place any obstacles between the remote control and the receiver window The effective range of...

Page 18: ...al Good analog Connect a digital or analog antenna cable or coaxial cable to watch TV programming Best analog RGB PC VGA This is most commonly used for PC input Better analog Component Component video...

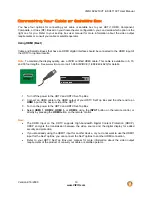
Page 19: ...888 849 4623 for details SET TOP BOX 1 Turn off the power to the HDTV and HDTV Set Top Box 2 Connect an HDMI cable to the HDMI output of your HDTV Set Top Box and the other end to an HDMI input on th...

Page 20: ...e control Note The HDMI input on the HDTV supports High bandwidth Digital Content Protection HDCP HDCP encrypts the transmission between the video source and the digital display for added security and...

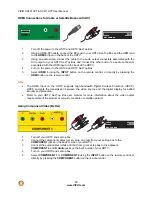
Page 21: ...ck of your HDTV 3 Connect the audio cables white and red on your set top box to the corresponding L and R AUDIO jacks on the back of your HDTV 4 Turn on your HDTV and set top box 5 Select AV1 using th...

Page 22: ...cable TV connect it to the Antenna In connector on the rear of 1 Turn off the power to the HDTV 2 Connect the coaxial RF connector from your antenna or cable to the DT connector on the CABLE ANTENNA...

Page 23: ...3 Connect the audio cables white and red from the DVI audio output jacks on the DVD player to the adjacent HDMI 3 L and R AUDIO jacks on the back of the HDTV 4 Turn on the power to the HDTV and your...

Page 24: ...the S VIDEO jack on the back of the HDTV ed on your DVD player to the corresponding L and R 4 player 3 Connect the audio cables white and red from your DVD player to the COMPONENT L and R AUDIO jacks...

Page 25: ...from your DVD player to the S VIDEO AV1 jack on the back of your HDTV or the AV2 jack on the side of your HDTV Connect the audio cables white and red on your DVD playe 3 r to the S VIDEO AV1 L and R A...

Page 26: ...being viewed no matter what input is being used 1 Turn off the power to the HDTV and Receiver Amp 2 Using an audio cable white and red connectors connect the eceiver Amp and cable to the audio input...

Page 27: ...ep is optional an needed if you want to transmit audio from the 5 the remote control Note puter through RGB PC set your PC Ref rements of the product can be purchased at an 3 computer through the TV 4...

Page 28: ...077 72 188 P P 50 000 Windows 5 46 875 75 000 800 x 600 75 P P 49 500 Windows 6 1024 x 768 60 48 363 60 004 N N 65 000 Windows 7 1024 x 768 70 56 476 70 069 N N 75 000 Windows 8 1024 x 768 75 60 023 7...

Page 29: ...p The first folder on the dr el 1 A folder w in that fold l with at folder is Level 3 etc folder de Fold ith n be up to er is Leve levels dee 2 a folder ive is Lev in th Display Limits Multim er w he...

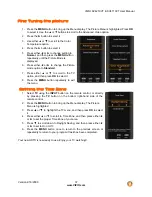
Page 30: ...yed showing the and files that are on yo 4 i t and then press OK to s The f 5 While pl usic rease 5x The display at the bottom will show content you want to see or hear and then press OK to select it...

Page 31: ...hoose from or Jazz to adjust the overall quality of the audio being lideshow Re Choose deshow Sort By You can choose to sort the pictures on the USB device by Photo Date File Date or alphabetically Fi...

Page 32: ...ures thumbnails in the menu Choose from Small Medium or Large Info W Music Settings When listening to music you can adjust various settings including selecting an audio mode choosing repeat options et...

Page 33: ...2 hoose from Flat Rock Pop Classic Jazz and Soft to adjust the overall dio being played fo set to on information about the video briefly appears on the TV w 1 Insert a USB device and select the Video...

Page 34: ...s the OK button on the remote control to go to the next screen Setup Wiza 1 Connect the Power Cable Connect the power cord to the power cord connector on the back of the HDTV and then plug the power c...

Page 35: ...m your cable or satellite company is being used you do not n r channels Press the OK button on fo control and select Skip Scan k Press the OK button on the e control to start the se remot for av will...

Page 36: ...s or channels If the e which setup includes a box with two outputs for two different distan els will help you to find the signal The channel to be selected varies You may have to call your provider to...

Page 37: ...her or to scroll to Time Zone and then press either or to set the proper Time Zone of your area 5 Press to scroll down to Daylight Saving and then press either or to set to On or Off 6 Press the MENU...

Page 38: ...ted with the dev n ote control or the CH or control control will Composite inputs Watching a TV Program B secure Also verify that the power cord is plugged into a correctly grounded electrical outlet...

Page 39: ...when available from the broadcaster is displayed Volume the desired level is reached To step up or down through the available TV ch the remote control once for the next or previou en w ing a digital...

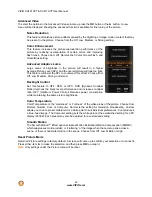
Page 40: ...ct the option or feature you want to adjust 4 Once the menu option is displayed press or on the remote control to select one of the items to adjust s or to adjust the selection rol or the control but...

Page 41: ...t This adjustment is helpful when viewing Standard Definition sources 2 Press or on the remote control to highlight the Picture 3 Press or on the remote control to select a Picture menu option 4 Once...

Page 42: ...suppresses motion judder or stuttering of the image when the camera pans across a or there is horizontal motion in the scene Choose from Off Low Middle or High ttings to factory default A screen will...

Page 43: ...shown on the screen 2 Press or on the remote control to highlight the Audio menu and then press OK to sele or on the remote cont e the menu option is h ss the MENU key once to return to the previous s...

Page 44: ...nfirm your selection or to cancel it ress or to make the selection and then press OK to accept it ettings under the Audio menu will be reset line out to connect a Receiver Amplifier Home Theater syste...

Page 45: ...on to select the range of channel numbers you want to start searching in Press OK to start channel search Skip Channel After the TV has stored all of the available digital channels in memory you will...

Page 46: ...lation type status SNR signal noise ratio and signal strength Setup Menu 1 Press the MENU button on the remote control and the Picture menu will be shown on the screen 2 Press or on the remote control...

Page 47: ...9 9 9 9 9 HDMI 2 9 9 9 9 9 9 9 HDMI 3 9 9 9 9 9 9 9 HDMI 4 9 9 9 9 9 9 9 RGB 9 9 9 9 9 9 Indicates which inputs are available for PIP and POP modes PIP Position Size of the PIP window Choose from Smal...

Page 48: ...ing digital TV roadcaster or Custom If Custom is selected then available are Font Size letter size Font Opacity letter transparency Background Color color of the background where Closed nd Opacity set...

Page 49: ...te T MI A new m Ra g Sel f ill not be able to set the US Ch n Block in els from being displayed V Position Adjust the vertical position of the picture H SIZE Adjust the horiz V SIZE Adjust the vertica...

Page 50: ...Viewers 14 years or older 18 Adult programming Note When Rating Enable is OFF US TV Rating adjustments are not available Press the OK button to block locked or allow unlocke ratings Y All children Y7...

Page 51: ...w menu will be d System Reset settings se this function to return to the Initial Setup menu Use this function if you want to have a guided scanned channels will be removed Reset Use this The scr e to...

Page 52: ...please follow the instructions on page 39 Modes aspect ratio 1 33 1 source is preserved so black bars adcasts a ft and right of the display image Standard TV bro 4 3 Aspect Ratio Movies in 4 3 Aspect...

Page 53: ...es not turn off repeat Steps 2 through 4 with the next code listed for the component and manufacturer Notes If the codes do not work or your brand is not listed see Searching for Component Codes Somet...

Page 54: ...number buttons If the code is accepted the LED flashes twice after the last digit is entered If the LED does not flash twice repeat Steps 2 through 4 wit 5 Point the remote control at the Cable or Sat...

Page 55: ...00 00012 0 Maspro 01510 Memorex 00000 Mitsubishi 00003 Motorola 01376 00476 00810 00276 01187 01254 00014 01106 Multitech 00883 Myrio 01822 NEC 01496 Nova Vision 00008 Novaplex 00008 00017 NSC 00012 0...

Page 56: ...G 01226 01414 Magnavox 00722 00724 Maspro 01530 McIntosh 00869 Memorex 00724 Mitsubishi 00749 Motorola 00869 NEC 01519 Netsat 00099 Next Level 00869 Optimus 00724 Panasonic 00701 00247 01508 Pansat 01...

Page 57: ...rian 21072 21416 Acoustic Solutions 20730 Advent 21016 Afreey 20698 Aiwa 20641 Akai 20695 20705 20770 20899 21089 Alba 20672 20717 Alco 20790 Allegro 20869 Amphion Media Works 20872 AMW 20872 Apex Dig...

Page 58: ...623 20867 21164 Kawasaki 20790 Kenwood 20490 20534 KLH 20717 20790 21020 21149 Kloss 20533 Koss 061 20651 21 Lasonic 20627 20798 Lecson 21533 Lenoxx 21127 LG 20591 20741 20869 20801 LiteOn 21058 21158...

Page 59: ...Tevion 20651 Theta Digital 20571 Thomson 0511 20522 2 Tivo 21588 21503 Toshiba 21588 20503 20573 20539 20695 21045 21154 21503 21639 Tredex 20800 Unimax 20770 United 20730 Universum 20591 Urban Conce...

Page 60: ...Oritron 31366 31497 Outlaw 30391 Panasonic 31308 31518 30367 31316 31633 764 30309 31288 31548 31763 31 Philips 311 30891 31266 89 31269 30189 30391 Pioneer 31023 30014 30150 30244 30531 30630 31384...

Page 61: ...240 Bell Howell 20035 20048 20039 20000 20104 20046 20479 Broksonic 20184 20121 20209 20002 20208 20479 21479 Calix 20037 Candle 038 20037 20 Canon 20035 Capehart 20020 20002 20062 Carrera 20240 Carve...

Page 62: ...Kenwood 20041 20067 20038 20046 KLH 20072 Kodak 20035 20037 KTV 20000 LG 21037 20037 20240 20038 Linksys 21972 Lloyd s 20038 20240 20000 20072 20208 Loewe 20081 Logik 20240 2 20072 0000 Lumatron 20278...

Page 63: ...sar 20035 20162 20002 21035 21162 RadioShack 20035 20162 20037 20048 20047 20240 20000 20046 20 20104 062 21037 21162 Radix 20037 Randex 20037 RCA 20060 20035 20048 20240 20045 20000 20149 20042 20105...

Page 64: ...m 20240 Toshiba 008 21972 20240 20045 20000 20042 20043 20209 20041 20062 20845 21 21145 21996 VCR Codes Tosonic 20278 Totevision 20037 20240 Touch 21972 Trix 20037 Ultra 20045 20278 20020 Unitech 202...

Page 65: ...he acking r seriously contaminated use a soft cloth mois uted n the display Wring water out of the cloth reven e housing Wipe the display with a ing enance an Troubleshoot Maintenance Important 1 Make...

Page 66: ...indow If th Check the connections of external devices that may be connected to the HDTV Press the TV button on the top of the remote to return to the TV mode e screen is black Make sure the power butt...

Page 67: ...resolution If you are using an antenna the sure your antenna is connected securely to the TV and move the room or close to a window The display image does not cover the entire screen e If you are usi...

Page 68: ...the file complies with the supported format bit rate and or profile Also check the file for damage Some files that comply with the supported format may not play back or display properly Slideshow does...

Page 69: ...CC Cl NOTE This ant to Part 15 of t interference frequency energy and if no interference to radio commu d and used in accordance with the inst ica ions However there is no guarantee th pment does caus...

Page 70: ...component video TV Computer support at 640x480 800x600 1024x768 1360x768 1920x1080 via VGA Computer support at 640x480 1920x1080 via HDMI SRS TSHD SRS TruVolume PIP Multimedia Port decoder Dolby Digi...

Page 71: ...s SV421XVT 51 5 lbs SV471XVT 63 6 Certifications S FCC Class B CSA CSA U Compliances tar 3 0 ATSC Spec A 65 EIA CEA 766 A Energy S Product specifications may change without notice or obligation Note T...

Page 72: ...to the reverse side of this page for additional information regarding how to obtain warranty service PLEASE DO NOT RETURN YOUR UNIT TO VIZIO WITHOUT PRIOR oduct Warranty VIZIO provide workmanship t N...

Page 73: ...sales receipt as evidence of the purchase date and location This limited warranty applies only to original purchaser and is non transferable Note Warranty service conditions are subject to change For...

Page 74: ...equired to ship the unit to IZIO s service center per the below V VIZIO is not responsible for the de in installation may be performed d VIZIO s Limited Product Warranty for warranty terms and conditi...

Page 75: ...33 Naming Inputs Brightness Cable Box Connecting 19 Camcorder Parental Controls 49 Block Unrated Programming 51 Connecting 25 CC Closed Caption 16 48 Changing Channels 39 Channel information 46 Clean...

Page 76: ...46 Parental Controls 49 PIP 46 Setup Wizard 51 System Menu 51 Wide 47 arpness 41 ip Channel 45 eep timer 47 ecifications Media Port 29 TV 70 Stereo Connecting 26 18 S Video nt 41 leshooting 66 Troub T...

Reviews: