background image

● 

The bracket is suitable for concrete wall mounting or wooden stud wall.

● 

Concrete wall mounting thickness must be a minimum 

4

'' (100mm). Anchor bolt and s

c

rew (M6 × 55) are 

needed  to be used for 

concrete wall

 installation. 

● 

Dry-wall 

wall 

 thickness must be a minimum 

4.5"


(

114

mm). Only s

c

rew(M6 × 55) is needed to be used for   

installation, and gypsum board thickness 

less

 than 

0.59"

 (

15mm

).  

If the wall is not strong enough,

 r

einforce it sufficiently before installation. 

● 

Please contact 

reseller

 if you have any questions 

about mounting surface issue.
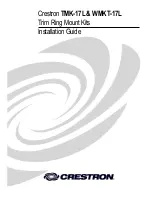
>55mm

ø

10~11mm

B


Concrete wall mounting


Use anchor bolt

>55mm

ø

3mm


Dry-wall mounting


Not use anchor bolt


When installation on the

wood stud wall,

 Align the 

center of the wall mount 
plate with the center of 
the stud. 

screw central point

Loosen the screws with L3 allen wrench, 
pull out the support arm around 


4

'' (

100mm

)

and make power cable & signal cables go 
through the support arm.

The cables can be got through the wall plate 
by three ways as shown in the pictures. Then, 
Lock


the


screw

  “

F

” 

, but not


tighten it


s

c

rew (M6 × 55) are needed  

for installation in concrete wall mounting

s

c

rew (M6 × 55) are needed 

for installation in dry-wall mounting

Pg.4

C

A

C

A

Take off the cap

Loosen the screw

D

C

F

The arrows up

The arrows up

The cables

The cables

The cables

Summary of Contents for WM-3

Page 1: ...ed mounts or projectors on to the mount Suf cient expertise is required for installing this projector wall mount Do not use the projector wall mount for purposes other than for which it is designed Please contact Vivitek at 1 855 885 2378 with any questions pertaining to the correct installation of this projector mount 46101 FREMONT BLVD FREMONT CA 94538 TEL 855 885 2378 EMAIL WWW VIVITEKUSA COM P...

Page 2: ...pport Arm X 1 Wall Cover X 1 Projector Mounting Plate X 1 B NO C D E A 5 5 1 3 F Screw M6X55 Φ10mm Anchor bolt L5 Allen key 4 Screw M4X10 diagrammatic presentation designation quantity 1 L3 Allen key Screw M6X15 Wall Plate Cover X 1 2 3 4 5 7 8 9 Pg 2 G M4 connecting screw 3 ...

Page 3: ...en width 2 0 351 87 221cm 13 33cm WXGA 1280x800 Image Size Diagonal Width Height 14 35 5cm 14 9 37 8cm 74 188cm 46 117cm 94 239cm 80 203cm 50 127cm 100 254cm 85 216cm 53 135cm Projector Resolution V Offset Distance between bottom of wall plate to top of image 87 221cm Image Size Diagonal Width Height 1080P 1920x1080P 76 193cm 43 109cm 12 5 31 75cm 92 234cm 80 203cm 45 114cm 13 125 33 34cm 94 239cm...

Page 4: ...10 11mm B Concrete wall mounting Use anchor bolt 55mm ø3mm Dry wall mounting Not use anchor bolt When installation on the wood stud wall Align the center of the wall mount plate with the center of the stud screw central point Loosen the screws with L3 allen wrench pull out the support arm around 4 100mm and make power cable signal cables go through the support arm The cables can be got through the...

Page 5: ...to your need Tighten the screw F after locating the projector position C F A B Move the projector mounting plate leftwards rightwards to determine the projector position Leftward Rightward sliding distance Pg 5 E G If the surface is not at pls use the G to avoid interference Sliding distance of adjusting the projector upward downward 3 15 80mm ...

Page 6: ......

Page 7: ......

Page 8: ......

Reviews: