background image

DU9900Z DLP Projector - User Manual 


21 

UM99000721EN00


Adjusting the Projection Mode 

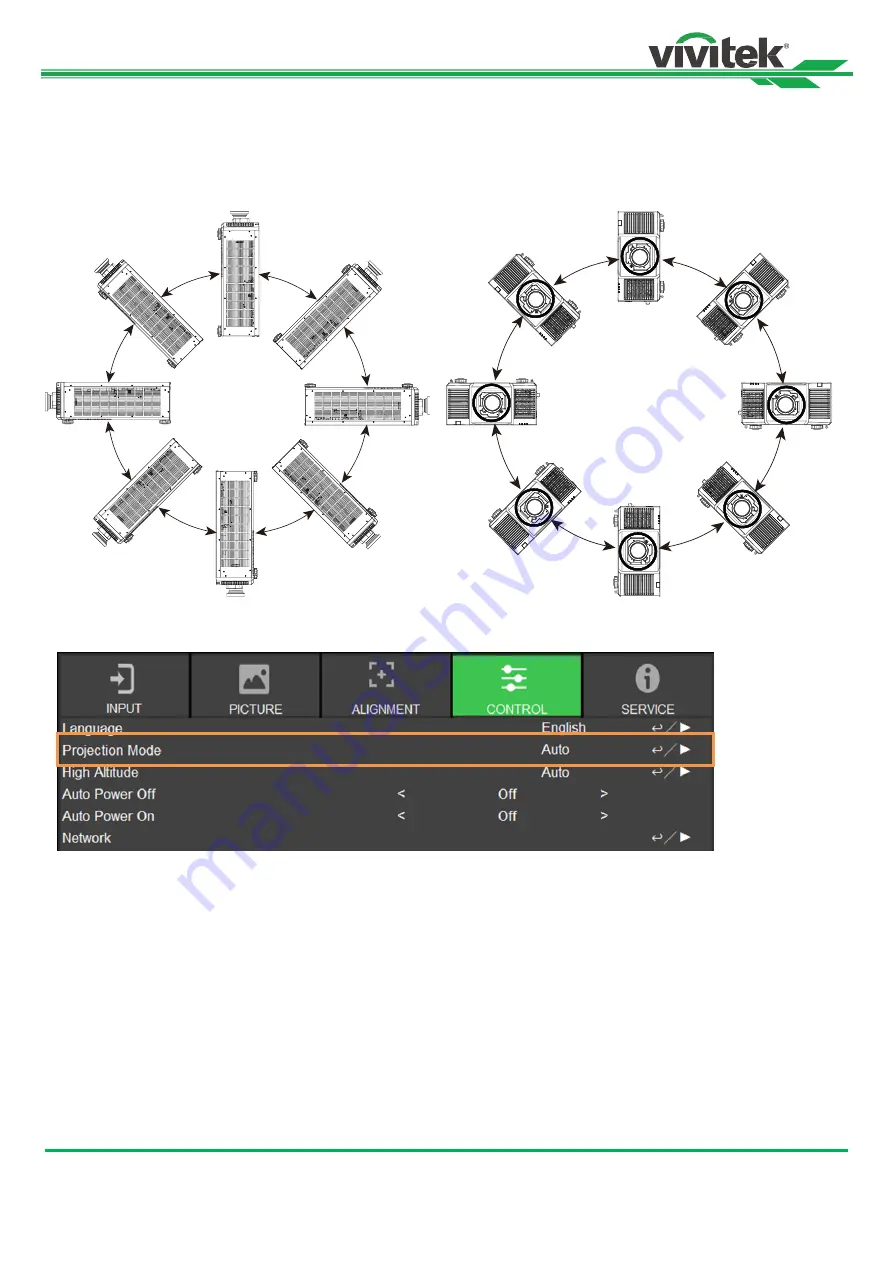
DU9900Z is designed for set up in all angles including desktop, ceiling, portrait and free-tilt installation as shown in the 

below illustration. 


You can change the direction of the image using the Projection Mode. The projector has a smart cooling mechanism, 

which regulates the fan automatically according to the projection mode. 


Use the ◄ o r ► button to select a projection mode to flip the projected image as installation orientation or viewing 
direction. The selection options are described as below. 

Auto-Front: 

Turn on the orientation sensor to change automatically the direction of the image. 

Front Desktop:

 Install the projector on the desktop and project the image forward. 

Rear Desktop:

 Install the projector on the desktop and project the image from the rear of the screen. 

Front Ceiling:

 Mount the projector on the ceiling and project the image forward. 

Rear Ceiling: 

Mount the projector on the ceiling and project the image from the rear of the screen. 

Summary of Contents for DU9900Z

Page 1: ...900Z User s Manual User s Manual DU9 ...

Page 2: ...Connecting to AC Power Supply 19 Turning On the Projector 19 Turning Off the Projector 20 Adjusting the Projection Mode 21 Adjusting the Projected Image Position 22 Adjusting the Focus and Zoom 22 Adjusting Geometric Distortion 23 Keystone 23 Rotation 24 Pincushion Barrel 24 Arc 25 Corner Adjustment 26 Preventing Unauthorized Use of the Projector 28 Using the Control Panel Lock 28 Using the Securi...

Page 3: ...TURE 46 OSG Menu ALIGNMENT 48 OSD Menu CONTROL 51 OSD Menu SERVICE 55 Product Specification 56 Supported Signal Input Timing 57 Configurations of Terminals 60 DU9900Z Lens Series 61 Product Dimensions 62 LED Indication 63 Common Problems and Solutions 64 About the Vivitek Support 66 ...

Page 4: ...t provide any statement or warranty of the contents in the manual and clearly give up the implied warranties of merchantability and of fitness for a particular purpose The manufacturer reserves the rights to modify the publication and change the contents of the materials at any time without notice to any person About the Manual The manual describes how to install and use the projector and is appli...

Page 5: ...ight expose user to a little lead a chemical known to the Stage of California resulting in risks of barrenness Please remember to wash hands after handling NOTIFICATION CANADA This Class A digital equipment complies with Canadian ICES 003 CE NOTIFICATION This is a Class A product which complies with rules for CE marking This product may cause radio interference that the user may be supposed to tak...

Page 6: ...cedures of operation LASER LIGHT AVOID DIRECT EYE EXPOSURE Do not point laser or allow reflected laser light toward other people or reflective objects Direct or scattered light can be hazardous to eyes and skin There is a potential hazard of eye exposure to laser radiation if the included instructions are not followed Caution use of controls adjustments or performance of procedures other than thos...

Page 7: ...getting into standby mode User should only use the connectors or accessories provided by the manufacturer 12 When user turns on the projector the red LED indicator would flash until stabilized Do not look at the lens directly while the projector is running 13 Unplug the power cord of the equipment if there is a thunderstorm or the equipment is not going to be used for an extended period of time 14...

Page 8: ...y updated due to the continuous product improvements and customer feedback You can find the latest version of the Manual and the manual of other Vivitek products on www vivitekcorp com Packing Checklist The following items are included in the packaging box of the DU9900Z series projector If there is any loss or damage to any item contact your dealer or Vivitek customer service department Power Cor...

Page 9: ...he lens Settings see OSD controls 6 AC Power Switch Turn on off the AC power of the projector 7 AC Inlet Connect the supplied power cable to this inlet 8 I O Connector Panel Connect to various input control or output terminals to the projector 9 Lens Release Button Press the Lens Release button before removing the lens 10 Height Adjuster Adjust level of projector 11 Intake Vent The fans pull air t...

Page 10: ...6mm 14 Recess for projector handling These four recesses can be used for handling the projector Caution When installing ensure that you use only UL Listed ceiling mounts Contact your dealer for information on mounting the projector on a ceiling With ceiling installation use approved mounting hardware M6 screws maximum depth of screw is 16 mm ...

Page 11: ...ect an Ethernet cable Cat5 Cat6 not supplied from a computer network device or HDBaseT transmitter HDMI 1 Connect the HDMI cable from a computer or video device DVI D Connect to DVI D cable from a DVI D output of the device DisplayPort Connect the DisplayPort cable from a computer or video device SDI IN OUT Connect to SDI source HDMI 2 Connect the HDMI cable from a computer or video device 3D SYNC...

Page 12: ...NTER Use the button to select settings or confirm the changed settings EXIT Push the button to return to the menu on the previous level or exit the OSD menu CENTER LENS Push the button to center the lens and calibrate the parameter of lens shift Note The lens position needs to be calibrated for the accurate lens shift operation after installing the lens Please center the lens every time after the ...

Page 13: ...ens right or left ENTER Use the button to select settings or confirm the changed settings MENU Press the button to display or hide the OSD Menu EXIT Press the button to return to the previous Menu or exit the OSD Menu AUTO PC You can use this function to execute signal source auto synchronization BLANK Press the button to temporarily interrupt the projection STATUS Show OSD MENU SERVICE VGA Select...

Page 14: ...esume the projection ID SET Set up ID number for remote control refer to the section Using Control ID for Multi projector Application Remote Control Operating Range The remote control uses the infrared transmission to control the projector It is not necessary to point the remote directly at the projector Provided you are not holding the remote perpendicular to the sides or the rear of the projecto...

Page 15: ...ting turned on Certain high frequency fluorescent lights can disrupt remote control operation Be sure nothing obstructs the path between the remote control and the projector Do not expose the remote control to high temperature or humidity otherwise the remote control will not function correctly Battery installation instructions Make sure the battery is installed with the correct polarity Do not us...

Page 16: ...mation about mounting the projector on a ceiling Only use the projector on a solid and level surface Serious injury and damage can occur if the projector is dropped Caution Ensure that the hot air from the exhaust vent is not sucked into the projector Ensure the air intake and exhaust vents are unobstructed and keep the required distance from any object Below is required minimum distance between t...

Page 17: ...er Manual 16 UM99000721EN00 Mounting the Projector For mounting the projector please use UL Listed ceiling mounts and M6 screws maximum depth of screw is 16 mm 155 220 155 233 105 160 245 6 mounting holes M6 1 Max length L 16 ...

Page 18: ...f the main power switch Do not touch the lens surface when removing or installing the lens Keep fingerprints dust or oil off the lens surface Do not scratch the lens surface Work on a level surface with a soft cloth under the projector to avoid scratchs or other damage If you remove and store the lens attach the lens cap to the projector to keep out dust and dirt Install New Lens 1 If the Lens cov...

Page 19: ... projector be sure to remove the lens cap from the back of the optional lens before installing the optional lens into the projector Failure to do so will cause damage to the projector and lens There is one safety switch inside the projector s lens slot to prevent unexpected injury by laser beam The projector cannot be turned on if the projection lens has not been installed or is not installed corr...

Page 20: ...ure that the projector can operate normally Turning On the Projector Once the projector is correctly located and the power cable and other connections are in place it is important that the projector is powered on correctly in order to avoid damage to components and un necessary wear and tear Refer to the following guide to power on the projector 1 Press the main power switch to the on I position a...

Page 21: ... equipped with a power on switch and surge proector Do not turn off the AC power supply within 10 seconds after making adjustment or changing the setting Doing so is possible to cause loss of adjustments and settings and return to default Refer to the following guide to shut down the projector 1 Press the POWER button on the control panel or OFF button on the remote control once the Power Off wind...

Page 22: ...he o r button to select a projection mode to flip the projected image as installation orientation or viewing direction The selection options are described as below Auto Front Turn on the orientation sensor to change automatically the direction of the image Front Desktop Install the projector on the desktop and project the image forward Rear Desktop Install the projector on the desktop and project ...

Page 23: ...ctor is equipped with a safety switch inside the lens mount hole The projection lens must be installed in the projector before turning on the power or the projection can t be displayed There is a Lens Lock function on OSD menu to disable lens control adjustment for avoiding possible misoperation after you finish the adjustment Please make sure to disable the lock before performing the lens control...

Page 24: ...stortion the adjustable value in horizontal and vertical correction is 30 The illustration is as below Horizontal Keystone 600 60 0 600 60 Vertical Keystone 400 40 0 400 40 Besides correcting H and V Keystone by separate you can use H and V keystone combination to correct the distortion In this case the effective range may be limited Note Above adjustable range is for the case you adjust single di...

Page 25: ...that the image size is shrunk for projecting full image when Rotation is enabled please refer to below illustration for adjustable range 100 25 0 100 25 Pincushion Barrel When image is projected onto a cylindrical screen or hemispherical domes you can use Pincushion Barrel Correction to correct the distortion Use the or button to adjust Pincushion Barrel effect Keystone or rotate the image by Rota...

Page 26: ...when H or V Keystone is adjusted When rotation is adjusted the image size is shrunk to fit for the active display area Arc Besides correcting the pincushion or barrel effect ARC function allows you to correct the distortion on one edge You can seperatly correct the distortion on top bottom left or right of the image Please refer to below illustrations Top 150 30 0 150 30 Bottom 150 30 0 150 30 Rig...

Page 27: ...y occur due to the installation or projected surface In this case you can use Conner adjustment to correct the distortion corner by corner Please refer to below illustrations Top Left Corner Horizontal 192 Pixiels 0 192 Pixels Vertical 120 Pixiels 0 120 Pixels Top Right Corner Horizontal 192 Pixels 0 192 Pixels Vertical 120 Pixels 0 120 Pixels ...

Page 28: ...1EN00 Bottom Left Corner Horizontal 192 Pixels 0 192 Pixels Vertical 120 Pixels 0 120 Pixels Bottom Right Corner Horizontal 192 Pixels 0 192 Pixels Vertical 120 Pixels 0 120 Pixels Custom Warp Apply the geometry adjustment using a PC projector tool ...

Page 29: ...ontrol Buttons Select CONTROL OSD Settings Control Panel Lock to enable the function as the below illustration The pop up message will be shown as below if Control Panel Lock is turned on Select the OK button to confirm or Cancel to ignore the setting Once the Control Panel Lock is enabled all the control buttons on the projector are locked The below message is shown on the screen for several seco...

Page 30: ...Security Lock This function allows you to lock the projector for preventing the unauthorized turning on the projector the setting is valid when you turn on the projector next time Enable the Security Lock Select CONTROL OSD Settings Security Lock then select On to enable the function as below illustration Once Security Lock is turned on the pop up message for setting up the password Lock as is sho...

Page 31: ...ction Unlocking the Projector The projector can be unlocked from the OSD menu enter CONTROL OSD Settings Security Lock and select Off to disable Security Lock as the below illustration Once the Off option is selected the pop up window will be displayed to confirm the setting Select OK to disable the function otherwise select Cancel to ignore the setting Register Password Confirm Password Password ...

Page 32: ... option please OK button to confirm or Cancel button to skip it 2 Set Control ID Number Select Control ID Number option then press Enter button use the button to increase the number or the button to decrease the number This option is available when Projector ID Control is turned on Set the identification number of remote control Press and hold ID SET button on the remote control around 5 seconds P...

Page 33: ...e projector and remote control The identification number of the projector and remote control can be checked by entering the SERVICE menu as per the below image X represents that the function is not enabled the number 26 is the current identification number of the remote control Note Project ID Control function is available when the option is turned on and remote control wire is not plugged into th...

Page 34: ... the light output to your pre defined brightness level and thus maintaining a constant level of brightness To use this function follow the steps below 1 Select SETUP Light Power Light Power Change it to Custom Power Level with a value under 100 For example 90 or 85 The reduced power percentage will be used to later regulate the brightness when the Constant Brightness function is enabled 2 Enable t...

Page 35: ...nnected Fasten the nut on the joint and connect the signal source equipment to the projector according to the image below Connecting a Computer Connect the PC signal to be projected to the projector through the DVI D HDMI DisplayPort VGA or RGBHV BNC cable If the signal to be input is a VGA signal connect the VGA cable to the external display to simultaneously monitor the projected content Connect...

Page 36: ...If the projector cannot receive the IR signal from the remote control due to the overly long distance or obstacles you can connect the cable to the IR remote control or the external IR transmitter optional via the WIRE input port to expand the working range of the remote control 3D Sync Out In Connect to 3D IR sync signal transmitter or device Note When the terminal of the remote control cable is ...

Page 37: ...jection screen and other 12V trigger device you can connect these devices to the projector s 12V trigger output port to configure the 12V signal settings The projector will output 12V signals when it s turned on You can use the signal to control the screen or device by turning on the OSD option under CONTROL Trigger 1 or Triger 2 ...

Page 38: ...ts the video signal R 232 IR remote control and the reception of the network control signals but do not support Power over Ethernet PoE The baud rate will be switched to 9600 automatically If RS232 command is sent via external HDBaseT transmitter If the command is sent via the HDBaseT transmitter the longest transmission distance is 100 meters If the transmission distance exceeds 100 meters there ...

Page 39: ...ol buttons on the projector to navigate and make changes to the OSD The following illustration shows the corresponding buttons on the remote control and on the projector 1 To open the OSD press the Menu button on the OSD control panel or remote control There are five folders on the menu Press the or buttons to move through the submenus or secondary menus 2 Press the or button to select the option ...

Page 40: ...on PIP Input Position Auto Source Off On Color Space Auto YPbPr YCbCr RGB PC RGB Video Aspect Ratio 5 4 4 3 16 10 16 9 1 88 2 35 LetterBox Source Native Overscan Off Crop Zoom VGA Setup H Total H Start H Phase V Start Test Pattern Crosshatch Color Bar Checker Board White Red Green Blue Black 3D 3D Format Eye Swap DLP Link Dark Time Sync Delay Sync Reference Auto Sync Execute PICTURE Picture Mode H...

Page 41: ...reen Gain Blue Gain Dynamic Black Off On Light Off Timer Disable 0 5 1 0 1 5 2 0 3 0 4 0 seconds ALIGNMENT Lens Lock Off On Lens Control Zoom Focus Lens Shift Lens Memory Memory 1 Memory 2 Memory 3 Memory 4 Memory 5 Memory 6 Memory 7 Memory 8 Memory 9 Memory 10 Save keyboard Load Reset Save keyboard Load Reset Save keyboard Load Reset Save keyboard Load Reset Save keyboard Load Reset Save keyboard...

Page 42: ...er 1 User 2 Warp Filter H Warp Filter V Warp Filter Edge Blend Edge Blend Align Pattern Blend Start White Level Black Level Reset Top Bottom Left Right Top Bottom Left Right Top Bottom Left Right All Red Green Blue Screen Setting Screen Format Screen Position 16 10 16 9 4 3 2 35 1 CONTROL Language English Français Español Deutsch Português 簡体中文 繁體中文 日本語 한국어 Projection Mode Front Desktop Front Ceil...

Page 43: ...te Remote Sensor ID Control Enable Control ID Number Trigger 1 Off Screen 5 4 4 3 16 10 16 9 1 88 2 35 Letterbox Source Native Trigger 2 Off Screen 5 4 4 3 16 10 16 9 1 88 2 35 Letterbox Source Native OSD Setting Menu Position Menu Transparency Time Out Message Box Control Panel Lock Security Lock Image Latency Normal Fast SERVICE Model Serial Number Software Version 1 Software Version 2 Control R...

Page 44: ... windows will be shown on the projected picture The larger one is the primary picture the smaller one is the sub picture By choosing Off PIP function will be disabled and only one picture window will be projected PIP Input Press ENTER to display available sources for the sub picture and then select a source Note The unavailable input sources of sub menu will be grayed out and cannot be selected Th...

Page 45: ...white to 255 255 255 RGB if an 8 bit image is used RGB Video Use the RGB color space and set the black to 16 16 16 RGB while set the white to 235 235 235 if an 8 bit image is used to correspond to the luminance value defined in the digital component standard Aspect Ratio This function allows the user to adjust the aspect ratio of the projection image by the or button Overscan Noise may appear on t...

Page 46: ...r deactivate the DLP Link sync Dark Time Manually switch the Dark time for glasses tolerance the available options are 0 65ms 1 3ms and 1 95ms Sync Reference The projector provides DLP Link and 3D IR sync for 3D display the projector will automatically set the sync signal depended on the 3D format and if the external 3D sync device is connected This function is only applied to the condition that 3...

Page 47: ...t the contrast of the projected image Saturation Press ENTER and use the or button to adjust the level of saturation Hue Press ENTER and use the or button to adjust the level of hue Sharpness Press ENTER and use the or button to adjust the sharpness which changes the high frequency details Color Temperature The default of color temperature is Native and it is suitable for most situations As color ...

Page 48: ...By increasing the offset the image brightness will become lower Gain These three options are used to increase or decrease the range of color input for the entire image If minimal amount of red green or blue appears in the gray areas lower the gain of the corresponding color accordingly As gain increases the contrast of the image will become lower HSG HSG is a function to adjust Hue Saturation and ...

Page 49: ...d horizontal shift of the lens Lens Memory This projector supports Lens Memory function Lens shift Zoom and Focus memory can be stored in the projector up to 10 sets You can load the stored memory setting to set up the lens automatically Select Lens memory 1 10 ENTER key to Save Load Press to switch Load Reset state CLEAR key to Reset Center Lens This is the lens calibration function the projector...

Page 50: ...n Barrel Press the or button to correct pincushion barrel distortion Top Left Corner Press the or button to correct the distortion at top left of the picture Top Right Corner Press the or button to correct the distortion at top right of the picture Bottom Left Corner Press the or button to correct the distortion at bottom left of the picture Bottom Right Corner Press the or button to correct the d...

Page 51: ...hite Level is used to set the overlapped area for blending in multi projection application the overlapping When projecting White the area where the two images overlap is projected twice the projectors white output levels The solution is to adjust the White Level First make sure that the units connected to the projectors are outputting black Then increase the White Level Top Bottom Left and Right u...

Page 52: ...led in an area over 4000 feet The projector is equipped with an altitude sensor which is capable of detecting atmosphere pressure for estimating altitude If the Auto option is set to AUTO then the system can adjust automatically to corresponding settings that are based on an estimated altitude If you prefer to manually set this feature you can select On or Off Off Turn off High Altitude mode if th...

Page 53: ...IP address window without need to make any input If the domain cannot assign any IP address 0 0 0 0 will be shown on the IP address window IP Address To specify an IP address press the Enter button to show the IP address input window Use the or button to select the number in the address to change Use the or button to increase or decrease the number in the IP address Network IP Address 172 xxx xxx ...

Page 54: ...screen and projector by a cable Once the projector is powered on the screen would be automatically turned on as well There is a 2 3 second delay to activate this function The selectable aspect ratios are as follows Off Turn off screen trigger Screen Outputs 12V of power on Trigger for whichever aspect ratio 5 4 Outputs 12V of power on Trigger when Aspect Ratio is set to 5 4 4 3 Outputs 12V of powe...

Page 55: ...te the projector Refer to page 29 Using the Security Lock for detail message Image Latency This function allows you to set image latency Note that normally the image latency should be set to Normal for best picture quality Normal Set image latency to 2 frames Fast Set image latency to less than 1 5 frames ...

Page 56: ...ber Active Source Display the current input source information Signal Format Display current input source format H V Refresh Rate Display horizontal and vertical refresh rates of the current picture Pixel Clock Displays the pixel clock of the current input signal Light Time Displays the accumulated time which the light source of the projector is used Thermal Status Displays the current status of t...

Page 57: ...mote HDBaseT LAN Shared Projection Method Table Top Ceiling Mount Front or Rear Free Tilt Portrait Security Solutions Kensington Security Slot Security Bar Dimensions WxDxH 748 x 530 x 248mm 29 4 x 20 8 x 9 7 Weight 49kg 1kg 108 0lbs 2 2lbs Noise Level 48dB Normal Mode Power Supply AC 100V 130V 50 60Hz AC 200V 240V 50 60Hz Power Consumption Normal Mode 1150W 110Vac 1950W 220Vac Standby Power On Le...

Page 58: ...7 5 75 108 000 1280x720 35 531 47 95 57 987 1280x768 47 776 60 79 500 1280x768 60 289 74 89 102 250 1280x768 68 633 84 84 117 500 1280x800 49 702 60 83 500 1280x800 62 795 74 93 106 500 1280x960 60 000 60 108 000 1280x960 85 938 85 148 500 1280x1024 63 981 60 02 108 000 1280x1024 79 976 75 02 135 000 1280x1024 91 146 85 02 157 500 1366x768 47 712 60 85 500 1440x900 55 935 59 89 106 500 1440x900 70...

Page 59: ...0x576i 31 250 50 27 000 EDTV 480p 31 469 59 94 27 000 576p 31 250 50 27 000 HDTV 1035i 33 750 60 74 250 1080i 28 125 50 74 250 1080i 33 716 59 94 74 176 1080i 33 750 60 74 250 720p 37 500 50 74 250 720p 44 955 59 94 74 176 720p 45 000 60 74 250 1080p 26 973 23 98 74 176 1080p 27 000 24 74 250 1080p 28 125 25 74 250 1080p 33 716 29 97 74 176 1080p 33 750 30 74 250 1080p 56 250 50 148 500 1080p 67 4...

Page 60: ...5 100 1080p59 Top and Bottom 1920x1080 59 94 1125 67 43 5 120 1080p60 Top and Bottom 1920x1080 60 00 1125 67 50 5 100 1080p50 Frame Sequential 1920x1080 50 00 1125 56 25 100 1080p59 Frame Sequential 1920x1080 59 94 1125 67 43 120 1080p60 Frame Sequential 1920x1080 60 00 1125 67 50 120 1080p100 Frame Sequential 1920x1080 100 00 1125 112 50 4 5 100 1080p120 Frame Sequential 1920x1080 120 00 1125 135...

Page 61: ...een Input 10 GND 3 Blue Input 11 GND 4 N C 12 VGA_SDA 5 N C 13 H Sync 6 GND 14 V Sync 7 GND 15 VGA_SCL 8 GND 16 GND HDMI 19 pin Type A 1 T M D S Data 2 Input 11 Ground 2 Ground 12 T M D S Clock C Input 3 T M D S Data 2 Input 13 CEC 4 T M D S Data 1 Input 14 N C 5 Ground 15 SCL 6 T M D S Data 1 Input 16 SDA 7 T M D S Data 0 Input 17 Ground 8 Ground 18 P5V 9 T M D S Data 0 Input 19 HPD 10 T M D S Cl...

Page 62: ...orized Vivitek dealer for additional details Part Number Lens Name F Number Focal Length Zoom Ratio Screen Size Throw Ratio D98 0912 Extreme Ultra Wide Angle Lens 2 2 2 53 19 34 25 76mm 1 33 1 50 500 0 9 1 2 1 D98 1215 Short Throw Lens 2 18 2 66 25 69 33 22mm 1 3 1 40 500 1 2 1 56 1 D98 1520 Standard Lens 2 17 2 65 31 9 42 2mm 1 33 1 40 500 1 5 2 0 1 D98 2040 Longer Zoom Lens 2 17 2 64 42 6 84 8mm...

Page 63: ...DU9900Z DLP Projector User Manual 62 UM99000721EN00 Product Dimensions 155 220 155 233 105 160 245 6 mounting holes M6 1 Max length L 16 248 530 743 ...

Page 64: ...or No Error ORANGE repeat flash 2 times Request to re execute the Lens Calibration process GREEN repeat flash 2 times Lens calibration is processing RED repeat flash 1 time Cover Error RED repeat flash 2 times TEC Color sensor Problem RED repeat flash 4 times Fan Error ORANGE solid on Firmware Upgrade mode RED solid on System Error LIGHT LED Indicator LED Color and Status Pattern Sequence Conditio...

Page 65: ...reen 1 Verify the settings on your notebook or desktop PC 2 Turn off all equipment and power up again in the correct order 3 Check if shutter is enabled Problem The image is blurred 1 Adjust the Focus on the projector 3 Performance Auto Sync on the remote control or projector 4 Ensure the projection distance is within the specified range 5 Check that if the projection lens is clean Problem The ima...

Page 66: ...eck if the lens is installed properly improper lens installation may cause to lens cannot work normally Please follow the lens installation procedure to check again 2 Check if Lens Lock function is enabled locking the lens will disable all of lens adjustment functions 3 Perform Center Lens function to calibrate the Lens again 4 Replace the other lens to check the problem if the lens is available 5...

Page 67: ...t contact support North America Vivitek Service Center 15700 Don Julian Road Suite B City of Industry CA 91745 U S A Tel 855 885 2378 Toll Free Email T services1 vivitekcorp com URL www vivitekusa com Asia and Taiwan Vivitek Service Center 7F No 186 Ruey Kuang Road Neihu District Taipei Taiwan 11491 Tel 886 2 8797 2088 ext 6899 Direct Tel 0800 042 100 Toll Free Email kenny chang vivitek com tw URL...

Reviews: