VITO PRO-POWER SDS-MAX Instruction Manual Download Page 15

EN

15

Make sure that extension cord 

is in good condition before 

using. Always use the cord that 

is suitable for the power input 

of your tool (see technical data 

on name plate). The minimum 

conductor size is 1.5mm 2.

DESCRIPTIOn (FIG. A).

Your heavy-duty rotary 

hammer has been designed for 

professional rotary drilling and 

hammer drilling as well as light 

chipping.

1. Variable speed ON/OFF switch.

2. Mode selector.

3. Safety lock.

4. Steel ball support.

5. Front cover.

6. Side handle.

TORQUE LIMITInG 

CLUTCH

These tools are equipped with a 

torque limiting clutch that reduces 

the maximum torque reaction 

transmitted to the operator in 

case of jamming of a drill bit. This 

feature also prevents the gearing 

and electric motor from stalling. 

The torque limiting clutch has 

been factory-set and cannot be 

adjusted.

ASSEMBLY AnD 

ADJUSTMEnT

Prior to assembly and adjustment 

always unplug the tool. N.B. 

nOTE:Accessories mentioned in 

this manual may not necessarily 

be included in your pack. 

Selecting the Operating Mode 

(Fig. B). The rotary hammer 

drill can be used in the following 

operating modes. Hammer 

drilling: simultaneous rotating 

and impacting for concrete and 

masonry drilling. Hammer only: 

for light chipping, chiseling and 

demolition applications. In this 

mode the tool can also be used 

as a lever to free a jammed drill 

bit. Select the required operating 

mode by depressing the safety 

lock (3) and rotating the mode 

selector switch (2) until it points 

to the symbol of the required 

mode. Release the safety lock 

and check that the mode selector 

switch is locked in place. Do 

net select the operating mode 

when the tool is running. For 

screw driving, refer to section 

“Instructions for use”.
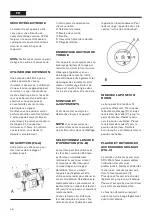
InDEXInG THE CHISEL 

POSITIOn

The chisel can be indexed and 

locked into 51 diferent positions. 

Depress the safety lock (3) and 

rotate the mode selector switch 

(2) until it points to the “‘D2bit 

rotation”Position. Rotate the 

chisel in the desired position. Set 

the mode selector switch (2) to 

the “hammering only position. 

Twist the chisel until it locks in 

position. 

InSERTInG AnD 

REMOVInG SDS-MAX 

ACCESSORIES (FIG.C)

Your rotary hammer drill uses 

SDS-MAX accessories (refer to 

the inset in fig.C for a cross-

section of an SDS-MAX bit 

shank). We recommend using 

professional accessories only. 

Clean and grease the bit shank. 

Insert the bit shank into the tool 

steel ball support (4). Push the bit 

to check if it is properly locked. 

The hammering function requires 

the bit to be able to move axially 

several centimeters when locked 

in the bit holder. To remove a 

bit pull back the tool bit holder 

locking sleeve (4) and pull out 

the bit. 

Summary of Contents for PRO-POWER SDS-MAX

Page 1: ...AL DE INSTRUCCIONES INSTRUCTION MANUAL MODE D EMPLOI MARTELO PERFURADOR DEMOLIDOR SDS MAX MARTILLO PERFORADOR DEMOLEDOR SDS MAX PT ES ROTARY HAMMER SDS MAX MARTEAU PERFORATEUR PIQUEUR SDS MAX en fr P...

Page 2: ...tes de travail ICONOGRAFIA ICONOGRAF A ICONOGRAPHY ICONOGRAPHIE Sistema anti vibra o Sistema anti vibraci n Anti Vibration system Systh me anti vibration Fun o martelo Funcion martillo Hammer function...

Page 3: ...Utilize grampos para segurar a pe a que est a trabalhar mais seguro e mant m ambas as m os livres para operar com a m quina 10 Liga o de equipamento de extrac o de p Se as m quinas forem fornecidas c...

Page 4: ...r a m quina corrente Desligue a m quina da corrente sempre que iniciar um trabalho 26 N o force a m quina Ela far um trabalho melhor e mais seguro velocidade para a qual foi concebida 27 Segure a m qu...

Page 5: ...nclu dos na embalagem Seleccionar o modo de opera o fig B O martelo pode ser utilizado com as seguintes fun es Martelo perfurador simultaneamente rota o e impacto para cimento e alvenaria Martelo para...

Page 6: ...U ES DE UTILIZA O Observe sempre as instru es de seguran a e regulamentos aplic veis Tenha em aten o a coloca o de tubagens e cablagens Aplique apenas uma press o ligeira com a m quina aproximadamente...

Page 7: ...lizados por pessoal qualifcado e autorizado para o efeito Utilize sempre sobressalentes originais ATEN O A utiliza o de sobressalentes n o recomendados pode resultar em diversos danos PROTEC O AMBIENT...

Page 8: ...n de equipamiento de extracci n de polvo Si las m quinas fueran suministradas con estos equipamientos asegure que los mismos est n a ser debidamente utilizados especialmente en reas peque as 11 Remue...

Page 9: ...s met licas de la m quinas en partes vivas causando un choque el ctrico al operador 28 No utilice punteros o talhadeiras en cualquiera una de las posiciones de rotaci n por ejemplo martillo rotativo o...

Page 10: ...correcto No seleccione la operaci n con la m quina en funcionamiento Para desaperto refera para la secci n instrucciones de utilizaci n INDEXAR LA POSICI N CINCEL El cincel puede ser fjado en 51 posi...

Page 11: ...ESCONECTAR FIG A Para conectar la m quina presione el interruptor 1 La presi n ejercida en el interruptor va a determinar la velocidad con que la m quina ir a trabajar Para parar la m quina largue el...

Page 12: ...uede llegar el d a en que su m quina precisa de sustituci n o que su utilizaci n ya no es necesaria Piense en la preservaci n del ambiente Recomendamos en estos casos el contacto con las autoridades l...

Page 13: ...es both hands to operate the tool 10 Connecting dust extraction equipment If devices are provided for the connection of dust extraction and collection ensure these are connected and properly used espe...

Page 14: ...is not ON before you plug in Always switch OFF before you put your hammer drill down 26 Do not force your hammer drill D0 it will do a better and safer job at the speed for which it was designed 27 Ho...

Page 15: ...ng chiseling and demolition applications In this mode the tool can also be used as a lever to free a jammed drill bit Select the required operating mode by depressing the safety lock 3 and rotating th...

Page 16: ...rve the safety instructions and applicable regulations Be aware of the location of pipe work and wiring Apply only a gentle pressure to the tool approx 5Kg Excessive force does not speed up drilling b...

Page 17: ...HE ENVIRONMENT Should you fnd one day that your tool needs replacement or if it is of on further use to you think of the protection of the environment pleas recommends you to contact your local counci...

Page 18: ...intenez vous alerte et soyez attentif ce que vous faites Utilisez le bon sens lorsque vous manipulez un appareil lectrique N utilisez pas l appareil si vous vous sentez fatigu 9 Environnement de trava...

Page 19: ...risquez de perdre le contr le de l appareil Perforer ou rencontrer des mat riaux durs tels que le fer peut galement causer des l sions 24 Utilisez chaque fois que c est possible des serre joints pour...

Page 20: ...et ne peut pas tre r ajust MONTAGE ET AJUSTEMENTS Avant de monter ou d ajuster d branchez toujours l appareil NOTE Les accessoires qui constant dans ce manuel peuvent ne pas tre inclus dans l emballa...

Page 21: ...me option dans votre distributeur SERREZ LE FORET DANS LE CANON Ins rez l adaptateur dans l appareil comme s il s agissait d un accessoire SDS MAX normal Pour retirer l adaptateur proc dez comme si vo...

Page 22: ...la position souhait e Placez nouveau le s lecteur de mode dans la position de d molition Ajustez la poign e lat rale 7 comme vous pr tendez Branchez l appareil et commencez le travail D branchez toujo...

Page 23: ...105 dB A Niveau de puissance mesur LpA 96 dB A S Jo o de Ver 5 Juin 2015 Central Lob o S A Responsable du Processus Technique CERTIFICAT DE GARANTIE La garantie de cet appareil est de deux ans partir...

Page 24: ......

Page 25: ......

Page 26: ......

Page 27: ......

Page 28: ...CENTRAL LOB O S A RUA DA G NDARA 664 4520 606 S JO O DE VER STA MARIA DA FEIRA PORTUGAL...

Reviews: