background image

VITEK 5-in-1 CCTV TESTING MONITOR

VITEK 5-in-1 CCTV TESTING MONITOR


Page  23 


RTSP:

 Get RTSP address of the current camera 

Doc:

 Auto generate test reports document of camera, click "Create document”. Click Preview to view 

the report document. 


Enter the camera test information, click "Create Document" to complete the report.


Click doc menu again, where you can preview the report document.


Page  24 


Icons description: 

the description of function icons on the bottom toolbar 

IP Camera's IP:

 Enter the IP camera’s IP address manually or click “Search” to auto-scan for the IP 

camera’s IP address. It is better to directly connect the IP camera to the tester so the search results will 
only display the camera’s IP address. If the tester is connected to a PoE switch, it will find and display 
several IP addresses 

IPC Username

: Enter IP camera’s user name   

IPC Password:

 Enter IP camera’s login password 

IPC Port:

 When you select the IP camera type, it will default the camera’s port number and doesn’t 

need to be changed.   

After all settings are completed, click “Enter” to view live video 


If IP address setting has an error or IP camera is not connected, the tester prompts “Network Error”   

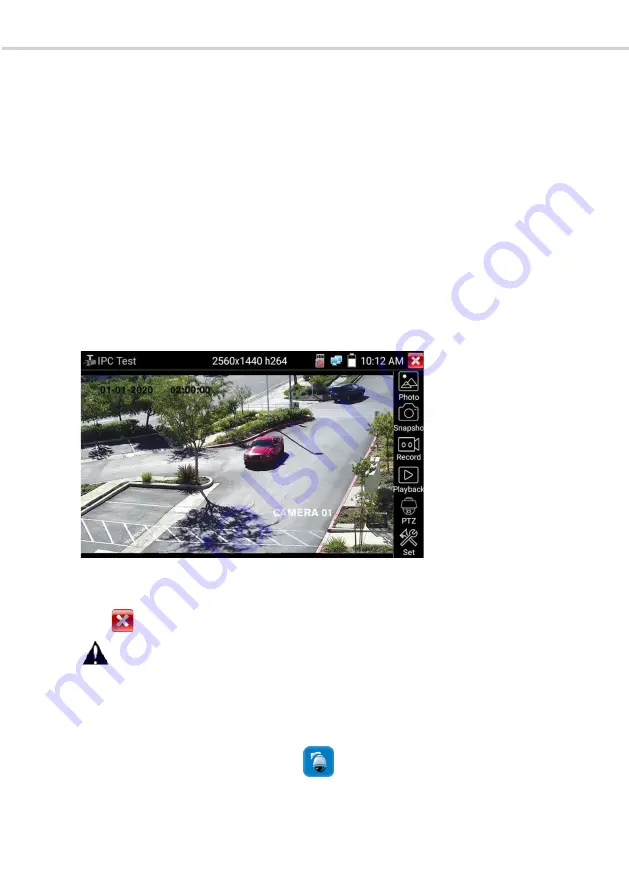
Click      to quit from image display and return to the IP camera test interface. 

  Once you are viewing video on the IPC Test app, you will see the “Video Menu” icon on the top 

right. This button will give you access to Snapshot, Record, Photo, Playback, PTZ, and Set. Please refer 

to the ONVIF section to use these functions. 

3.3.6  Video monitor test


Analog camera test and PTZ control: Click icon         to enter. 

Summary of Contents for VT-SCT-U4

Page 1: ...tects all Network Cameras with Auto Display Network Tool PING Test IP Address Scan Port Flashing Drop down Menu Selects Poe Power IP Setting CVBS LAN Information Self updating Software Install Apps wi...

Page 2: ...nnection 6 3 2 2 Analog camera connection 7 3 2 3 HD Coaxial camera connection 7 3 3 OSD menu 8 3 3 1 Lite mode 8 3 3 2 Screen capture 10 3 3 3 Tester Play 11 3 3 4 IP discovery 12 3 3 5 Rapid ONVIF t...

Page 3: ...ecording 48 3 3 15 Data monitor 49 3 3 16 Audio player 49 3 3 17 Media Player 50 3 3 18 RTSP Player 50 3 3 19 Update 52 3 3 20 Office 52 3 3 21 LED Flashlight 53 3 3 22 Browser 53 3 3 23 Notepad 54 3...

Page 4: ...ce with local rules of electrical usage and avoid places which are inapplicable for the use of electronics of this nature such as hospitals gas stations etc To prevent damage to the unit keep away fro...

Page 5: ...and analog PTZ control The combination of touch screen and key buttons make this IP camera tester highly user friendly The tester is also a great tool for Ethernet network testing Other functions inc...

Page 6: ...3 Function interface 1 Charge indicator The light is red while the battery is being charged When the charging is complete the indicator turns off automatically 2 The RS485 data transmission indicator...

Page 7: ...VITEK 5 in 1 CCTV TESTING MONITOR Page 4 Top interface Left interface Right interface...

Page 8: ...key A long press will capture the screen interface 7 Function switching key 8 Press 2 seconds to turn on or off the device short press to turn on or off menu display 9 RS485 Interface RS485 communicat...

Page 9: ...ry charging is complete Notice When the Charge Indicator turns off the battery is approximately 90 charged The charging time can be extended for about 1 hour and the charging time within 12 hours will...

Page 10: ...1 Connect the camera s video output to the IP tester s VIDEO IN The image will display on the tester after pushing the PTZ icon 2 Connect the camera or the speed dome RS485 controller cable to the tes...

Page 11: ...ith an HD analog input interface There is no output interface 2 Connect the HD camera or the speed dome RS485 controller cable to the tester RS485 interface 3 3 OSD menu Press the key 2 seconds to tur...

Page 12: ...Page 9 In Lite mode tap the finger icon in the lower right corner to turn Orange long press the icon to move the function icon to other items Do not tap the finger icon and long press the application...

Page 13: ...VITEK 5 in 1 CCTV TESTING MONITOR Page 10 Click SD card install or remove SD card 3 3 2 Screen capture Long press the enter key capture screen interface and save it...

Page 14: ...e phone connect to the same Wi fi network Tap icon then select Tester Play app to enter click Start button to generate a two dimensional code Please use mobile phone to scan it then download and insta...

Page 15: ...IP discovery test auto scan the whole network segment IP as well as auto modify the tester s IP to the same network segment with the scanned camera s IP The meter Auto search connects the whole netwo...

Page 16: ...covery App you do not need to know the first two digits of the camera s IP address it can auto scan the whole network segment IP and auto modify tester s IP address greatly improving engineering effic...

Page 17: ...ck the button Refresh and the tester will scan the ONVIF camera again Click the newly displayed ONVIF camera on the Device List The tester will show the IP camera s relative information and settings W...

Page 18: ...Video transmission protocol UTP and TCP protocol Open password cracker Cracks password of cameras Show focus Info Focus Information View manual Open Manual Restore Defaults Revert Rapid ONVIF to defa...

Page 19: ...ide of the image to move left right and up to go up and down to go down Compatible IP PTZ cameras will rotate accordingly PTZ rotation direction is displayed at the top left corner of the image IP cam...

Page 20: ...s and backlight compensation mode Profiles Click profiles to view video streaming current configuration files as well as switch between Major stream and minor stream Preview pictures Quickly preview a...

Page 21: ...VITEK 5 in 1 CCTV TESTING MONITOR Page 18 Time set click Time set Select Manual set to set up the time of camera Maintenance For camera software reset or restore to factory settings...

Page 22: ...VITEK 5 in 1 CCTV TESTING MONITOR Page 19 User Set Modify camera username password etc parameters...

Page 23: ...ensure the IP camera s video coverage and decide the IP camera s installation site The image can only be enlarged on SD mode The icon ONVIF is SD mode Select relative function on the bottom Toolbar to...

Page 24: ...ndicating the time elapsed for the video Click on the Stop icon to stop recording and save the video file to the SD card Playback Click the Playback icon to view saved videos Double click the video yo...

Page 25: ...ition Move the camera to preset position enter the preset number on the Bottom right corner to complete position preset Call the preset position Select the preset number on the left click Call to call...

Page 26: ...current camera Doc Auto generate test reports document of camera click Create document Click Preview to view the report document Enter the camera test information click Create Document to complete the...

Page 27: ...Enter IP camera s login password IPC Port When you select the IP camera type it will default the camera s port number and doesn t need to be changed After all settings are completed click Enter to vi...

Page 28: ...quickly can be full zoom in on the touch screen 1 PTZ controller parameter setting Select and click icon PTZ to enter PTZ setting A Protocol Use the up and down arrow keys to move the yellow cursor to...

Page 29: ...ition number 1 128 click sure to save Call some special preset number can call the dome camera menu Check and set the protocols address interface and baud all must be consistent with the dome camera t...

Page 30: ...540 the zoomed in image is very clear This is very helpful for IP camera installation 3 Snapshot Click the icon Snapshot when the video in to take a picture and save the current video frame in the SD...

Page 31: ...SD card If you select manual storage before recording begins a dialog box Input Name appears with user defined the files name by letter or digit to store in SD card The tester will store the files in...

Page 32: ...ONITOR Page 29 To rename or delete an image click and hold on the file until this screen below appears 6 Recorded video playback Click the Playback icon to view your recorded videos Tap on the video f...

Page 33: ...ra CVI dome camera test and PTZ control click icon to enter When HD CVI signal input is connected the tester will display the image resolution on the top bar Double tap on the screen to make the image...

Page 34: ...CCTV TESTING MONITOR Page 31 1 PTZ control 1 1 Coaxial PTZ control Click the icon PTZ on the right toolbar for the corresponding settings Port select coaxial control Enter PTZ address to perform param...

Page 35: ...eter The tester can control the PTZ and lens To control PTZ by screen touch Tap left right upward and downward on the touch screen to control the PTZ rotation direction PTZ cameras will rotate accordi...

Page 36: ...ea input preset position number Tap call position to complete call preset position 1 2 RS485 control For operation instructions please refer to 3 3 9 PTZ 1 PTZ control parameters setting 2 Coaxial Cam...

Page 37: ...CCTV TESTING MONITOR Page 34 Input calling dome camera menu address code after finishing the parameter settings you can press the key Enter or click the icon to call the dome camera menu set the para...

Page 38: ...play back please refer to 3 3 9 PTZ 1 Video monitor test Tap close menu to close camera menu 4 Save setting Click icon Set on the right toolbar to enter storage setting The tester support auto storag...

Page 39: ...Double tap on the screen to make the image displayed full screen The tester supports the following resolution 1280x720P 25FPS 1280x720P30FPS 1280x720P 50FPS 1280x720P 60FPS 1920x1080P 25FPS 1920x1080P...

Page 40: ...amera menu Input calling dome camera menu address code after finishing the parameter settings you can press the key Enter or click the icon to call the dome camera menu For more operation instructions...

Page 41: ...following resolution 1280x720P 25FPS 1280x720P 30FPS 1920x1080P 25FPS 1920x1080P 30FPS 2048x1536P 18FPS 2048x1536P 25FPS 2048x1536P 30FPS 2560x1440P 15 FPS 2560x1440P 25 FPS 2560x1440P 30 FPS 2592x19...

Page 42: ...in the Port Number Scan to scan for open ports 2 PING Test Connect a network cable to the LAN port and click the icon to open the PING tool You can set your LOCAL native IP address Remote IP address e...

Page 43: ...rst data packet will be lost when the test starts 3 Network test Ethernet bandwidth test Network test Ethernet bandwidth test To use the Network tester you will need two IP testers One is used as a Se...

Page 44: ...be tested with a computer using compatible network bandwidth testing software Install network bandwidth testing software on a computer as a test Client or Server to do the mutual testing with the tes...

Page 45: ...VITEK 5 in 1 CCTV TESTING MONITOR Page 42 Or use tester as a Server computer as test Client select Client input tester s IP address to test When using tester as Server shows results...

Page 46: ...and PoE switch are connected properly the LAN port of POE switch flashes at a special frequency if not test different LAN port Application The tester will send special signals to make the connected L...

Page 47: ...worked devices Click the Refresh button to check your Client list 6 Trace route This is used to determine the path of the IP packet access target Note Trace route testing results are only for referenc...

Page 48: ...ferent network segments click the Settings icon on the main menu and go to IP Settings and make the desired changes Once the desired IP addresses are added to the Link Monitor list click Start If the...

Page 49: ...ted equipment in the whole network segment Click Stop to stop 3 3 12 PoE power DC12V 3A power output When the tester is turned on the DC12V power output functions are automatically turned on To use th...

Page 50: ...er adaptor to resume the tester 4 Before turning on the PoE power output please make sure the IP camera supports PoE power Otherwise it may damage the IP camera 5 Make sure you plug in your IP camera...

Page 51: ...eters Advanced Test Test cable pair status length attenuation reflectivity impedance skew and other parameters Attenuation reflectivity After linking up if the reflectivity value is 0 the best quality...

Page 52: ...ves the code press the Return key to clear Through the RS485 port display the PTZ control code of the multifunctional keyboard or the DVR The controller can check the status of the RS485 transmission...

Page 53: ...e or delete an existing file press the file name for a few seconds until the screen below appears You can then rename or delete the file by pressing the desired option 3 3 18 RTSP Player The RTSP Play...

Page 54: ...RTSP stream IPC Username Enter the IP camera s username IPC Password Enter the IP camera s password Once you have entered all necessary information select OK at the bottom left to view the RTSP strea...

Page 55: ...o update via the SD card or select Online Update to check for updates on the internet If there are applications that need updating the applications will be listed in the interface Click related applic...

Page 56: ...the Time Setting button to set a timer that will shut off the lamp 3 3 22 Browser Click icon to enter Type in the camera s IP address and press Go to access the IP camera s interface NOTE You will no...

Page 57: ...ts Click the key Save to save the contents Notepad can auto record the storage date and time Please click to view the notepad All saved contents will display Click each record bar to show the details...

Page 58: ...an select Typewriter or install another Typewriter Date Time Set the Date time of the IP tester IP setting Manually set the IP address Subnet Mask Default Gateway and DNS address or select Dynamic all...

Page 59: ...sing the Open the Wi Fi button Once Wi Fi is turned on click connected WIFI and it will scan for wireless networks in your area Select and press WIFI for several seconds to set static IP address Wi Fi...

Page 60: ...files via FTP Start the FTP server and then input the tester s FTP address in the PC s address bar This will enable the PC to read copy and edit the files from the SD card without the use of SD card r...

Page 61: ...tting digits letters or characters as the password then input it again to confirm When the tester is in standby mode or when you turn it on you can input your password to enter Pattern Lock Screen Dra...

Page 62: ...MONITOR Page 59 Browse Includes Music Videos Pictures Documents zip file etc It is convenient to view and manage FTP server You can choose internal or external SD card For other operation details ple...

Page 63: ...veral seconds the selected color icon will move to the rectangle area If you press the selected color for several seconds it will be auto deleted Theme colors include fixed order and random order Clic...

Page 64: ...Set color as application background Set at the same time Sets color as desktop background and application background Cancel Cancel current setting Picture Click picture to select one and set as tempor...

Page 65: ...3 4 Audio Test You can test the audio input from audio pickup devices by connecting the audio pickup device to the IP tester with the supplied audio cable 3 5 PoE power output The IP tester supports P...

Page 66: ...d occurs the tester will enter protection mode 3 6 DC12V 3A power output When the IP tester is turned on the DC 12V power output is ON by default The smaller end of the supplied converter cable connec...

Page 67: ...tically View Video Create Testing Report 8MP 4K TVI CVI AHD 3840 x 2160 15fps Control over COAX OSD menu Zoom Screen Snapshot Record Save View Record Playback Link Monitor Port Flashing Ping Test 1 Ch...

Page 68: ...replacement for a defective product however all related costs including but not limited to shipping and or delivery charges will be the responsibility of the customer If upon return in spection a pro...

Reviews: