ENGLISH
6
ENGLISH
7
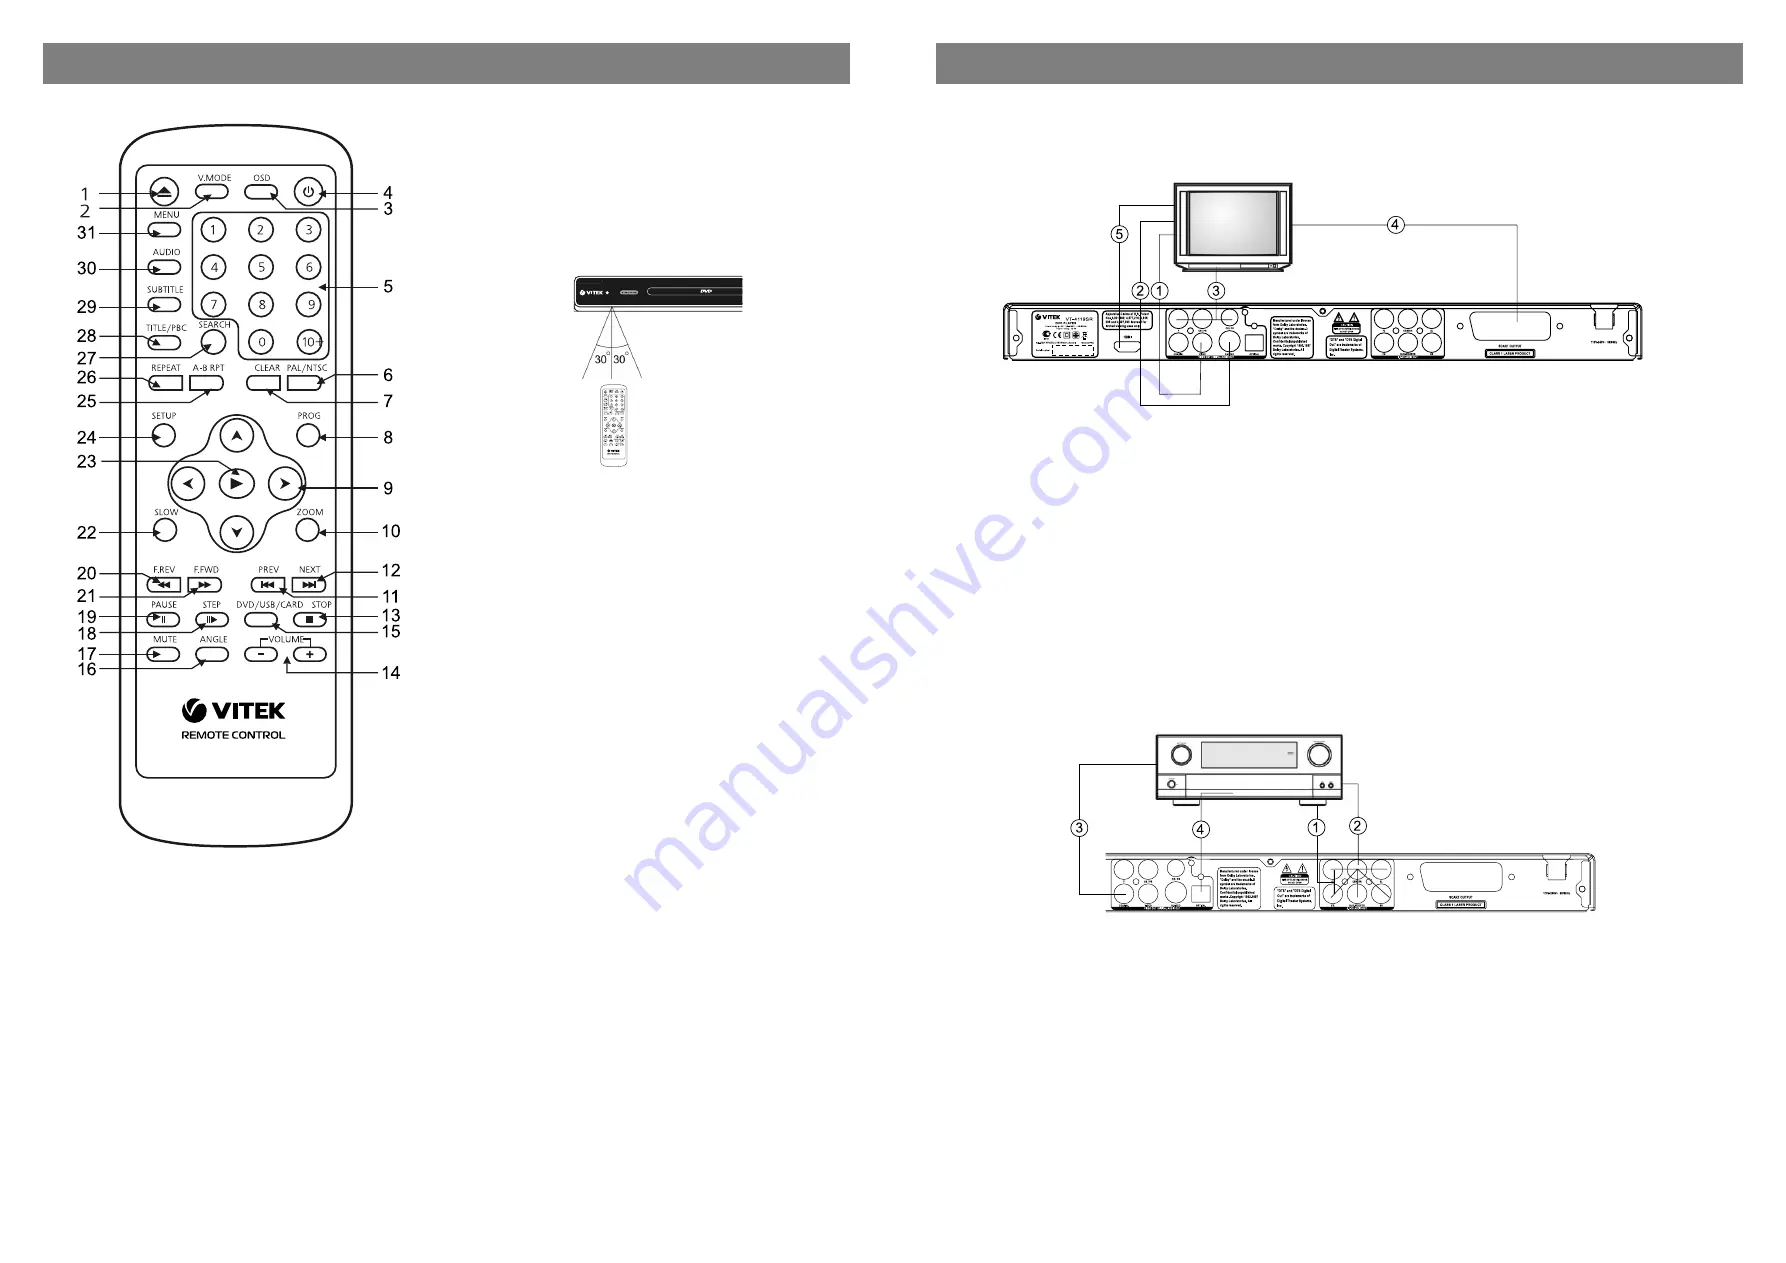
Remote control
1. disk tray open/close button OPEN/CLOSE
2. video out mode switching button V. MODE
3. OSD button (disk info)
4. POWER button
5. number buttons
6. color systems switching buttons PAL/NTSC
7. enter cancellation button CLEAR
8. program mode button PROG
9. navigation buttons (
)
10. zoom button ZOOM
11. skipping to previous track button PREV
12. skipping to next track button NEXT
13. playback top button STOP
14. volume level control buttons /-
15. media type selection button DVD/USB/CARD
16. angle view on button ANGLE
17. sound off button MUTE
18. frame by frame playback button STEP
19. playback pause button PAUSE
20. rewind button F REV
21. forward wind button F FWD
22. low motion button SLOW
23. play/enter button
24. setup menu enter button SETUP
25. fragment repeat button A-B RPT
26. repeat mode selection button REPEAT
27. search menu enter button SEARCH
28. disc content menu (title menu) enter button TITLE/PBC
29. subtitle selection button SUBTITLE
30. language selection button AUDIO
31. menu enter button MENU
Loading batteries into Remote control
• Load batteries into the battery compartment of remote control.
• Remove the batteries if the unit will not be used for a prolonged
period of time.
• Replace batteries in proper time.
Connection
Attention:
Before connecting DVD player to any other equipment, ensure power supply of player and other equipment is disconnected.
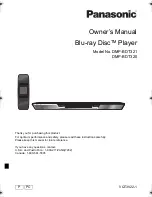
Connecting video cables
Choose the most appropriate type from the following types of connections according to capabilities of your TV-system.
(1) Composite video output
In order to display standard quality images, connect composite video output jack (VIDEO) of your DVD player to adequate input of your TV-set or
monitor using one audio-video cable (A/V) with yellow ending pins included into delivery set.
(2) S-Video output
In order to display high quality images connect S-VIDEO jack of your DVD player to adequate input of your TV-set or monitor using one S-Video cable
(not included into delivery set).
(3) Component video output
For exact color rendering and high quality picture view connect component video signal jacks Y Cb/Pb Cr/Pr (red/blue/green) to input jacks of your
TV-set using adequate cable (not included into delivery set).
(4) SCART output
Use 21-pins cable SCART (not included into delivery set) to connect SCART jack of your DVD player to the adequate jack of your TV-set.
(5) HDMI output
Special HDMI cable (included into delivery set) is used to connect DVD player to HDMI jack of TV-set. This way you can get high quality picture.
Notes:
• Parallel connection using several video outputs effects quality of image negatively.
• Only correct system connection and setting provides clear picture.
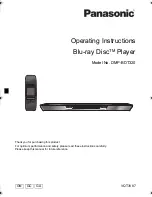
Audio System Connection
Choose the most appropriate type from the following types of connections according to capabilities of your TV-system.
(1) 2 channel analog audio output
Use jacks FR and FL 5.1 CH of analog audio output (5.1 CH AUDIO OUT) to connect 2-channel analog audio output. Switch the mode of audio output
to 2-channel mode (see dynamics’ setup page).
(2) 5.1 СН analog audio output
Use 3 pair of AV cables to connect 5.1-channel audio output (FL, FR, SL, SR, CENTER, SUB WOOFER) of DVD player to an adequate input (5.1) of an
amplifier/receiver.
(3) Coaxial digital audio output
Use special coaxial cable to connect COAXIAL jack of your DVD player to an adequate input of an amplifier.
(4) Optical digital audio output
Use special fiber optical cable to connect OPTICAL jack of your DVD player to an adequate input of an amplifier.
Note:
Setup parameters should meet the type of jack used to connect DVD player to external devices.


