background image

10 


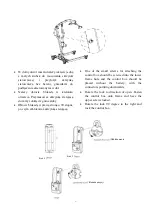
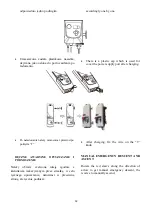
Krok 4: 
Usuwanie i montaż skrzynki akumulatora. 
 

Ściąganie:  Należy  nacisnąć  przycisk  A  i 
wyciągnąć baterię zgodnie z kierunkiem B. 
Montaż:  Umieścić  baterię  na  odpowiednim 
miejscu  i  nacisnąć  przełącznik  zgodnie  z 
kierunkiem C. Należy upewnić się, że bateria nie 
zostanie oddzielona bez naciśnięcia przełącznika. 


Step 4:  
Remove and install the battery box. 
 

Removal:  Press  down  the  switch  A  and  remove 
battery along direction of B.  
Installation:  Place  the  battery  in  place  and  press  the 
switch along direction of C. Ensure the battery won’t 
be separated without pressing the switch.  


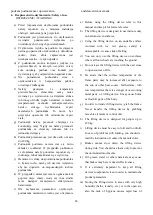
Jeden  koniec  kabla  zasilającego  należy 
podłączyć  do  skrzynki  sterowniczej, 
natomiast  drugi  koniec  do  gniazdka 
ściennego  prądowego,  aby  naładować 
akumulator. 


celu 

rozmontowania 

podnośnika 

transportowego Samson należy postępować 
odwrotnie niż w przypadku montażu. 


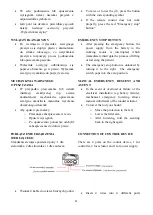
PILOT 


Podnoszenie  i  opuszczanie  wysięgnika  jest 
proste i wykonywane jest za pomocą pilota. 


Po  użyciu  lub  wyregulowaniu  wysokości 
wysięgnika  należy  zawiesić  pilot  w 
bezpiecznym  i  łatwo  dostępnym  miejscu 
przy uchwycie do prowadzenia. 


To  charge  the  battery  connect  one  end  of 
the  power  cable  to  the  control  box  and  the 
other end to the wall socket. 


In  order  to  disassemble  the  Samson 
transport  lift  you  should  do  the  opposite 
than in the case of assembly. 


  REMOTE CONTROL 


Lifting and lowering the jib is simple and it 
is performed by remote control. 


After  using  or  adjusting  the  lifter  arm 
height, the remote control should be placed 
in a safe and easily accessible place on the 
handle. 

Krok 3 / 

Summary of Contents for DRVF02

Page 1: ...Instrukcja użytkownika Samson podnośnik transportowy z wyposażeniem DRVF02 Wydanie AM 06 2018 User manual Samson transport lifting device DRVF02 Edition AM 06 2018 ...

Page 2: ...ction 7 5 Użytkowanie Usage 7 6 Bezpieczeństwo użytkowania Safety of use 14 7 Czynności obsługi i konserwacji Everyday use and maintenance 16 8 Parametry techniczne Technical paramets 23 9 Symbole Symbol 23 10 Dane teleadresowe Contact details 24 PRZED UŻYCIEM PRZECZYTAJ UWAŻNIE CAŁĄ INSTRUKCJĘ PLEASE READ CAREFULLY BEFORE USING WHOLE OF INSTRUCTIONS ...

Page 3: ...is document before first use This manual was made in order to provide the necessary information on the safe use of the device The correct application of the recommendations will contribute significantly to extend the durability and aesthetics of the product We want to distinguish that to date we are trying to improve the quality of our products which may result in minor changes that are not includ...

Page 4: ...ents that should be inside the packaging Ilustracja Illustration 2 Podstawa jezdna Base Ilustracja Illustration 3 Maszt z uchwytem do prowadzenia Frame with a handle Otwory na śruby do zamocowania skrzynki sterowniczej Screw holes for attaching the control box ...

Page 5: ...tor Ilustracja Illustration 6 Skrzynka sterownicza z baterią Control box with baterry Ilustracja Illustration 7 Pilot Remote control Płaskownik do zamontowania siłownika Flat bar for mounting the actuator Płaskownik do zamontowania czteropunktowej kołyski Flat bar for mounting the four point cradle ...

Page 6: ...jent powinien znajdować się pod nadzorem przeszkolonego opiekuna Do manewrowania podnośnikiem każdorazowo służy uchwyt do pchania Dzięki zastosowanym rozwiązaniom z urządzenia mogą korzystać pacjenci dotknięci Paraparezą niedowładem kończyn dolnych Samson transport lifting device is designed to carry only one patient at a time For safety during lifting and transport patient should be under supervi...

Page 7: ... each patient recommended by doctor During transport the patient by using Samson should not move it by carpet edge doorstep or any other uneven surface In case side effects occur should discontinue patient transport 5 Użytkowanie Usage Po rozpakowaniu opakowania należy sprawdzić czy zawiera ono wszystkie części zgodnie z wykazem elementów zamieszczonym powyżej Należy upewnić się że wszystkie eleme...

Page 8: ... 3 Pasek Krok 3 Instalacja skrzynki sterowniczej Maszt posiada dwa otworki na śrubki przeznaczone do mocowania skrzynki sterowniczej z baterią Ilustracja 3 1 Locknut 2 Bolt 3 Strap Step 3 Installation of control box The frame has two screw holes for fixing the control box with a battery Illustration 3 ...

Page 9: ...by Obrócić blokadę w prawą stronę o 90 stopni po czym zablokować skrzynkę sterującą One of the small screws for attaching the control box should be screwed into the lower frame hole and the control box should be placed without the battery with the connectors pointing downwards Rotate the lock to direction of open Fasten the control box onto frame and have the upper screws locked Rotate the lock 90...

Page 10: ...gi koniec do gniazdka ściennego prądowego aby naładować akumulator W celu rozmontowania podnośnika transportowego Samson należy postępować odwrotnie niż w przypadku montażu PILOT Podnoszenie i opuszczanie wysięgnika jest proste i wykonywane jest za pomocą pilota Po użyciu lub wyregulowaniu wysokości wysięgnika należy zawiesić pilot w bezpiecznym i łatwo dostępnym miejscu przy uchwycie do prowadzen...

Page 11: ...erujące posiada 4 porty 1 dla sterownika 2 dla siłownika i 1 dla zasilacza Wsunąć 4 kable do czterech różnych portów To raise or lower the jib press the button with the corresponding symbol If the remote control does not work properly press the red Emergency stop button EMERGENCY STOP BUTTON After pressing the emergency button the power supply from the battery to the working motor is interrupted w...

Page 12: ...rwoną tuleję zgodnie z kierunkiem wskazywanym przez strzałkę w celu ręcznego opuszczenia natomiast w przeciwną stronę ale ręcznie podnieść accordingly one by one There is a plastic cap which is used for cover the power supply port after charging After charging fix the wire on the T knob MANUAL EMERGENCY DESCENT AND ASCENT Rotate the red sleeve along the direction of arrow to get manual emergency d...

Page 13: ...dy istnieje ryzyko zranienia Ostrzeżenie Blokada kół tylnych podnośnika zwiększa ryzyko przewrócenia się urządzenia LOCK AND UNLOCK OF REAR WHEEL Rear wheels can be locked for no movement Operate with your foot to lock and unlock the rear wheels Attention It is unnecessary to lock the rear wheels for most of a ascent and descent movement We suggest only to lock the wheels when patient lift moves a...

Page 14: ...danych ruchów podnośnika k W przypadku zanieczyszczenia ogumienia kół poprzez oleje smary wodę czy inne środki może nastąpić zmniejszenie efektywności hamowania l Dla zachowania parametrów użytkowych podnośnika niezmiernie ważne jest utrzymanie a Before using the lifting device refer to this manual and keep it for future reference b The lifting device is designed to use indoors only on hard and ev...

Page 15: ...cjenta należy omijać w bezpiecznej odległości przeszkody które mogłyby spowodować przewrócenie podnośnika y Przed każdym użyciem podnośnika należy upewnić się że chusty są w dobrym stanie Użytkowanie chust z oznakami uszkodzenia lub zużyci jest zabronione operating parameters and aesthetic of the product n It is unacceptable to use the lifting device after discovering any visible or detectable dam...

Page 16: ...atomiast pętle udowe tak aby znajdowały się w obrębie ud pacjenta Wiszące pętle należy zawiesić na czteropunktowej kołysce Pętle posiadają różne kolory aby ułatwić zawieszenie nosidła na jednakowej wysokości Lifting the patient First set the ride base in the maximum enlarged position To do this press the pedal of the head adjusting the width of the transport lifting device For easy and comfortable...

Page 17: ...ulce zarówno w podnośniku jak i w wózku inwalidzkim Kolejnym krokiem jest naciśnięcie przycisku w dół na pilocie aby stopniowo obniżyć pacjenta Lock the rear wheel brakes and lift the patient by pressing the corresponding button on the remote control Should lift the patient until his feet are not touching the bed or the floor Then unlock the rear wheel brake and carry the patient over the wheelcha...

Page 18: ...aby jego plecy znalazły się najbliżej oparcia wózka Składana i przenośna rama Obniżyć sterownik a następnie całkowicie zamocować ramie podnośnika When descending help the patient to take a correct and a comfortable sitting position After setting down the patient in a wheelchair remove the sling loops from the four point cradle If using a sling with a leg separator make sure that the patient is pro...

Page 19: ...ame Taking off the sling Remove the hook loop from the four point cradle Thigh belts should be carefully pulled under the thighs from the side to the down Remove the sling carefully from the patient s back area moving them towards the legs Removing the belt will be easier if the patient tilts a little forward Ładowanie baterii 1 Kiedy baterii zostanie tylko 1 kreska skrzynka kontrolna wyda 4 sygna...

Page 20: ...tery in a humid atmosphere 4 In the event of that patient lift is not in daily use it is strongly recommended that to switch off the emergency stop button so that to cut off the currency and keep the battery level Utrzymanie i konserwacja Rutynowa kontrola wymieniona poniżej powinna być przeprowadzana codziennie ze względu na bezpieczeństwo 1 Należy sprawdzić wzrokowo czy nie ma żadnych uszkodzeń ...

Page 21: ...etce danego pasa Pasy można prać w pralce mechanicznej w temperaturze 30 C Wskazówka Nie używać środków wybielających na bazie chloru Nie suszyć w suszarkach do bielizny Nie prasować wheels Attention to clean the patient lift with chemicals with Phenol and chlorine is prohibited which may cause damage on plastic powder or plastic material Transportation and Storage Press the emergency stop button ...

Page 22: ... podnoszenia 1 Sprawdzić czy przycisk zatrzymania awaryjnego jest wciśnięty 2 Stosować awaryjne urządzenie obniżające 3 Sprawdzić czy ładowarka jest dobrze włożona do gniazda Description Trouble Shooting Patient lift can not work ascend and descend 1 Check if the emergency stop button is pressed down 2 Verify the controller and cables from actuator is properly connected 3 Check the battery level f...

Page 23: ...wania i użytkowania 30 70 Air humidity for storage and using Temperatura przechowywania i użytkowania 1ºC 40ºC Storage and use temperature 9 Symbole Symbol Potwierdzenie spełnienia norm UE Confirmation of compliance with EU standards Wytwórca Manufacturer Data produkcji Date of production Zajrzyj do instrukcji używania Read the user s manual Ostrzeżenie Warning Numer katalogowy Catalog number Nume...

Page 24: ...ingers jamming ograniczenia dopuszczalnej temperatury Temperature of storage and use 10 Dane teleadresowe Contact details mdh sp z o o 22 24 ks W Tymienieckiego Street 90 349 Łódź Poland tel 48 42 674 83 84 fax 48 42 636 52 21 www mdh pl www viteacare com ...

Reviews: