background image

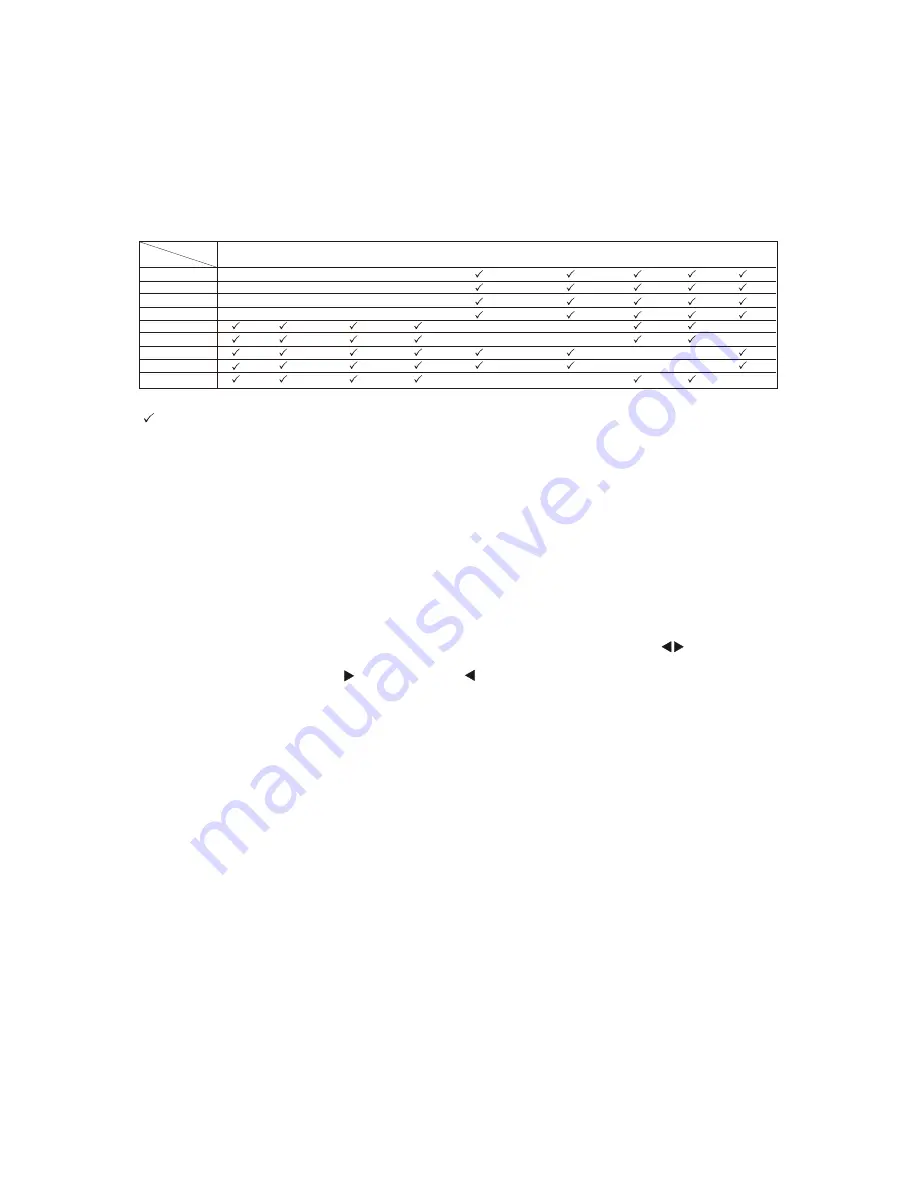
You can watch two pictures at the same time.  by pressing the PIP button on your  Remote Control, When PIP 
is turned on, One picture is displayed as the full screen (main screen) and the other picture is displayed in a 
small window(sub screen). The sub-screen can be set to small, medium or large.

See below for detailed information regarding the PIP sources.

3.4.9-Picture-in-Picture(PIP)/Picture-by-Picture(POP) Mode

"        "-Indicates which inputs are available for PIP and POP modes.

Swapping PIP/POP Video

You can swap the program that is in the main picture with the program in the PIP sub-picture. To swap the main 
picture with the PIP sub-picture program, press SWAP on the remote control. If you press SWAP again, it will 
return the program to the main picture. This works the same if you are in the Picture by Picture(POP) mode.

Swapping PIP/POP Audio

You can also swap the audio between main picture and PIP sub-picture by pressing the        button on your 
remote control. For example, if you are listening to the audio for the Main Screen and want to hear the audio 
from the Sub Screen you press the     button; press the      button to switch back. This works the same if you 
are in the Picture by Picture (POP)mode.

3.4.10-Adjusting Basic PIP/POP Settings

VGA

TV
Composite1
Composite2
S-Video
Component1
Component2
HDMI1
HDMI2
VGA

MAIN

TV

Composite1

S-Video

Component1

HDMI1

Component2

PIP

HDMI2

Composite2

WWW.VISIONQUESTCE.COM

42

Summary of Contents for LVQ-32HLB

Page 1: ...ease call 1 We recommend you register your VISIONQUEST 32 HDTV either at our website Write down your Serial Number located on the back of your 32 HDTV S N Purchase Date 877 851 2528 WWW VISIONQUESTCE...

Page 2: ...the manufacturer 12 Unplug this apparatus during lightning storms or when unused for long periods of time 13 Refer all servicing to qualified service personnel Servicing is required when the apparatus...

Page 3: ...s y m b o l i n d i c a t e s t h a t t h e r e a r e i m p o r t a n t o p e r a t i n g a n d m a i n t e n a n c e i n s t r u c t i o n s i n t h e l i t e r a t u r e a c c o m p a n y i n g t h...

Page 4: ...ring thunder and lighting unplug the power cord and antenna cord to prevent damage to your TV All repairs to this TV should only be performed by the TV service personnel PREFACE Position the TV in the...

Page 5: ...throw anything at the set The screen glass may explode by impact and cause serious injury Caution Do not insert anything in the ventilation holes If metal or something flammable enters it may result i...

Page 6: ...adapter to ground the appliance safely Do not defeat the safety purpose of the grounded plug Do not overload power strips and extension cords Overloading can result in fore or electric shock The wall...

Page 7: ...or cable system Do not locate the antenna near overhead light or power circuits or where it could fall into such power lines or circuits Television Antenna Connection Protection Article 810 of the Nat...

Page 8: ...easily scratched or broken please handle the product gently Never place the unit on a surface with the glass facing downwards unless it is on protective padding When opening the carton check that the...

Page 9: ...product is installed with the screen in landscape orientation Any 90 clockwise or counter clockwise installation may induce poor ventilation and excessive component damage Avoid installing the product...

Page 10: ...3 2 Using VGA Video 2 4 Connecting Your VCR or Video Camera 2 5 Connecting Coaxial RF 2 5 1 Using Your Antenna or Cable for TV 2 5 2 Using the Antenna or Cable through Your VCR 2 6 Connecting an Ampl...

Page 11: ...me When the OSD is active these buttons adjust the OSD options 3 MENU This button opens the TV OSD menu 4 INPUT This button switches between the available input sources in the sequence Composite1 Comp...

Page 12: ...the white and red connectors to connect the external audio from the same source 6 S VIDEO IN Connect the primary source for S Video devices such as a VCR or video game console Use the white and red co...

Page 13: ...nput source EXIT To close the current OSD page or function MENU To display and close the menu INFO This button displays the image and system information display ENTER To display the channel list To ad...

Page 14: ...ess this button to select the size of the PIP screen from one of the following small medium or large in PIP mode Additionally press it to zoom the image POS FAV LIST Press this button to change the PI...

Page 15: ...emote control sensor to transmit the commands Do not place any obstacles between the remote control and the receiver window The effective range of the remote control is approximately 32 feet 10 meters...

Page 16: ...es horizontal and vertical sync information on the green signal This is most commonly used for PC input Analog HD1 HD2 Component The video signal is separated into three signals one containing the bla...

Page 17: ...UEST certified HDMI cable available up to 10 meters or less See WWW VISIONQUESTCE COM or call 1 877 851 2528 Connecting DVD Player Best 1 Turn off the power to the LCD TV and DVD player 2 Connect a HD...

Page 18: ...CD TV and your DVD Player 5 Select HDMI1 using the INPUT button on the remote control or the front of the LCD TV or directly by pressing the HD button on the remote control WWW VISIONQUESTCE COM 18 W...

Page 19: ...audio input connectors in the rear of your LCD TV 6 Turn on the power to the LCD TV and DVD player 7 Select Component1 using the INPUT button on the remote control or front of the LCD TV or directly...

Page 20: ...4 Turn on the power to the LCD TV and DVD player 5 Select S Video using the INPUT button on the remote control or front of the LCD TV or directly by pressing the AV button on the Remote Control Turn...

Page 21: ...your DVD player to the R 3 red color and L 3 White color audio input connectors in the rear of your LCD TV 4 Turn on the power to the LCD TV and DVD player 5 Select AV1 Composite1 using the INPUT butt...

Page 22: ...equirements of the product or consult your satellite or cable operator You have several options for connecting your HDTV Set Top Box to your new 32 HDTV HDMI Digital HD and VGA inputs Based on your ho...

Page 23: ...Set Top Box and connect the other end to the audio connectors associated with the HDMI input in the rear of your LCD TV 4 Turn on the power to the LCD TV and your HDTV Set Top Box 5 Select HDMI1 or HD...

Page 24: ...o the LCD TV and HDTV Set Top Box 5 Select VGA using the INPUTbutton on the Remote control or front of the LCD TV or directly by pressing the VGA button on the Remote Control Note Refer to your HDTV S...

Page 25: ...ed color and L white color connectors on your VCR or video camera to the R 3 red color and L 3 white color audio input connectors in the rear of your LCD TV 4 Turn on the power to the LCD TV and VCR o...

Page 26: ...ear of your LCD TV 3 Turn on the power to your LCD TV 4 Select TV using the INPUT button on the front of the LCD TV or directly by pressing the TV button on the Remote Control Note a Digital broadcast...

Page 27: ...he INPUTbutton on the remote control or front of your LCD TV or directly by pressing the TV button on the Remote Control Note If you have an off air antenna or cable TV connect the off air antenna or...

Page 28: ...wer to the LCD TV and Receiver AMP 4 Refer to your Receiver Amp system manual to select the corresponding audio input Note This audio output is not amplified and cannot be connected directly to extern...

Page 29: ...uter to the VGA Audio IN in the rear of your LCD TV 4 Turn on the power to your LCD TV and computer 5 Select VGA using the INPUTbutton on the front of the LCD TV or directly by pressing the VGAbutton...

Page 30: ...menu and Channel Scan for the available TV channels Please follow the instructions below a Select the TV input by pressing the INPUT button on the front of the TV or using the INPUT button on the remo...

Page 31: ...dish connected through the component inputs YPbPr select Component1 or Component2 using the INPUT button on the front of your LCD TV Note You should be able to see a picture If you do not make sure t...

Page 32: ...y OSD The OSD consists of several menu options Video Audio TV Setup Parental The main menu options may vary depending on your selected input source Note Some of the main menu options may have addition...

Page 33: ...ion Code Antenna English TV ENTER Enter Select EXIT Exit Select EXIT Back OSD Language Screen Mode Blue Mute DPMS Time Setup Caption Reset Default English Normal On Off Setup Channel Block Program Blo...

Page 34: ...ke the flesh tones more natural Sharpness Adjusts the clarity of the picture If the sharpness is set too high hard edges in the picture appear to have a ghost image Back Light To adjust the back light...

Page 35: ...ncement Off Concert Living Room Hall Bathroom Cave Arena and Church Equalizer To adjust the equalizer OFF Rock Pop Live Dance Techno Classic and Soft Speaker To adjust the TV speakers On and Off SPDIF...

Page 36: ...displayed press MENU to navigate away from this screen when finished The list of channels available and stored in memory is shown on the screen If the list is longer than 9 channels you will be able t...

Page 37: ...a printed version of the dialog and sound effects TEXT1 TEXT2 To display station information presented using either half or the whole screen TEXT3 TEXT4 To display extended data service press the arro...

Page 38: ...n and button repeatedly The boxes to the right of the channel names are empty by default As you scroll down the channels with the DOWN arrow each one is highlighted in turn When a channel you want to...

Page 39: ...own and store the new password in a secure place b The TV Parental Control password will always be the same as this one Open V Chip To adjust individual programs based on the broadcasted regional rati...

Page 40: ...If you do nothing else with the INFO button these panels will remain on the screen even when changing channels Press the INFO button and the program summary will disappear but the information header...

Page 41: ...C DT 58 2 58 1 KLCS DT Rosita Befriends A Frog W earing A Crown Rosita is sad because alt of her friends are too bust to play withher She ends up meeting a frog that wants to play and they 6 00 PM Mon...

Page 42: ...picture with the PIP sub picture program press SWAP on the remote control If you press SWAP again it will return the program to the main picture This works the same if you are in the Picture by Pictur...

Page 43: ...play with a dry cloth after cleaning 1 Use a soft cotton cloth to gently clean the screen 2 The screen glass is very fragile Do not scrape it with any sharp object Do not press or tap the screen to av...

Page 44: ...that the power button is turned on Make sure that the selected input source is connected to a working input source You see a distorted picture or hear unusual sound You may be getting interference fr...

Page 45: ...ities Up converting can cause noise or trash You switch to a different input and the screen size changes The LCD TVremember the viewing mode from the last time you used a particular input AV S Video A...

Page 46: ...couraged to try to correct the interference by one or more of the following measures 1 Reorient or relocate the receiving antenna 2 Increase the separation between the equipment and receiver 3 Connect...

Page 47: ...V Chip Parental Control stereo 15 W channel integrated speakers 60 000 hours IEC Connector for direct power line connection 110 240 VAC 50 60Hz 200 W Temperature 5 35 C Relative Humidity 10 90 Altitu...

Page 48: ...isplay It may be stand alone or integrated in the set High Definition Television HDTV The best quality digital picture wide screen 16x9 display with at least 720 progressively scanned lines 720p or 10...

Reviews: