background image

8

SYSTEM DIAGRAM

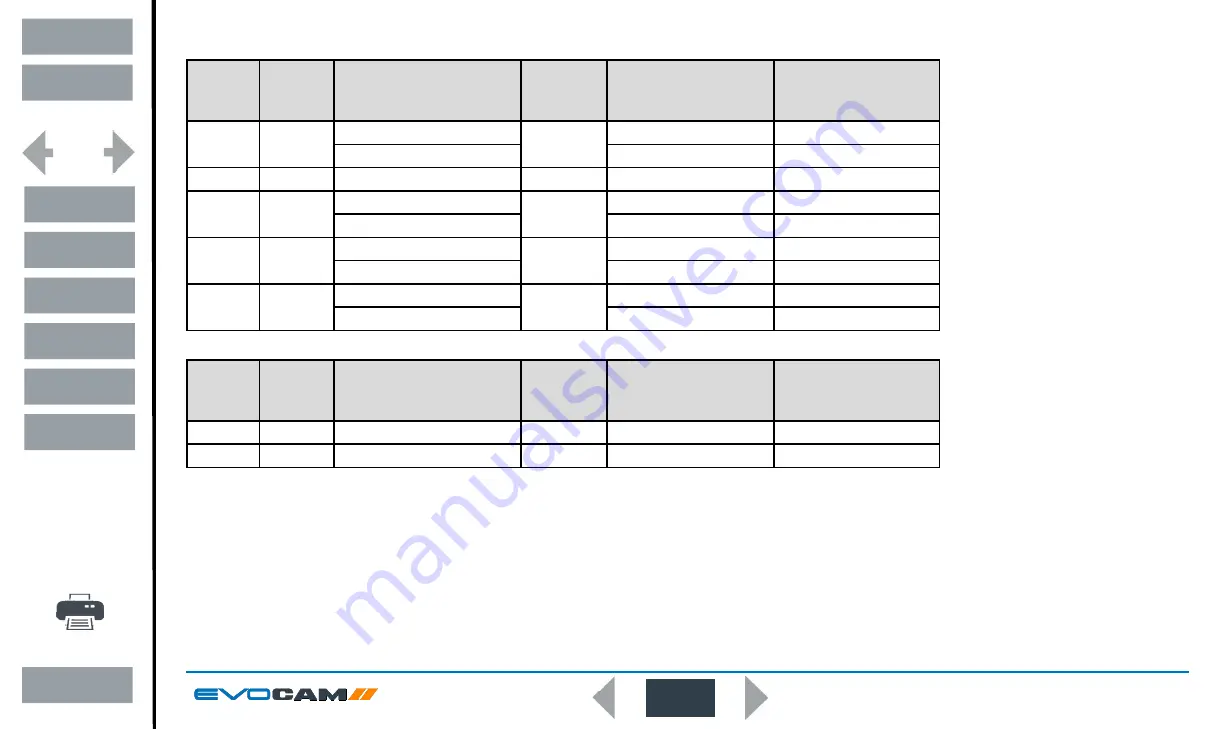
Optical data

Objective 

lens

Part 

number

Magnification 


zoom range*

Working 

distance

Field of view  

at min. zoom 

(width / height)

Field of view  

at max. zoom 

(width / height)

0.45x

ECL001

 Full field:  2.27x –  68.04x

160mm

 241.0mm  /  134.0mm

  7.8mm /  4.2mm

 Optimal:  3.78x –  68.04x

 142.6mm  /  82.6mm

  7.8mm /  4.2mm

0.62x

ECL002

 Full field:  3.12x –  93.74x

106mm

 173.1mm  /  96.8mm

  5.5mm /  3.1mm

1.0x

ECL003

 Full field:  5.04x – 151.2x

85mm

  88.0mm /  57.0mm

  3.5mm /  2.0mm

 Optimal: 12.56x – 151.2x

  40.2mm /  23.1mm

  3.5mm /  2.0mm

1.5x

ECL150

 Full field:  7.56x – 226.8x

43mm

  45.0mm /  36.0mm

  2.3mm /  1.2mm

 Optimal: 16.38x – 226.8x

  28.5mm /  17.0mm

  2.3mm /  1.2mm

2.0x

ECL200

 Full field: 10.08x – 302.4x

29mm

  37.0mm /  27.0mm

  1.5mm /  1.0mm

 Optimal: 23.18x – 302.4x

  20.5mm /  12.5mm

  1.5mm /  1.0mm

* with 24” monitor

Objective 

lens

Part 

number

Magnification 


zoom range*

Working 

distance

Field of view  

at min. zoom 

(width / height)

Field of view  

at max. zoom 

(width / height)

4 dioptre

ECL040

  Full field:  1.71x –  51.41x

245mm

  293mm / 171mm

  10mm /   5.5mm

5 dioptre

ECL050

  Full field:  2.12x –  65.5x

197mm

  232mm / 135mm


8mm /   4.5mm

* with 24” monitor

Exit

Contents

Preface

Assembly

Operation

Maintenance

Specification

System Diagram

Start page

Summary of Contents for EVO Cam II

Page 1: ......

Page 2: ...elow do not function They are for illustrative purposes only Click on this button to display the Contents page Back one page Forward one page Back button Forward button Click this button to print some...

Page 3: ...tted substage illumination module option EVO Cam II On the rear of the unit Multi axis stand On the rear of the stand mechanism S N Ergo stand At the base of the column at the back Focus assembly On t...

Page 4: ...Engineering Ltd Galileo Drive Send Road Send Woking Surrey GU23 7ER UK www visioneng com Disclaimer This document is provided as is without any warranty of any kind either express or implied statutory...

Page 5: ...illuminator option 10 Stand mounts 11 Ergo stand 11 Polarisation filter option 11 Multi axis stand 11 Objective lens 12 Cabling 12 OPERATION 13 Quick start 13 Control functions 14 Power on off 14 Ill...

Page 6: ...llumination safety Do not look directly at the illuminated LED s This may cause damage to the eyesight Environmental considerations Avoid large temperature fluctuations direct sunlight and vibrations...

Page 7: ...pply unit Plug cord HDMI cable USB3 cable Lens cloth 2mm HEX key Objective lenses Remote Keypad optional EVO Cam II 360 rotating viewer optional see Optical data tables ECH 005 EVR066 ECX155 PRESET P2...

Page 8: ...23 1mm 3 5mm 2 0mm 1 5x ECL150 Full field 7 56x 226 8x 43mm 45 0mm 36 0mm 2 3mm 1 2mm Optimal 16 38x 226 8x 28 5mm 17 0mm 2 3mm 1 2mm 2 0x ECL200 Full field 10 08x 302 4x 29mm 37 0mm 27 0mm 1 5mm 1 0...

Page 9: ...is stand base board Focus assembly Monitor mount Ergo stand with focus Transmitted substage illumination EVS012 EVB021 EVB022 EVF111 EVB092 Multi 75mm Riser Block directional floating stage EVS120 EVB...

Page 10: ...ugh the base as shown Push the cable grommet y into the stand Turn the Ergo stand upright and replace the illuminator diffuser z shiny side up surround and glass Once EVO Cam II is installed on the st...

Page 11: ...it to the mounting post and attach the focus assembly in the desired orientation Take care when mounting EVO Cam II Ensure the mounting plate is perpendicular to the base or work bench Tighten the 2x...

Page 12: ...rom the power supply into the EVO Cam II power connector w on the back of the unit If required an external ringlight option can be used with EVO Cam II Plug the external ringlight into the rear panel...

Page 13: ...press or for fine adjustment Overview mode z Short press Activate overview mode Press any button to exit overview mode u v w x y z Ring light illumination control Press to increase brightness Press t...

Page 14: ...l can be adjusted using the right hand side buttons v Holding down the buttons will allow for faster control of the light settings The internal ringlight is disabled when an external ringlight is conn...

Page 15: ...lso displayed e g x60d to indicate a magnification level of 60 including digital zoom When changing lenses or monitor the Screen Size and Lens Power settings need to be changed using the menu options...

Page 16: ...Main menu options To access the Main Menu press the Menu button Use the and buttons to navigate the menu and the button to make a selection To Exit the menu simply press the image capture button unti...

Page 17: ...set press to store it and then press to return to the exposure menu Press to turn on the blue indicator next to the option to ensure it has been selected then press to return to the main menu Auto ex...

Page 18: ...re it and then press to return to the focus menu Manual exposure This option enables exposure controls to be set manually Aperture Gain and Exposure time can all be adjusted Aperture F14 F1 6 closed G...

Page 19: ...orner of the Status bar Features that affect the calibration will be disabled while the calibration is active Press again to turn this feature off to reactivate disabled features Calibration Before se...

Page 20: ...Cam_overlay png Use the and buttons to highlight one of the following options then press to activate it ON Turn the overlay on OFF Turn the overlay off IMPORT Import overlay file from USB stick CLEAR...

Page 21: ...tions Presets and hotkeys The current camera settings can be saved as one of the 10 presets These settings can then be exported and subsequently imported enabling multiple EVO Cam II cameras to be sta...

Page 22: ...highlight the required state press to store the change and then press to return to the magnification options Set measurement units With set measurement units highlighted press To alter the units use t...

Page 23: ...to off short or long use the and buttons to highlight the required state press to store the change and then press to return to the user interface options Capture button action Set this option to Freez...

Page 24: ...hair colour use the and buttons to highlight the required colour press to store the change and then press to return to the user interface options On screen display With on screen display highlighted p...

Page 25: ...to the user interface options Import settings from a USB stick connected to the EVO Cam II To import all settings from a USB memory stick ensure the import icon is highlighted press and then press to...

Page 26: ...ied to partially unscrew the grub screw v releasing the lens from its housing While holding the objective lens u in position use the HEX key supplied to secure the lens by tightening the grub screw v...

Page 27: ...presentative who will be able to advise you FIRMWARE UPGRADE Firmware upgrade EVO Cam II includes a Firmware Upgrade Function allowing users to install new versions of the firmware Any update files wi...

Page 28: ...eady or full HD recommended Outputs HDMI USB3 0 Image capture USB 2 0 High speed Dimensions 11 x 16 5 x 14 cm w x h x d Power Max 72 Watts depending on external attachments Operating temperature Stora...

Reviews: