background image

11


Viscount


UNICO

8

-

7

/

/

User Guide

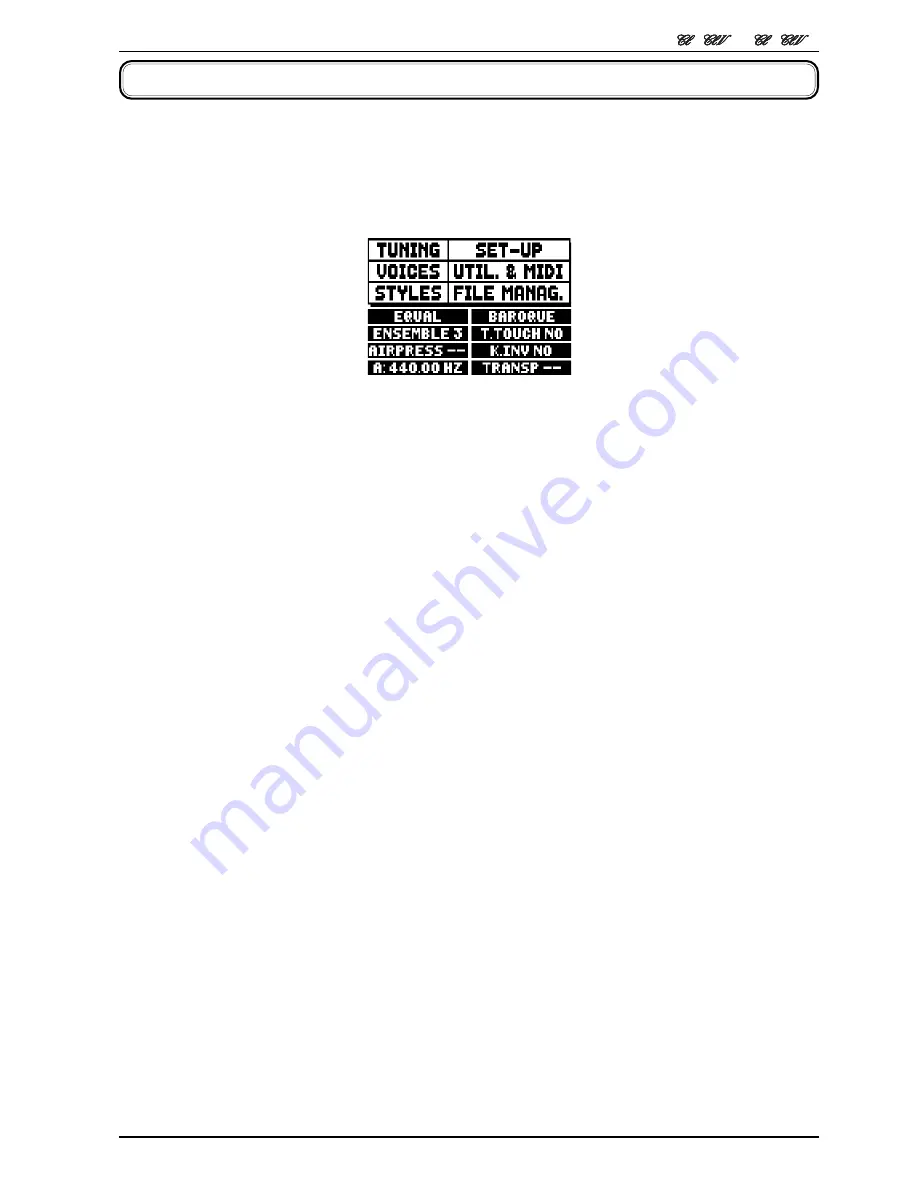
The top of  this screen contains the fields for selecting the organ’s various setup menus:

o

TUNING:

 instrument tuning parameters.

o

VOICES:

 functions relating to all the organ’s voices.

o

STYLE:

 style selection.

o

SET-UP:

 organ general set-up functions

o

UTIL. & MIDI 

(Utility & MIDI)

utility and MIDI functions

o

FILE MANAG. 

(File Manager)

:

 management of  the files saved in the internal memory or the USB

device.

To display the contents of  a menu, simply locate the cursor (the field on which it is located appears in reverse
mode) on the field required using the [FIELD 

S

] and [FIELD 

T

] buttons and press [ENTER]. [EXIT] quits

the menu and returns to the main video page.

The bottom of  this screen displays the instrument parameters the status of  which it is always useful to know:

o

[box in top left-hand corner]:

 (Equal in the screen shown) displays the temperament currently in use,

selected in the TUNING menu.

o

ENSEMBLE: 

the ENSEMBLE value set in the TUNING menu.

o

AIR PRESS: 

the AIR PRESSURE parameter value set in the TUNING menu.

o

A: 

the instrument’s tuning, expressed as the frequency of  A4, set in the TUNING menu.

o

[box in top right-hand corner]: 

(Baroque in the screen shown) contains the style selected in the STYLE

menu.

o

T. TOUCH: 

the status of  the TRACKER TOUCH function as set in the UTILITY & MIDI menu.

o

K. INV: 

the status of  the KEYBOARD INVERSION function as set in the UTILITY & MIDI menu.

o

TRANSP: 

the transposition set in TUNING.

These fields are for information only and cannot be selected. The menus referred to above have to be
accessed to modify the setting of  the relative function.

The buttons used to view and navigate through all the display screens are arranged around the display.

-

[SEQUENC]: 

screens for use of  the instrument’s internal sequencer.

-

[VOLUMES]:

 screen containing all the instrument’s volumes.

-

[FIELD 

S

and

 [FIELD 

T

]: 

buttons used to move the cursor, identified by the field in reverse.

[FIELD 

S

] positions it in the field above or the previous field, [FIELD 

T

] in the field below or the next

4. SWITCHING ON and MAIN VIDEO PAGE

After the instrument is switched on with the [POWER] switch, the system takes a few seconds to become
operational.  During this stage, the LEDs on the separate panels of  the manuals come on in sequence, and
the display shows the introductory screen.
When the main video page appears,  the instrument is ready for use:

Summary of Contents for UNICO CL7

Page 1: ...S CH CHOIR SWELL Great to Pedal Swell to Pedal Choir to Pedal MEM BANK MEM BANK S HR 1 2 3 4 7 8 9 10 HR 1 2 3 4 5 6 HR 1 2 5 3 4 6 SW P HR 1 2 5 3 4 6 G P HR 1 2 5 3 4 6 5 6 C P C T SWS A P SW C SW G C G M SOLO M SOLO M SOLO O SOLO PREV NEXT Tremolo Tremolo Tremolo PREV E N XT MIDI REVERS 32 UTE FL REVERS 2 REED 3 REVERS User Guide EN Ver USA 1 4 ...

Page 2: ......

Page 3: ...ve Voice function 17 8 4 Saving different orchestral voices and parameters in the combinations 19 9 Instrument general settings Set Up menu 20 9 1 Setting the routing of the voices on the rear audio outputs Ext Out Router function 21 9 2 Configuring the audio outputs on the rear Ext Out Config function 23 10 Utility and MIDI functions Util MIDI menu 24 11 File management functions File Manag menu ...

Page 4: ... units especially amplification and diffusion systems you are about to connect are switched off This will prevent noisy or even dangerous signal peaks Connect the net cable to an earthed socket Check that the voltage corresponds to the voltage shown on the serial number plate of the organ If the organ is to be out of use for lengthy periods disconnect the plug from the power socket 1 2 NOTES ABOUT...

Page 5: ... only and may differ from your product The instructions provided in this manual only concern the instrument s operating system version that was up to date when the document was released Therefore such instructions might not describe faithfully your current operating system release Please visit the website http www physisorgans com download asp to check for the newest operating system release and m...

Page 6: ...ry materials used and pertaining air pressure etc The fact that the simple reproduction of memorized sound has been disregarded permits the achievement of unimaginable realism with the level of detail previously only created by a traditional pipe organ For example the mathematical model allows the production of a different sound for each key since it provides the virtual reproduction of the origin...

Page 7: ...Swell to Great Choir to Great CHOIR Choir to Great GT PD SW PD CH PD SW GT CH GT SW CH CHOIR SWELL Great to Pedal Swell to Pedal Choir to Pedal MEM BANK MEM BANK S HR 1 2 3 4 7 8 9 10 HR 1 2 3 4 5 6 HR 1 2 5 3 4 6 SW P HR 1 2 5 3 4 6 G P HR 1 2 5 3 4 6 5 6 C P C T SWS A P SW C SW G C G M SOLO M SOLO M SOLO O SOLO PREV NEXT 18 14 19 15 16 19 15 17 13 Tremolo Tremolo Tremolo PREV NEXT MIDI REVERS 32...

Page 8: ...ER FIELD VALUE VALUE 24 28 10 8 9 12 3 11 viscount 22 19 21 23 24 13 6 20 27 SWELL GREAT Great to Pedal Swell to Pedal Swell to Great Swell Great Swell Great SW PD SW G T PREV SWELL HR 1 2 3 4 5 6 S HR 1 2 5 3 4 6 SW P HR 1 2 5 3 4 6 G P PREV NEXT SW G C A P MEM BANK MEM BANK SWS T HR 1 2 3 4 5 6 18 14 15 16 13 19 13 Swell Swell Great Great TREMOLO GT PD ...

Page 9: ...bles the PROG OUT external outputs in the rear panel point 26 8 CANCEL Section Cancel buttons which allow disabling of all the Reed voices REEDS tab and the Plenum voices MIXTURE tab 9 MIDI Section These controls provided for each manual and the pedal board allow transmission of the note MIDI codes on the MIDI OUT port to be enabled and disabled All the instrument s other MIDI messages will contin...

Page 10: ...mbinations of Great HR for restoring the Great voice setup prepared in manual mode before a Great combination was recalled G P SW G and C G couplings the last one in the CL CLV 8 only The combinations can be modified the procedure for saving them is described in point 18 The CL CLV 8 model also have the O SOLO Organ Solo pistons which allow the Swell voices to be played in mono mode with priority ...

Page 11: ...s which activate a preset series of stops The step currently selected is displayed by the additional CRESCENDO display see point 12 Each Crescendo step is programmable The procedure for saving them is described in point 18 24 Swell expression pedals The CL CLV 8 model have two swell pedals for continuous control the expression of Choir and Swell The CL CLV 7 model has continuous control of the vol...

Page 12: ...hich allow setting of the type of wind chest its size and the position in space of the speakers used for each stop Each output also has dedicated level and equalisation controls INPUT L R R line inputs which allow other instruments to be played using the organ s internal amplification If the source is monophonic use the L R connector only INPUT MIC microphone input allowing amplification of the si...

Page 13: ...d as the frequency of A4 set in the TUNING menu o box in top right hand corner Baroque in the screen shown contains the style selected in the STYLE menu o T TOUCH the status of the TRACKER TOUCH function as set in the UTILITY MIDI menu o K INV the status of the KEYBOARD INVERSION function as set in the UTILITY MIDI menu o TRANSP the transposition set in TUNING These fields are for information only...

Page 14: ...ols CL CLV 8 CL CLV 7 o MST Master the organ s overall volume which can also be adjusted with the MASTER VOLUME trimmer underneath the manuals o REV Reverb reverb effect which can also be adjusted with the REVERB VOLUME trimmer underneath the manuals o PHO Phones level of the output signal at the headphone PHONES connector underneath the manuals o EXT External outputs general volume of the PROG OU...

Page 15: ...e and another simulating the tuning error that occurs in the organ s pipes due to wear over time and variations in temperature The values range from pipes perfectly tuned to 8 maximum pitch instability o AIR PRESSURE simulates the drop in air pressure when a large quantity of air is requested in a short time e g when large chords are played with the Tutti This is reflected in a temporary gradual d...

Page 16: ...les are programmed by our laboratories on the basis of the appropriate organ schools and cannot be modified by the user The other four Styles called User styles can be freely modified and customised to personal taste making the organ extremely flexible Select the STYLE field on the main page for the Style selection As we have already stated the first four Styles cannot be modified so accessing to ...

Page 17: ... for each rocker switch or draw stop and the sound generation parameters and volume are automatically saved in the current Style This means that when another style is recalled the voices will be reset with new parameters taken from the last style recalled The changes made earlier are not lost and will be made available when the style in which they were made is selected again The first video page d...

Page 18: ... can also be switched on to assess the overall effect of the changes To quit the function and save the values press EXIT 8 2 REGULATING THE AUDIO PARAMETERS EDIT PARAMETERS function To view the screens containing the sound generation parameters of each individual voice select the EDIT PARAMETERS field in the VOICES menu For this function the display again shows the organ s sections allowing select...

Page 19: ...e the sound takes to reach the maximum volume o REL DETUNE Release Detune detuning in the release phase o FREQ SKEW gradual change in the air s pitch during the attack and release phases o DETUNE detuning to produce the throb effect in the voices concerned o KEYB LO LEV Keyboard Low Level gain positive values or attenuation negative values of the volume in the low part of the manual o KEYB LO LEV ...

Page 20: ...creen printed on the draw stop or tab so that the stop the voice of which is being changed can be identified at all times When the FIELD S and FIELD T buttons are used to move the cursor to other voices the prompt changes to ENTER TO REPLACE instructing you to press ENTER to confirm the new voice and render it usable The voice on which the cursor is located is available and can be played even befo...

Page 21: ...hese voices the video page shows parameters for each voice indicated as L Left and R Right for the voices in Split mode and 1 and 2 for voices in Layer mode Split sounds has also the SPLIT KEY parameter to set the split point note To quit the edit menu press the EXIT button After Orchestra sounds are programmed it is possible to store them in the desired combination If you wish to set a different ...

Page 22: ...arious stops o INT AMPL TUNE UP Internal amplification tune up function not available in these models o PROG FUNCTIONS Programmable functions settings relating to operation of the combinations the pistons the Crescendo and the trimmers underneath the manuals o SWS CONFIGURATION All Swells in Swell configuration program the SWS piston function o EXT OUT EQUALIZER External outputs equalizer setting ...

Page 23: ...ied with regard to the width of the wind chest and its location in space defined by the number of outputs used To access the rear audio output setting video page select the EXT OUT ROUTER field in the SET UP menu CL CLV 8 CL CLV 7 this displays the screen for selection of the section which contains the stop to be set up which has to be chosen from the list of the stops in the section Here again th...

Page 24: ... in the first fifth of the area between output 3 and output 4 The screen shown above refers to a peaked wind chest placed between output 1 and a position between outputs 3 and 4 o position indicator it consists of small rectangles located above the drawing of the wind chest and indicates that the zone is displaying the part below the total number of outputs o wind chest on outputs in the bottom of...

Page 25: ...ction As set in Ext Router Conf function As set in Ext Router Conf function Outputs 1 8 Outputs 9 12 GENERAL ANTIPH As set in Ext Router Conf function General signal As set in Ext Router Conf function Outputs 1 8 Outputs 9 12 ANTIPH REVERB As set in Ext Router Conf function As set in Ext Router Conf function Reverberated signal only Outputs 1 8 Outputs 9 12 9 2 CONFIGURING THE AUDIO OUTPUTS ON THE...

Page 26: ...setting of the code used to lock out the organ to prevent access to the instrument s set up screens and the saving of combinations the Tutti and the Crescendo o RESTORE FACT SET Restore factory settings restores the factory settings o OP SYS UPGRADE Operating System upgrade upgrade of the instrument s operating system The second part of the menu relates to the MIDI interface settings o Tx AND Rx C...

Page 27: ...e file management functions There is also a screen which provides information about the firmware versions installed on the organ As the video page shows the bottom of the screen identifies the memory unit currently in use INTERNAL MEMORY USB STICK DRIVE The functions available are as follows o DIR displays the contents of the mass memory o LOAD file loading o SAVE saving of the set up of the organ...

Page 28: ...equencer press the SEQUENC button beside the display The screen for selection of the system s three operating modes is displayed o PLAY playback of the performances saved in the internal memory or the USB pen o PLAY OPTIONS options for playing back pieces o RECORD recording of pieces of music The memory unit currently used appears in the bottom of the screen Remember that the USB stick has priorit...

Page 29: ...lay speed displayed on top left as percentage of the original value 100 in the screen picture above VALUE press once increase play speed displayed on top left as percentage of the original value 100 in the screen picture above VALUE press and hold rewind VALUE press and hold fast forward Once playback of a song has been started the display changes to as the screen shows the functions of the ENTER ...

Page 30: ... restart recording EXIT stop recording Press EXIT to end the session The display will show the screen allowing the recording just made to be saved select NEW SONG to start a new recording Otherwise a MIDI file can be loaded to overdub it or in other words make a new recording which will be added to the performance already recorded 12 2 RECORDING A PIECE RECORD mode In the sequencer mode video page...

Page 31: ...quired but not saved the system warns that the recording is about to be lost The functions displayed allow o SAVE saving of the recording as a MIDI file o PLAY playback of the recoding before saving it o OVERDUB creation of a new recording to be added to the sequence just acquired o DISCARD AND EXIT delete the recording and quit sequencer Record mode If the SAVE field is selected the system prompt...

Page 32: ... button o LIST LOOP if this function is set as YES at the end of the last piece in a Songlist the first piece is automatically played again 12 4 SONGLISTS SONGLIST function Songlist is the organ function used to create and save lists of pieces of music MIDI files To programme a list of pieces recall the FILE MANAGEMENT menu and select the SONGLIST function the system asks if you wish to create a n...

Page 33: ...VALUE to move the position forward or VALUE to set an earlier position Finally press ENTER to save the list or EXIT to return to the previous video page As for MIDI files the first three characters can only be numbers To enter the name use the FIELD S and FIELD T buttons to move the cursor and VALUE and VALUE to select the character Press ENTER to confirm the name and go ahead with the saving oper...

Page 34: ...red press S and C together to save it Accessing the Local Off setting function after this will trigger display of the status of the stops as follows Light on stop in Local On mode plays with internal generation Light off stop in Local Off status 13 2 FACTORY SETTINGS The Factory Setting procedure allows restoration of the factory settings of all the instrument s internal functions deleting all the...

Page 35: ... start the procedure during which the PERFORMING message is displayed after which will display ACCOMPLISHED Press EXIT to quit the operation 13 3 UPGRADING THE OPERATING SYSTEM The operating system of the Unico organs can be easily and quickly update Just copy the update files in an flash drive and plug it in the USB connector under the manuals then recall the OP SYS UPGRADE function To get the in...

Page 36: ......

Page 37: ...t different from that to which the receiver is connected Consult the dealer or an experienced Radio Tv technician for help The user is cautioned that any changes or modification not expressly approved by the party responsable for compliance could void the user s authority opearate the equipment INFORMATIONS FCC NOTE Cet instrument a été controlé et il est garanti pour etre en conformité avec les s...

Page 38: ...viscount Viscount International S p A Via Borgo 68 70 47836 Mondaino RN ITALY Tel 39 0541 981700 Fax 39 0541 981052 Website www viscount it www physisorgans com ...

Reviews: