background image

102

Viscount


Choir Master

User Manual

N.B.:

-

Keep in mind that Combinations are not recorded. This means that
if a song is loaded and a Combination is selected, overdubbing
will not affect the original Registration and the voices after the
overdub are still those of the Registration and not those of the
Combination selected.

-

To record MIDI tracks with organs that are not produced by
viscount, set the MIDI IN channels (see par. 9.1) as following:
Pedal:1
Great:2
Swell: 3
Choir: 4

-

The stops level of Registration type songs cannot be modified
while overdubbing. Neither  STOPS buttons nor incoming MIDI
messages will affect the stops level.

For further information on this video page, read the previous paragraph.

Summary of Contents for Choir Master

Page 1: ...viscount Manuale d Uso IT User Manual EN Guide de l utilisateur FR Ver 1 1 Choir Master ...

Page 2: ......

Page 3: ...tion 77 4 2 Searching by digits 80 4 3 Searching by notes 81 5 Playing a song 83 5 1 Main video page and play 83 5 2 Tap Conductor advancement 85 5 3 Adjusting the play speed 89 5 4 Adjusting volume and transposition 90 5 5 Controlling the organ stops 91 5 6 Song lyrics display 93 6 Quick Selection locations 96 7 Recorder 98 7 1 First recording 99 7 2 Overdubbing 100 8 File Manager 103 8 1 Copying...

Page 4: ...111 8 5 Create folders 113 9 General settings 115 9 1 Selectiong MIDI channels 116 9 2 Locking Quick Selection 117 9 3 Pedal settings 117 9 4 Setting display contrast 119 9 5 Selecting the numerical panel transmission mode 120 9 6 Selecting TV signal PAL or NTSC 121 9 7 Upgrading operating system 121 ...

Page 5: ...r liquids of any kind into it For cleaning use only a soft brush or compressed air never use detergents solvents or alcohol Always use good quality screened cables for connection to amplification or diffusion systems When disconnecting cables from sockets always take hold of the connector and not the cable itself when winding cables do not knot or twist them Before making the connections ensure th...

Page 6: ...of a constructional or commercial nature at any time and without undertaking to update this publication immediately All rights reserved the reproduction of any part of this manual in any form without the manufacturer s specific written permission is forbidden All the trademarks referred to in this manual are the property of the respective manufacturers Read all the information carefully in order t...

Page 7: ...of the track even in the case of tempo variations in the same track Furthermore it is possible to show the song lyrics on both internal or external optional displays A cursor indicates the current syllable show on the external display optional the digits assigned to the current song or any other code e g the page on which the hymn can be found select a song or playlist just by pressing one of the ...

Page 8: ...selects one out of four Quick Selection banks A D shows the currently selected Quick Selection bank SET press this button to save a song on a Quick Selection location 1 16 these buttons recall the 16 Quick Selection locations from the bank indicated by the A D LEDs 2 MANAGER section use these buttons to select the file management and general settings menus FILE recalls the file management menu Bot...

Page 9: ...n the SONG STRUCTURE buttons see point 5 4 STOPS section these buttons control the active stops in the current song par 5 5 DIM decreases the amount of stops and couplers CRESC increases the amount of stops and couplers 5 SONG STRUCTURE section contains buttons to skip or activate deactivate the verses and the LEDs showing the verses of the song par 5 1 0 INTRO ABC ENDING selects and activates dea...

Page 10: ...his button to show the beats and notes graph while on the main screen decrease the value highlighted by the cursor 8 TEMPO section use these button to adjust the song speed SLOW decrease the metronome time by percentage FAST increase the metronome time by percentage 9 ENABLE section buttons activating the following functions LYRICS show the lyrics of the current song A PANEL activate the Annunciat...

Page 11: ...s out MIDI data through this connector the cable plugged in this connector must be connected to the MIDI IN port of the playing instrument THRU transmits the incoming data from the IN port to other MIDI devices 4 USB ports plug a USB drive not included to the type A connector the one on the right to use it as an external memory Type B connector on the left is unused at the moment and will be neede...

Page 12: ...ume control or foot switch pedals For further information about the pedal functions see par 9 3 7 connector connect here the Choir Master antenna Thanks to the antenna the Annunciator Panel can be used without cables 8 VIDEO connector RCA output connector Connect to video input of a TV set to show the song lyrics ...

Page 13: ...how the SONG SELECT menu this menu can be accessed from any other page by pressing the SONG button Use the S and T buttons to place the cursors on the relevant memory unit then press ENTER The system will show the root directory of that memory unit The fields are o first line on top at first access Parent Directory Shows the name of the selected directory INTERNAL USB means that you are in the roo...

Page 14: ...ield without connecting a USB drive will produce the following message USB key not present To access a USB drive connect one to the USB connector in the rear panel Then wait a few seconds before trying to access it Should the pen drive be already connected try disconnecting it and inserting it again then check that the USB drive is working and using the right file system After the first access the...

Page 15: ... while playing a song Should you try the following message will appear If necessary to access the USB drive while playing a song be sure to access it for the first time after connection before anything else Then you will be able to access the USB drive at any time even while playing a song as long as the drive is connected Please keep in mind that navigating through USB drives and directories with...

Page 16: ... to load and select songs through these buttons press a SONG STRUCTURE button for the first digit then again for the second and then a third time for the third digit For example pressing the SONG STRUCTURE 0 button will show on display only the files whose first character is 0 pressing 3 afterwards the display will show filenames beginning in 03 After that you might already be able to find the fil...

Page 17: ...tion To find a song play part of its melody on the SONG STRUCTURE buttons and press ENTER thereafter The system will find four similar songs on the internal memory Up to 16 notes of the melody can be played at once When the 16th note is played the system will start searching the song as if the ENTER button were pressed Use the S T and ENTER buttons to select and load a track If the song you are lo...

Page 18: ...s saved in the internal memory containing notes on the MIDI channel n 5 The system cannot play songs while using the SMART HYMN SEARCH function Attempting to access the function while playing a song or start playing a song while using the SMART HYMN SEARCH function generates an error message ...

Page 19: ...ws the main video page containing general information about the current track In detail 1 Filename of the track Press ENTER to read the full name and further information such as song key author year of composition etc 1 2 3 4 5 Use the and buttons to increase or decrease the character size Press EXIT instead to return to the main video page ...

Page 20: ...tons represent only verses and not choruses all choruses except the first one are considered part of each verse If a song begins with a chorus there will be no blinking led To avoid playing the first chorus skip to the first verse To skip to another verse press and hold the corresponding SONG STRUCTURE button After doing this the screen will show Pressing the KEYBOARD button the SONG STRUCTURE LED...

Page 21: ...utton 5 2 TAP CONDUCTOR ADVANCEMENT Thanks to this function you can control the tempo and rhythm of a song This is particularly useful when using the Choir Master together with a singer or solo instrument Indeed a common pre recorded track no matter how good is always inadequate to these situations as it cannot interact with musicians Thanks to the TAP CONDUCTOR function anyone with just a hint of...

Page 22: ...y transposition the graph 1 on the picture represents the beats of each bar of the song with note symbols The note type represents the length of each beat For example two crotchets quarter notes indicate a 2 4 tempo three minims half notes stand for 3 2 etc Above 2 the little x symbols indicate the notes of the melody Their horizontal position corresponds to their exact time location inside the mu...

Page 23: ...he song at the given tempo The tempo is calculated as the time gap between the last two times the button has been pressed Pressing the BEAT button while green i e while the current beat is being played will cause the system to skip to the next beat Doing this will force an accelerando A sharp accelerando will leave a black stripe white in the picture below on the progress bar which means that part...

Page 24: ...d if the current tempo percentage is not 100 This function can be helpful in case a song reaches a fermata sign and must start at the original tempo afterwards In this case when marking the beat ending with a fermata sign hold the BEAT button pressed The NOTE button works with a similar rationale as the BEAT button The difference is the NOTE button controls the advancement in terms of notes The us...

Page 25: ...e SLOW and FAST buttons can be found to the right of the display These buttons change the song s tempo Using these buttons adjusts the tempo by percentage The current value is shown on screen The original tempo multiplied by percent time makes the absolute time A 100 tempo corresponds to the original tempo of the song If the value is below 100 the SLOW button glows green meaning that the song is s...

Page 26: ... adjust the volume of a song hence the volume of the instrument used as output press the VOLUME button use the and buttons to adjust the volume by percentage Press EXIT or VOLUME to save the new value and return to the main video page To transpose a song to a different key from the original press the TRANSP button The display will show the current transposition by semitones Again use the and butto...

Page 27: ...el 3 will be played with level 4 The actual level is the sum of the two numbers Keep in mind that the minimum level is 1 and maximum is 9 The button lights shows that the register level has been modified The active stops can be found on the bottom of the screen and so the nine registration levels This table shows the correspondence between symbols and stops LEVEL SYMBOL MANUAL STOPS PEDALBOARD STO...

Page 28: ...oth buttons at the same time to activate the chosen combination Combinations can be activated at any moment After activating a combination the DIM and CRESC buttons turn red This means that any stop variation of the song will be ignored Therefore in a way the Combination mode is always lock mode as the registration can only be modified by the user Press the S button to return to the previous mode ...

Page 29: ...nu To access the menu press and hold for a second the LYRICS button First you can choose whether to modify lyrics options of the Choir Master display INTERNAL LCD or of the external screen EXTERNAL VIDEO Select the appropriate field with the arrow buttons and press ENTER More options will appear o CASE the lyrics can be visualized in the original format ORIGINAL or all upper case UPPER o HYPEN sel...

Page 30: ...included NOTE TAPS not available for External Video each syllable comes in square brackets useful when working in NOTE mode as it highlights the syllables activated by pressing the NOTE button For example if the current song has these lyrics A a a al le lu ia A a al le lu ia a Al le lu ia Al le e lu ia Al le lu ia vertical bars are used here only to highlight the syllables shown as PLAIN TEXT ...

Page 31: ...r Manual Viscount Choir Master shown as ORIGINAL shown as AUTOMATIC shown as NOTE TAPS ROWS set the number of text lines updating at the same time REFRESH1 one row at a time REFRESH2 two rows at the same time ...

Page 32: ...e the BANK button to select one out of 4 available memory banks The A B C and D LEDs show the current memory bank Songs can be saved in a quick selection slot using the SET button To save a song load it and then press and hold the SET button Then press one of the 16 quick buttons A pop up message asks to confirm the operation Release the SET button to cancel the operation press the Quick Selection...

Page 33: ...k Selection slot is assigned to a song saved in a USB key and the key itself is removed the song cannot be loaded Therefore the system will produce the message Attempting to load a deleted moved or renamed file either from internal or external memory will produce message If no song has been saved in the selected slot the system will show this message ...

Page 34: ...ard MIDI files format 1 125 bpm 384 ticks per quarter note Press the button to activate the recorder This video page will appear Select o RECORD NEW SONG to record a new song o OVERDUB SONG to overdub the currently loaded song The loaded song is displayed on the main video page N B If no song has been loaded recalling the Recorder function will not produce the video page above Instead you will see...

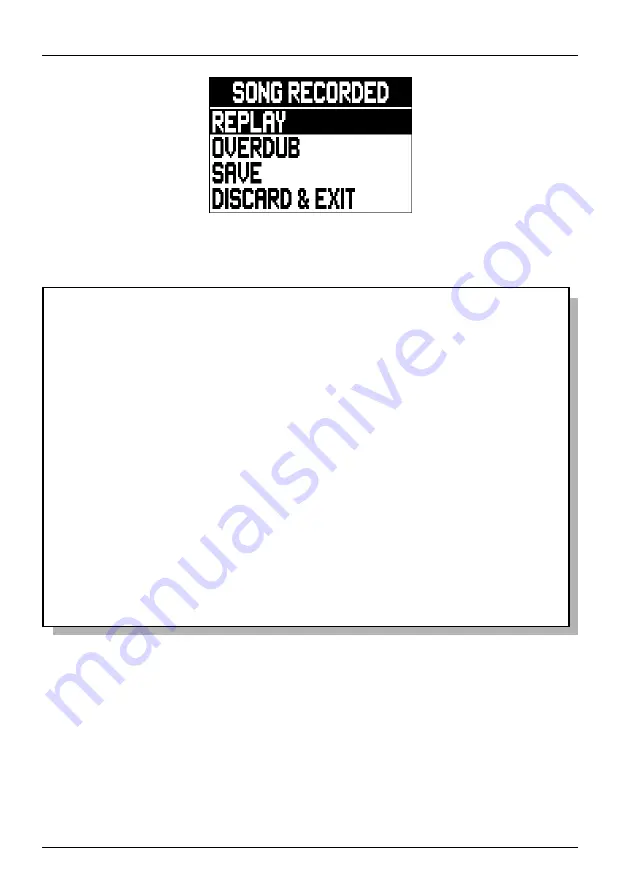
Page 35: ... in the internal or external memory Press or EXIT to leave the recorder and return to the main video page To stop recording press The display will show These are the options o REPLAY listen to the recording It will not be saved yet o OVERDUB start overdubbing the current recording o SAVE save the recorded MIDI data o DISCARD EXIT discard all acquired data Use the buttons S T and ENTER to select an...

Page 36: ...r information about this page see par 8 4 7 2 OVERDUBBING Overdubbing means overlapping the data received from the MIDI IN port to the currently loaded song or recording To do so load a song then from this video page Select the OVERDUB SONG field Otherwise if you wish to overdub the track just recorded in this page ...

Page 37: ...press The display will show These are the options o REPLAY listen to the recording It will not be saved yet o ACCEPT accept and save the recording o DISCARD discard the recording and delete all acquired data Use the buttons S T and ENTER to select a field Press to leave the Recorder and return to the main video page Press EXIT to return to the previous page instead When accepting the current recor...

Page 38: ...till those of the Registration and not those of the Combination selected To record MIDI tracks with organs that are not produced by viscount set the MIDI IN channels see par 9 1 as following Pedal 1 Great 2 Swell 3 Choir 4 The stops level of Registration type songs cannot be modified while overdubbing Neither STOPS buttons nor incoming MIDI messages will affect the stops level For further informat...

Page 39: ...tions o COPY copy files or folders o MOVE move files or folders o DELETE delete files or folders o RENAME rename files or folders o CREATE DIR create folder To use a function simply place the cursor on the corresponding field using the S and T buttons then press ENTER Press EXIT or FILE to return to the main video page N B Only use USB keys formatted with FAT or FAT32 file system not NTFS We recom...

Page 40: ...ld the pen drive be already connected try disconnecting it and inserting it again then check that the USB drive is working and using the right file system After connecting the USB pen wait a few seconds before browsing it The performances of the USB drive might affect the browsing speed While loading the memory content the system shows this message The system can read up to 512 elements either fil...

Page 41: ...lder involves making a duplicate and pasting it into a different directory It works as the Copy Paste function of the computers Select the COPY field under the FILE MANAGER menu then select the memory unit containing the data you wish to copy N B The system cannot play songs while using the FILE MANAGER functions Attempting to access the functions while playing a song or start playing a song in th...

Page 42: ...ies the selected folder with all its sub folders o COPY FILES copy all the files contained in the selected folder but not sub folders Select the proper option and press ENTER To copy a file locate the cursor on it and press ENTER The system will show this message The content of the root folder appears on screen Asking where to copy the selected data Press ENTER to select the directory where the da...

Page 43: ... the system automatically returns to the FILE MANAGER menu 8 2 MOVING FILES OR FOLDERS Moving differs from copying as the former deletes the files from their original position after writing them to a new location It works exactly as the Cut Paste function available in computers To move a file enter the FILE MANAGER menu and select the MOVE field The procedure is the same as with the copy function ...

Page 44: ...E DIRECTORY moves the selected folders with all its sub folders o MOVE FILES moves all the files contained in the selected folder but not sub folders Select the proper option and press ENTER To move a single file locate the cursor on it and press ENTER The system will show this message Asking where to move the selected data Press ENTER to select the directory where the data will be copied or press...

Page 45: ... wish to move there this message will appear N B A folder cannot be moved inside itself If attempting to do so the following error message will appear asking if you wish to overwrite the original files Press ENTER to overwrite or EXIT to cancel Once the procedure is over the display shows the FILE MANAGER menu ...

Page 46: ...he content of a folder locate the cursor on it using the S and T buttons then press ENTER Press EXIT to quit the current folder On the second line from the top of the display there is a bracketed field Again use the and buttons to switch between these options o DELETE DIRECTORY deletes the selected folder and all its sub folders o DELETE FILES deletes all files in the selected folder but not its s...

Page 47: ...g data loss the system asks for a confirmation Press ENTER to delete or EXIT to abort the operation 8 4 RENAME FILES OR FOLDERS To rename a file or a folder enter the FILE MANAGER menu and select the RENAME field The display shows the content of the root directory ...

Page 48: ...e the cursor on the chosen key then press ENTER The first character assigned to that key will appear to the left of the cursor Press the button again immediately to choose the following character assigned to the same key This works in cycle to return to the first character press ENTER again Waiting a second after pressing ENTER will fix the character Some buttons have different functions A deletes...

Page 49: ...anel Please keep this in mind while renaming the files Two files in the same folder cannot share the same name Should you attempt this the following message will appear Press EXIT or ENTER to modify the filename 8 5 CREATE FOLDERS To create a new folder in a memory unit access the FILE MANAGER menu and select the CREATE DIR field Next you must indicate in which memory unit you wish to create your ...

Page 50: ...directory in which you wish to create a new directory then locate the cursor on the CREATE HERE field and press ENTER Now you need to enter a name for your directory see instructions in par 8 4 N B You cannot give the new directory a name that has already been assigned to another directory Should you attempt this the following message will appear Press EXIT or ENTER to modify the filename ...

Page 51: ...ion locations o FOOTSWITCHES sets the functions performed by the pedals Pedals must be connected to the FOOTSWITCH connectors on the rear panel o LCD CONTRAST adjusts LCD display contrast o A PANEL LINK MODE selects the data transmission protocol to the A PANEL connector o TV SYSTEM selects the type of TV signal sent out from the VIDEO connector o OP SYS UPGRADE upgrades the operating system To us...

Page 52: ... the wrong sections Should this happen modify the Choir Master settings to match the instrument s To set the Choir Master channels enter the SETUP menu and select the MIDI CHANNELS field This page will appear Use the S and T buttons to move the cursor press and to select the channel Press EXIT to leave the page and save the new settings NB It is not possible to assign the same MIDI channel to two ...

Page 53: ...st press its QUICK SELECTION button Press EXIT to save changes and quit the function 9 3 PEDAL SETTINGS All the main functions of you Choir Master can be performed through pedals either foot switch or expression pedals As already stated in chap 3 2 pedals can be connected to the FOOTSWITCH 1 and 2 connectors of the rear panel To assign a function to the pedals enter the SETUP menu and select the F...

Page 54: ...order Works as the button front panel Best used with foot switch pedals o DIM decreases the amount of stops and couplers in the current song Works as the DIM button front panel Best used with foot switch pedals o CRESC increases the amount of stops and couplers Works as CRESC button front panel Best used with foot switch pedals o SLOW slows down tempo by percentage Works as SLOW button front panel...

Page 55: ... Choir Master is off after it is on do not modify the switch s position on off To calibrate move the pedal to its maximum position Then press q and set the pedal to its minimum Press ENTER again o INACTIVE no function assigned to the pedal It is best to select this function when no pedal is connected Press EXIT to save and quit 9 4 SETTING DISPLAY CONTRAST To set the display contrast according to ...

Page 56: ...be activated To do so enter the SETUP menu and select the A PANEL LINK MODE Use the and buttons to select the connection mode o RADIO connect the panel to Choir Master via radio waves needs an antenna Moreover you can find the CHANNEL parameter This parameter sets the radio channel in use if there are several Viscount instruments with radio devices nearby set a different channel to avoid interfere...

Page 57: ... 7 UPDATING THE OPERATING SYSTEM Each time Viscount releases an operating system update for the Choir Master you need to contact the technical support by email at service viscount it requesting the update file ucm extension The file will be sent by email Then copy the ucm file in the root directory of a USB key Inserire quindi la penna nel connettore USB del pannello posteriore e richia mare la fu...

Page 58: ...TUP menu After the update the system will automatically reboots N B Pay attention when copying the ucm file in your USB drive The file must always be placed in the main directory of the drive and not inside any other folder the address of the main directory usually appears as D or F not D Peter or F v_songs Peter and v_songs are subfolders and phy file should not be saved inside these If the file ...

Page 59: ... the file again from the computer to the USB key Should the error occur a second time contact the technical assistance at service viscount it and request a new update file The flash drive used to update the organ must be formatted with FAT or FAT32 file system not NTFS otherwise the organ will not be able to read from the flash drive ...

Page 60: ...t different from that to which the receiver is connected Consult the dealer or an experienced Radio Tv technician for help The user is cautioned that any changes or modification not expressly approved by the party responsable for compliance could void the user s authority opearate the equipment INFORMATIONS FCC NOTE Cet instrument a été controlé et il est garanti pour etre en conformité avec les s...

Page 61: ...lvedere Fogliense 154 47836 Mondaino RN ITALY Tel 39 0541 981700 Fax 39 0541 981052 Website www viscount it Distribuito in Italia da TITAN MUSIC S A Strada Genghe di Atto 80 47892 Acquaviva Repubblica di San Marino Tel 0549 999164 fax 0549 999490 ...

Reviews: