IPI-4 Converter – Installation Guide
Page 3 of 6
D-301285_V6.0
Initial Configuration and What You Need To Know
Configuration should be carried out as soon as the installation is completed. It is important that the installer have a basic understanding
of Ethernet setup in order to initially configure the IPI-4 Converter. If you do not have this basic knowledge, please seek the proper
assistance.
Before proceeding with remote management of the device via EIRIS or AXSalert enterprise software; you need to know the IPI-4
converter’s unique IP address on the LAN/WAN network. Several options for determining the IP address of the device are available.
We recommend that you simply PING the device. Alternatively you can use the enclosed Lantronix_Programming application to assign
an IP address to the converter.
Pinging the IPI-4 Converter
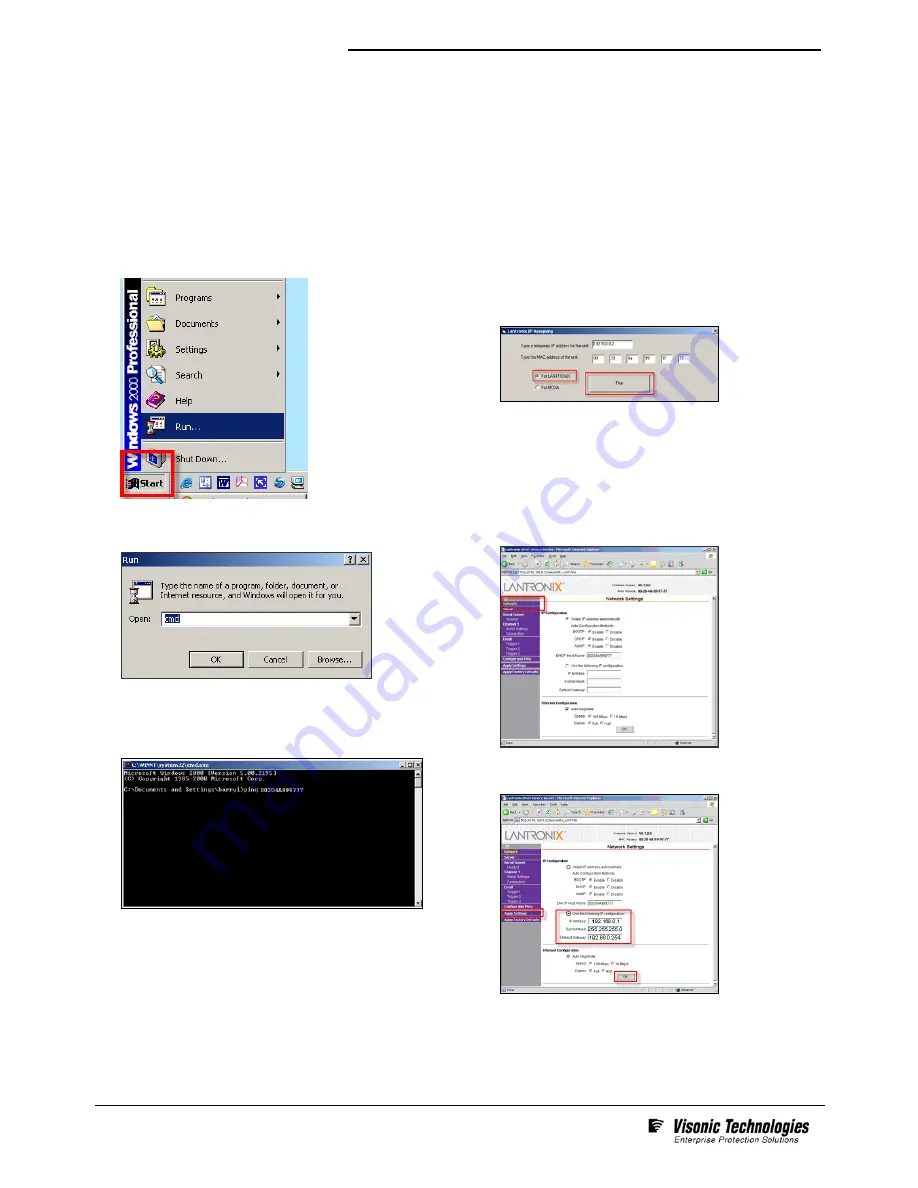
1.
In the Start Menu located on the far left side of the
Windows task bar select Start > Run; the Start, the
Run/Search Command dialogue box appears.
2.
Type cmd in the free text field then click OK;
the MS Windows command interpreter (DOS shell)
box appears.
3.
Type Ping ‘<MAC address>’; then press the Enter key
on your computer’s keyboard.
The IPI-4’s ‘MAC’ address can be found printed on the
product label glued to the top side of the RJ-45 connector.
If there is a response from the IPI-4, the IP address of
the device will immediately appear.
4.
Record the returned IP address for use with either EIRIS
or AXSalert enterprise software.
Using the Lantronix_Programming Application
The Lantronix_Programming application is supplied on the
enclosed CD. You can either run it directly from the CD or
copy it to any folder on the host EIRIS or AXSalert computer
and run the program from there.
1.
Launch the Lantronix_Programming application;
the Lantronix IP Assigning box appears.
2. Enter a temporary IP address for the IPI-4 that does not
conflict with any other components on the network. Next;
enter the MAC address of the adapter in the provided fields.
The IPI-4’s ‘MAC’ address can be found printed on the
product label glued to the top side of the RJ-45 connector.
3. Enable the For LANTRONIC option, then Click Run. When
prompted for a
User Name and Password; click OK; the
Lantronix XPort Device Server
browser window appears
.
4.
On the left side of the browser window, Click Network;
the Network Settings window appears.
5. Enable the Use the following IP configuration option. Enter
appropriate IP, Subnet and Gateway data in the applicable
fields. Then click OK and finally click Apply Settings.
6. Record the entered IP address for use with either EIRIS
or
AXSalert enterprise software


