background image

EN

VirtuFit CTR 3.0i Elliptical Trainer
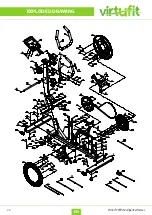
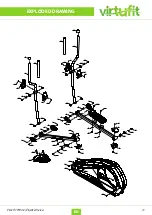
18

Display shows no values
If the display does not show any values, you can try to check the sensor cables and the cables in the back 
of the display. If this still does not work, you can move the sensor slightly.

The device beeps
If necessary, lubricate parts with silicone spray. Check that all nuts and bolts are tightened. It may be that a 
screw is too loose or too tight, this creates friction and makes the device appear to beep. If this is the case, 
try to find out exactly where the beep comes from and then tighten or loosen this screw. It must always be 
possible to loosen the screws with your hands. If this is not possible, the screw is too tight.

No resistance
First check whether you can hear the motor running. You will hear the motor running briefly when you 
increase or decrease the resistance. If you hear the engine running, all electronics are in order, but the 
V-belt is probably over. You can then open the housing and put the V-belt back on it. If you do not hear 
the motor running, it is possible that the motor or the display is defective. First check whether the cable 
running upwards in the pipe is still properly connected.

Ticking sound
It is possible that the flywheel (in the housing) comes against a cable with each
pedaling movement. This may be disturbing but will not permanently damage your crosstrainer.
To fix this, open the housing and move the cable or fix it with
for example a tie wrap.

Heart rate display is not functioning
There can be various reasons for this: 

 • The sensor cables that run from the heart rate sensor to the display are not properly installed or have  

  become detached during use.

 • The sensors may become damp, dirty or greasy. So you have to clean them regularly.

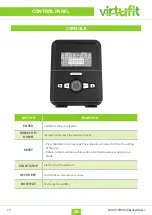
The console is not working
If there is no signal when pedaling, check if the cable is properly attached.

TROUBLE SHOOTING

Summary of Contents for CTR 3.0i

Page 1: ...User manual EN CTR 3 0i Elliptical Trainer...

Page 2: ...USTMENTS GUIDE ADJUSTMENTS GUIDE TRAIN ON HEART RATE TRAIN ON HEART RATE MAINTENANCE MAINTENANCE TROUBLE SHOOTING TROUBLE SHOOTING CONTROL PANEL CONTROL PANEL APP INSTRUCTIONS APP INSTRUCTIONS EXPLODE...

Page 3: ...t irregular heartbeat extreme shortness of breath lightheadedness dizziness or feelings of nausea If you do experience any of these conditions you should consult your doctor before continuing with you...

Page 4: ...d or seek assistance if necessary Please keep the space at least 1 to 2 meter at the end of base frame to escape any accidents Place the device on a clean and flat surface Do not place the device on a...

Page 5: ...hen you open the carton and you will find the below parts in the carton NOTE Do not connect the appliance to the power before it has been completely assembled 2 st 2 st 1 st 4 st 2 st 6 st 4 st 4 st 4...

Page 6: ...Ensure that all cables are carefully attached The aluminum legs are very sensitive and must remain straight Do you receive an error message after mounting your device Then you have to straighten thes...

Page 7: ...EN VirtuFit CTR 3 0i Elliptical Trainer 7 STEP 2 Attach the rear stabilizer 3 to the main frame 1 with curved washer 28 springWasher 27 and Allen C K S half thread screw 26 ASSEMBLY INSTRUCTIONS...

Page 8: ...the main frame 1 with flat washer 33 spring washer 27 Allen C K S full thread screw 104 and Allen C K S half thread screw 105 curved washer 28 spring washer 27 12 Hex self locking nut 32 Attach uprigh...

Page 9: ...left body arm 5 and right body arm 6 to the left Axle 25 and right Axle 25 with flat washer 31 and Allen C K S full thread screw 29 Attach arm cover 16 17 to the left body arm 5 with Philips pan head...

Page 10: ...al left 84 on the pedal group left 7 and lock it with carriage screw 86 flat washer 33 hexagon lock nut 32 Install the foot pedal to the right 85 of the pedal group right 8 in the same way The pedals...

Page 11: ...S full thread screw 40 Attach the rear cover of pedal supporter 20 21 to left pedal supporter 7 with Philips pan head full thread screw 37 Attach the front cover of pedal supporter 18 19 to left pedal...

Page 12: ...ire 13 out of the upper upright post 4 Attach handlebars 9 to upright post 4 with flat washer 31 spring washer 30 and Philips pan head full thread screw 36 Attach bottle holder 24 to upper upright pos...

Page 13: ...ulse communication wire 13 with console outset 14 Attach console 10 to upper upright post 4 with Philips C K S full thread screw 42 Through left handlebar cover 22 and right handlebar cover 23 out of...

Page 14: ...the adapter connector and connect to mains power You can now use the cross trainer Do not use the machine until it has been fully assembled and inspected for correct operation in accordance with the...

Page 15: ...andlebars until the transport wheels on the front stabilizer touch the ground With the transport wheels on the ground you can easily transport the elliptical to the desired location ADJUSTMENTS GUIDE...

Page 16: ...t rate monitor that works on Bluetooth With a wireless heart rate monitor it is important that the electrodes are slightly moist and that the heart rate monitor fits well on your body Refer to your he...

Page 17: ...nts of the use equipment silicone spray if necessary Safeandeffectiveusecanonlybeachievedifthedevicewillbeassembledandmaintained well It is your responsibility to ensure that the equipment is regularl...

Page 18: ...resistance If you hear the engine running all electronics are in order but the V belt is probably over You can then open the housing and put the V belt back on it If you do not hear the motor running...

Page 19: ...s off and reconnect it E1 De console ontvangt geen FAT testsignaal pak de sensoren beide goed vast E1 Console is not receiving a FAT test signal grasp both sensors securely E2 Check if the motor excee...

Page 20: ...decrease the resistance level RESET Press the button for 2 seconds The computer will restart at from the setting of the user Return to the main menu while setting one training value or during stop mod...

Page 21: ...Range 0 0 99 99 CALORIES Burned calories during workout display Range 0 9999 PULSE Pulse bpm displayed during exercise Pulse alarm when over preset target pulse RPM Rotation per minute Range 0 999 WA...

Page 22: ...Press any key may wake the console up MANUAL MODE Press START in main menu may start workout in manual mode 1 Press UP or DOWN to select workout program choose Manual and press ENTER KRY to enter 2 Pr...

Page 23: ...E 5 Press START STOP button to start workout Press UP or DOWN to adjust load level 6 Press START STOP button to pause workout Press RESET to reverse to main menu H R C MODE 1 Press UP or DOWN to selec...

Page 24: ...urn the main display 3 During RECOVERY user may press RECOVERY button to back to main menu 4 Without pulse inputted it is invalid to press RECOVERY button 1 0 OUTSTANDING 1 0 F 2 0 EXCELLENT 2 0 F 2 9...

Page 25: ...directly to the place in the App Store or Google Play Store where the app is located and can be downloaded 3 Scan the QR code on the right to go to the user manual of the app The manual describes ste...

Page 26: ...EN VirtuFit CTR 3 0i Elliptical Trainer 26 EXPLODED DRAWING...

Page 27: ...EN VirtuFit CTR 3 0i Elliptical Trainer 27 5 EXPLODED DRAWING...

Page 28: ...washer 10 8 28 Curved washer 10 5 R100 t2 0 10 29 Allen C K S screw M8 20 6 30 Spring washer 8 2 DESCRIPTION QTY 31 Flat washer 8 5 20 t1 5 6 32 Hex self locking nut M10 6 33 Flat washer 10 6 34 Idle...

Page 29: ...gnetic bed fixed axle 12 50 1 73 Brake tension spring 1 74 Magnet motor 1 75 Double flywheel 280 9KG 1 76 Motor belt 540PJ6 1 77 Standing bar decoration 102 57 8 1 78 Platic cover 42 5 30 2 79 Handle...

Page 30: ...eart rate and warm the working muscles Activities may include brisk walking jogging jumping jacks jump rope and running in place Stretching while your muscles are warm after a proper warm up and again...

Page 31: ...For questions or missing parts please contact your dealer...

Reviews: