background image

Operation of the Canister Vacuum 


* Read operators manual thoroughly 

prior to operating or servicing this 

machine. 

DRY PICKUP 

1]

 Remove The vac head of machine and 

confirm  that  there  is  either  a  cloth  of 

paper filter in place. 

2] Replace & the latch vac head. 


* Be sure the machine is not plugged 

into an outlet. 

3]  Connect  vacuum  hose  to  inlet  on  the 

machine body. 

4]  Remove  tool  storage  lid  on  top  of 

machine and unwind power cord.. 

5] Choose  appropriate tool, and attach it 

to the free end of the hose . 

6] Plug power cord into grounded 

    outlet. 


* Do not use an extension cord in 

conjunction with the standard power 

cord. 

7]  To  start  the  machine,  push  on  the 

red  power button  located  above  the 

left rear wheel. 

8] Check the filter bag periodically to see 

if  it  is  full.  For  optimal  performance, 

replace the bag when it is 3/4 full.   

9] This machine is designed to be pulled 

around by the vacuum hose, so pull the 

hose, and the vacuum will follow. 

10]  To  stop  the  machine  at  any  time, 

simply  press  the  red  power  switch  & 

the machine will stop automatically. 


MAINTENANCE 

To  keep  the  machine  performing well  for 

many  years,  please  follow  the  following 

maintenance procedures. 


*  Always  confirm  that  the  machine  is 

unplugged  prior  to  performing  any 

maintenance or repairs. 


1]  Unplug  machine  as  soon  as  you  are 

done using it. 

2]  Rewind  the  power  cord  into  the  tool 

storage area.. 

3]  Replace  the  tool  into  the  tool  storage 

area. 

4]  Check  power  cord  for  any  damage.  If 

any  damage  is  detected,  replace  the 

cord immediately. 

5]


Lubricate  wheels  &  casters  with  a 

water resistant lubricant every month. 

6]  Check  machine  for  loose  or  missing 

nuts  and  bolts,  and  replace  as 

necessary. 

7]  Check  the  motor  cover  /  filter,  and 

clean it after each use. 

8] Remove the vacuum hose and check it 

for any holes and clogs. 

9] Clean the outside of the machine with 

a mild cleaner. 

STORAGE 

1] Unplug machine from power source. 

2] Properly store power cord and tools in 

the on-board storage compartment. 

3] Store in upright position in a dry area. 

Summary of Contents for MB39CV Mamba Series

Page 1: ...MODEL MB39CV SERIAL VA41128 HAMILTON MI 49419 VIPER NORTH AMERICA 866 41 VIPER 866 418 4737 P O BOX 104 Rev 00 08 08 VIPER exceptional value ...

Page 2: ...u happy with your purchase for many years to come As part of the V I P family you are entitled to the best protection by one of the most comprehensive warranties in the industry Thank you for purchasing Viper products Tom Vander Bie CEO TABLE OF CONTENTS Safety Precautions 3 Machine Operation 4 Machine Maintenance Storage 4 Parts Lists 5 9 Wiring Diagram 10 ...

Page 3: ...eas In standing water Without bag filters in place With the use of extension cords 2 Before operating machine Make sure all safety devices are in place and operate properly 3 When using machine Do not run machine over cord Do not pull machine by cord or plug Do not pull cord around sharp edges or corners Do not unplug by pulling on the cord Do not stretch cord Do not handle plug with wet hands Kee...

Page 4: ...pull the hose and the vacuum will follow 10 To stop the machine at any time simply press the red power switch the machine will stop automatically MAINTENANCE To keep the machine performing well for many years please follow the following maintenance procedures Always confirm that the machine is unplugged prior to performing any maintenance or repairs 1 Unplug machine as soon as you are done using i...

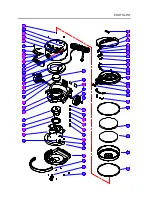
Page 5: ...PARTS LIST ...

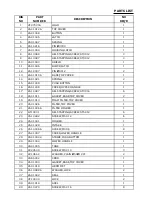
Page 6: ...7 SELF TAPPING SCREW ST3X16 6 18 VA41011 GASKET BASE TOP COVER 2 19 VA41013 FOAM FILTER TOP COVER 1 20 VA41026 FILTER TOP COVER 1 21 VA41006A FILTER HOLDER 1 22 GT13001 SELF TAPPING SCREW ST5X12 6 23 VA13492 SCREW M5X12 6 24 VA41041 HOLDER 1 25 VA41029 INTAKE 1 26 VA14006A SCREW M3X6 8 27 VA41007 COVER LOWER HANDLE 1 28 VA41004 3 STRIKE PUSH BUTTOM 1 29 VA41004 LOWER HANDLE 1 30 VA41005 TANK 1 31 ...

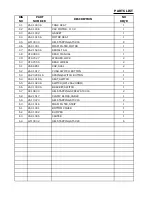
Page 7: ...1 49 VF47027 WASHER LOCK 2 50 VF47055 REAR WHEEL 2 51 VA96851 CAP AXEL 2 52 VA41017 PUSH SWITCH BUTTON 1 53 VA20209 16 SPRING SWITCH BUTTON 1 54 VA41018A SEAT SWITCH 1 55 VA41024A SWITCH HP12AS2HOOO 1 56 VA41030A BRACKET SWITCH 1 57 VV13640 SELF TAPPING SCREW ST4X16 2 58 VA21517 CLAMP BLOCK CABLE 1 59 VA13470 SELF TAPPING ST3X16 2 60 VA41016 FOAM FILTER STRIP 1 61 VA41001 BOTTOM COVER 1 62 VA41002...

Page 8: ...ACCESSORIES ...
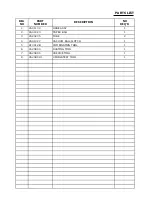
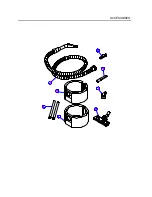
Page 9: ...IPTION NO REQ D 1 VA41130 HOSE ASSY 1 2 VA41023 PAPER BAG 1 3 VA20205 TUBE 2 4 VA41027 VACUUM BAG CLOTCH 1 5 GT0012B COMBINATION TOOL 1 6 VA20804 DUSTING TOOL 1 7 VA20805 CREVICE TOOL 1 8 VA20802 1 UPHOLSTERY TOOL 1 PARTS LIST ...

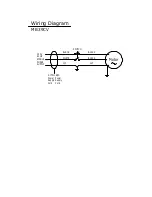
Page 10: ...Motor Cord Supply Power SJTW 16 3C Supply Cord Power MB39CV Wiring Diagram 120V SINGLE SUPPLY PHASE 60HZ SWITCH BLACK WHITE G Y BLACK G Y BLACK ...

Reviews: