background image

12

©

2002 

Directed Electronics, Inc.

3. Mount the receiver/antenna using the supplied double-sided tape. 
4. Route the receiver/antenna cable to the control module and plug it into the four-pin antenna

connector.

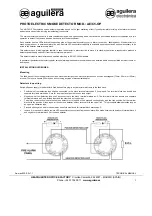
Shock Sensor Harness, 4-Pin White Plug

GREEN (-) Multiplex Input

Inputs shorter than 0.8 seconds will trigger the Warn Away® response, while inputs longer than 0.8
seconds will trigger full alarm sequence and report Zone 4. 

NOTE: If installing an optional Directed dual-stage sensor, connect to the GREEN wire. The
following diagram eliminates the need for diodes to isolate the sensors, as well as providing a
separate zone for each sensor.

Diagram for adding optional Directed dual stage sensor to GREEN wire (zone 4).

IMPORTANT! To achieve the best possible range, DO NOT leave the antenna cable
bundled under the dash. Always extend the cable full length during installation,
regardless of the antenna mounting location.

Summary of Contents for 650XV

Page 1: ...ta CA N436V 10 02 NOTE This product is intended for installation by a professional installer only Any attempt to install this product by any person other than a trained professional may result in seve...

Page 2: ...ay are all Trademarks or Registered Trademarks of Directed Electronics Inc The Bitwriter p n 998T requires chip version 1 4 or newer to program this unit w ww ww w d di ir re ec ct te ec ch hs s c co...

Page 3: ...Me en nu us s 1 17 7 Menu 1 Basic Features 17 Menu 2 Advanced Features 17 F Fe ea at tu ur re e D De es sc cr ri ip pt ti io on ns s 1 18 8 Menu 1 Basic Features 18 Menu 2 Advanced Features 19 T Tr r...

Page 4: ...oon as the system is disarmed The ORANGE wire is pre wired to control the 8618 starter kill relay It can supply up to 500 mA of current NOTE If using the H1 1 ORANGE wire to activate an add on accesso...

Page 5: ...us BMW some Mitsubishi some Mazda and other models NOTE For parking light systems that draw 10 amps or more the jumper must be switched to a light flash output see the Programming Jumpers section of t...

Page 6: ...ti im me ed d output will send a signal for 30 seconds when channel three is pressed This output can be shut off during the 30 second period by pressing Channel 3 again This output can also be progra...

Page 7: ...E instant trigger input This input will respond to a negative input with an instant trigger It is ideal for hood and trunk pins and will report on Zone 1 It can also be used with Directed single stage...

Page 8: ...und points It is recommended that all security components be grounded at the same location H1 9 YELLOW ignition input Connect this wire to the 12 volts ignition wire This wire is pre wired to the star...

Page 9: ...e protects the module itself H1 12 RED WHITE 200 mA channel 2 output When the system receives the code controlling channel 2 for longer than 1 5 seconds the RED WHITE will supply an output as long as...

Page 10: ...rates at 2 volt DC and plugs into the two pin WHITE port Make sure the LED wires are not shorted to ground as the LED will be damaged Multiple LED s can be used but they must be wired in series The LE...

Page 11: ...or more infor mation please refer to the guide packaged with the programmer This port can also be used to interface with Directed Video components for on screen security system programming and trigger...

Page 12: ...an 0 8 seconds will trigger full alarm sequence and report Zone 4 NOTE If installing an optional Directed dual stage sensor connect to the GREEN wire The following diagram eliminates the need for diod...

Page 13: ...elay is enabled and the unit will output 12V on the WHITE wire H1 2 In the position the on board relay is disabled The WHITE wire H1 2 will supply a 200 mA output suitable for driving factory parking...

Page 14: ...tem Features Learn Routine dictates how the unit operates Due to the number of steps they have been broken up into two menus It is possible to access and change any of the feature settings using the V...

Page 15: ...onding to the feature you wish to change For example to access the third feature press and release the switch three times Then press the switch once more and HOLD it The siren will chirp the number of...

Page 16: ...it once more and HOLD it The siren would chirp seven times to confirm access to the seventh feature To select another menu 1 Press and HOLD the Valet Program switch 2 After three seconds the unit will...

Page 17: ...olled domelight OFF 2 8 Single unlock pulse Double unlock pulse 2 9 Channel 3 Validity Channel 3 latched latched reset with ignition 30 second timed second unlock output Second unlock is only availabl...

Page 18: ...s for ignition lock and ignition unlock They can be programmed on or off independently 1 4 ACTIVE PASSIVE LOCKING If passive arming is selected in step 1 1 then the system can be programmed to either...

Page 19: ...rammed to the Vehicle Recovery System VRS setting VRS will be activated 1 10 CODE HOPPING ON OFF The system uses a mathematical formula to change its code each time the transmitter and receiver commun...

Page 20: ...s programmed off the full siren output will occur the moment the door is opened 2 5 VALET PULSE COUNT ONE TO FIVE PULSES The system can be programmed to count the number presses of the valet button be...

Page 21: ...Bitwriter the learn routine may be locked If the siren generates one long chirp when attempting to program the unit the learn routine is locked and must be unlocked using the 998T Bitwriter before pr...

Page 22: ...on from a known transmitter is programmed to Channel 9 all transmitters will be erased from memory and the system features will revert to the default settings This is useful in cases where the one of...

Page 23: ...rate buttons When programmed for standard configuration the transmitter buttons are assigned to the following functions operates Arm only operates Disarm only operates Channel 2 and Silent Mode operat...

Page 24: ...optional hood trunk pins 2 Multiplexed BLUE wire of plug in shock sensor Inputs shorter than 0 8 seconds will trigger a Warning Zone response while inputs longer than 0 8 seconds will instantly trigge...

Page 25: ...Valet Program switch 4 Press and release the Valet Program switch within five seconds The LED will flash in groups indicating the last two zones that triggered the unit The LED will flash for one minu...

Page 26: ...on Circuitry Nuisance Prevention Circuitry bypasses any zone that triggers the system more than three times within a one hour period For a full description of NPC operations refer to the Owner s Guide...

Page 27: ...ggers the system but opening the door does not Have you correctly identified the type of door switch system This happens often when the wrong door input has been used System will not passively arm unt...

Page 28: ...28 2002 Directed Electronics Inc Wiring Quick Reference Guide...

Reviews: