


16
Light indicator is on or flashing, but there is no image displayed on screen
•
Check if the monitor is receiving power.
•
Check if the graphics card is installed properly.
•
Make sure the HDMI cable is securely connected to the monitor.
•
Make sure the pins within the cable’s connectors are not damaged.
Color shortage (red, green, or blue)
•
Make sure the pins within the cable’s connectors are not damaged.
Image position is not centered/the size is not right
•
Please adjust Clock or Auto settings.
Color difference (colors are not optimized)
•
Adjust RGB colors or reset color temperature.
Section 12:
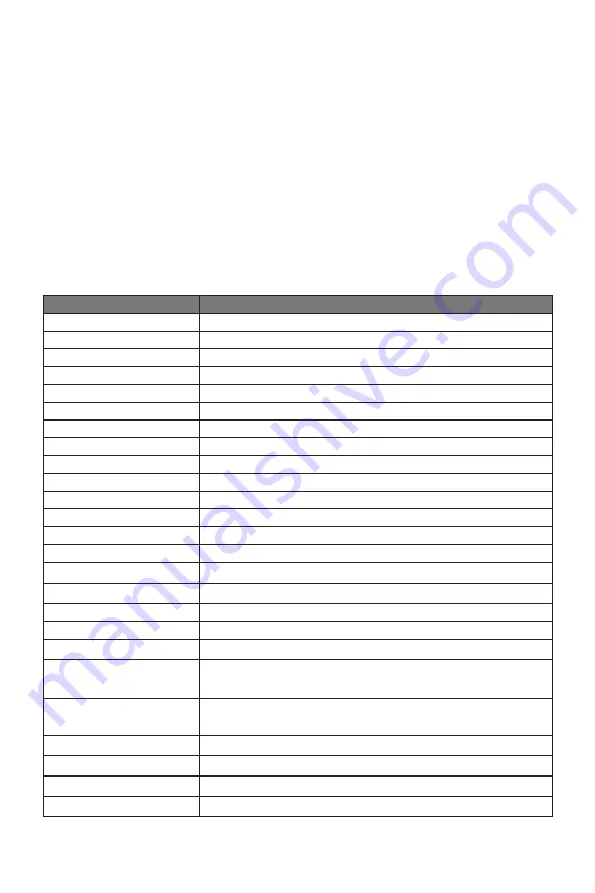
Specifications
Item
Detail
Model Number
NB32CW/NB32CB
Screen Size
31.5’’
Curvature
1800R
Viewing Angle
178° (H)/178° (V)
Aspect Ratio
16:9
Resolution
1920x1080p
Backlight
E-LED
LED Indicator
Power on: Blue (LED); Power saving : Blue Flicker (LED)
Typical Brightness
250 cd/m
2
Default Color Temp.
6500
Color Gamut
92% sRGB; 68% NTSC
Contrast Ratio
3,000:1 (Static)
Dot Pitch
0.3637x0.1212mm
Response Time
GTG 8Ms
Refresh Rate
60-75Hz (75 Max.)
Speaker
NA
Ports
VGA x 1, HDMI x 1, Audio x 1 (Output)
Power
AC100-240V, 50/60Hz 1.5A
Power Consumption
Typical: 36W, Max: 50W; Standby ≤ 0.5W
OSD Language
English, Español, Русский, Français,
한국
, Português,
Deutsch, Türkçe,
简体中文
, Polski, Italiano, Nederlands
Usage Temp.
32°F~95°F (Operating), -4°F~140°F (Storage), 10-90%
RH (Non-Condensation)
Tilt Angle
Forward 5°; Backward 15°
VESA Compatibility
75x75mm
Dimension (With Stand) 28.3x9.8x19.5” (718.26x248.08x496.83mm)
Weight
17.6lbs (Net) / 22lbs (Gross)


