Viotek NB32CB User Manual Download Page 11

11

Section 7:  Basic Operation

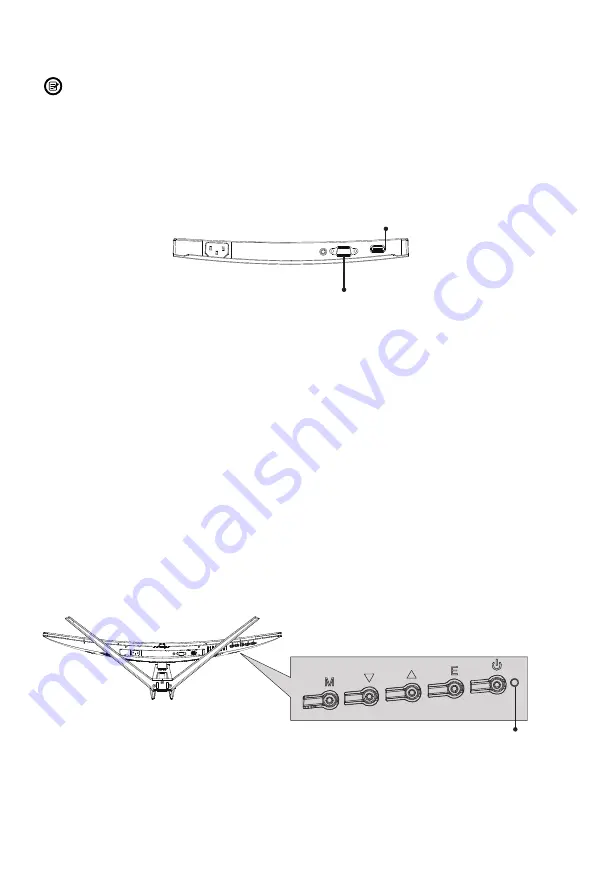
  When connecting or disconnecting any cables, remove the port cover first. 

Refer to Section 6.1.

1.   Insert one end of the HDMI cable into your PC’s graphics card. A VGA cable 

may also be used. A VGA cable is not included.

2.   Connect the other end of the cable to the corresponding connector on your 

monitor.

VGA Connector

HDMI Connector

3.   Connect the power cable to your monitor then connect the other end to your 

power source. It is recommended that you use a surge protector with adequate 

voltage if a wall outlet cannot be reached directly.

4.   Locate the power button on the monitor and press it to turn the monitor on.

FreeSync

Please note: FreeSync is turned off by default. To enjoy the benefits of FreeSync, 

you must have hardware with FreeSync capability, an HDMI cable, and the latest 

graphic drivers. To use this feature, connect your computer and monitor with an 

HDMI cable. After connecting, you may receive a prompt to enable the feature on 

your computer. If you do not receive the prompt, you can enable the function in your 

graphics card menu. See your graphics card manufacturer’s documentation for 

instructions on how to turn on and/or enable FreeSync.

Section 8:  Indicator Light

Indicator Light

Solid blue light indicates power is on and the monitor is operating normally. Flashing 

blue light indicates no video source has been detected. Red light indicates that no 

horizontal or vertical signal has been detected or voltage is low. Please ensure your 

computer is on and all video cables are fully inserted and/or connected.

Summary of Contents for NB32CB

Page 1: ...ustomers and providing the best products our product information including our user manuals may receive updates from time to time Please check our website for the latest user manuals and product mater...

Page 2: ......

Page 3: ...onnectivity Options 9 6 1 Removing the Port Cover 9 6 2 Connecting Your Earphones 9 6 3 Connecting the Power Cable 10 6 4 VGA Connectivity 10 6 5 HDMI Connectivity 10 Section 7 Basic Operation 11 Sect...

Page 4: ...nitor 5 Do not spray cleaner and or any kind of liquid directly onto the monitor s screen or any part of the monitor 6 Do not insert anything into any part of the monitor especially the ventilation op...

Page 5: ...60Hz NO 2 Screws x 4 for Mounting NO 1 Screws x 7 for Stand Installation HDMI Cable x 1 Screwdriver x 1 User Manual x 1 The NO 1 screws come in two types P Head and K Head Extra screws of each type m...

Page 6: ...nsert one end of the HDMI cable into the computer s HDMI output and connect the other end to the monitor s HDMI port 8 10 9 1 3 4 5 6 7 2 1 Power Connector Insert the power cable to supply power to th...

Page 7: ...the stand plate Next use two NO 1 K Head screws to fasten the stand plate to the stem Release Button Stand Plate NO 1 K Head Screws 12mm x 2 3 Insert the stand plate into the opening on the back of t...

Page 8: ...emove the stand plate If the monitor is already attached to the stand remove the stand Release Button Stand Plate 2 Remove the original screws x 4 1 from the opening in the back of the monitor 3 Follo...

Page 9: ...pluging in the earphones you can use the clip on the back of the stand stem to conveniently manage cables or store your headphones Gently pull the clip back to open it Note The clip only opens at 77...

Page 10: ...A Connectivity In order for the monitor to receive VGA signals from the computer use a VGA cable to connect the monitor to the computer VGA VGA OUTPUT VGA Cable Not included 6 5 HDMI Connectivity In o...

Page 11: ...turned off by default To enjoy the benefits of FreeSync you must have hardware with FreeSync capability an HDMI cable and the latest graphic drivers To use this feature connect your computer and moni...

Page 12: ...s configuration and parts etc 1 Press any one of the buttons M E to activate the navigation window eco 2 Press M to enter the OSD menu BRIGHTNESS BRIGHTNESS CONTRAST ECO DCR STANDARD OFF 3 Press or to...

Page 13: ...ze RGB components Green 0 50 Blue 0 50 OSD SETTING Language English Espa ol Fran ais Portugu s Deutsch T rk e Polski Italiano Nederlands Set OSD language OSD H POS 0 100 Adjust the OSD horizontal posi...

Page 14: ...of your game choose the corresponding game icon These game icons are primarily designed to optimize your aim during shooting games though they can be used for other scenarios 3 Press to switch ECO mod...

Page 15: ...roperly inserted A loose connection can cause a bad signal Try connecting to another video source for comparison The screen appears to be scrolling rolling or moving unusually Check that your source f...

Page 16: ...2CW NB32CB Screen Size 31 5 Curvature 1800R Viewing Angle 178 H 178 V Aspect Ratio 16 9 Resolution 1920x1080p Backlight E LED LED Indicator Power on Blue LED Power saving Blue Flicker LED Typical Brig...

Page 17: ...ot cover items out of production if the product is no longer made or stocked This Warranty is not assignable or transferable The original purchaser may call WP s toll free number at 1 855 229 9472 for...

Page 18: ...rotection against harmful interference in a residential installation This equipment generates uses and can radiate radio frequency energy and if not installed and used in accordance with the instructi...

Page 19: ......

Page 20: ...COPYRIGHT 2019 VIOTEK ALL RIGHTS RESERVED...

Reviews: