VCSO210SS
26
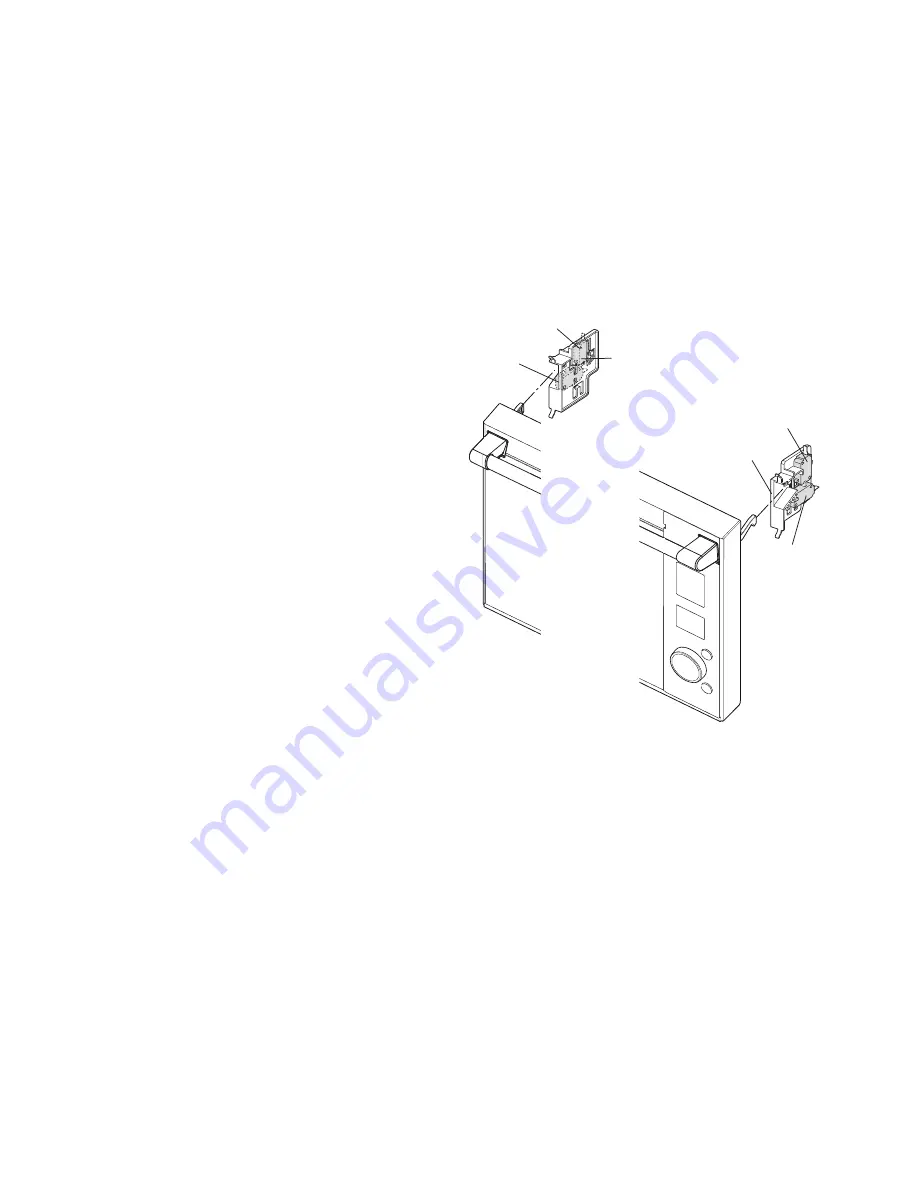
DOOR SENSiNG SWiTCH, SECONDARY/THiRD iNTERLOCK SWiTCH AND MONiTOR SWiTCH ADJUSTMENT
1. Adjustment
If the door sensing switch, secondary/third interlock switch
and monitor switch do not operate properly due to a
misadjustment, the following adjustment should be made.
1. Disconnect the power supply cord.
2. Remove the outer case cabinet, referring to
“OUTER CASE REMOVAL”.
3. Open the oven door and block it open.
4. Wait for 60 seconds to discharge the high voltage
capacitors of the inverter unit.
5. Loosen each one (1) screw holding the latch hook right
and the latch hook left to the oven cavity front plate.
6. With door closed, adjust the latch hook right and the
latch hook left by moving them back and forth, and up
and down. In and out play of the door allowed by the
latch hook right and the latch hook left should be less
than 0.5 mm.
The vertical position of the latch hook right and the latch
hook left should be adjusted so that the door sensing
switch and the secondary interlock switch are activated
with the door closed.
The horizontal position of the latch hook right and the
latch hook left should be adjusted so that the plunger of
the third interlock switch and monitor switch are ingaged.
7. Secure the screws firmly.
8. Check all of the switches operation. If each switch has
not activated with the door closed, loosen the screws
and adjust the position of the latch hook right and the
latch hook left.
2. After adjustment, check the following.
1. In and out play of the door remains less than 0.5 mm
when in the latched position. First check the position of
the latch hook right, pushing and pulling right portion of
the door toward the oven face. Then check the position
of the latch hook left, pushing and pulling left portion of
the door toward the oven face. Both results (play in the
door) should be less than 0.5 mm.
2) All switches (except monitor) will open with a 1.9mm gap
between oven door and cavity face.
3) Monitor switch will close with same amount of gap.
(Monitor switch closes when door is open.)
4. Reinstall the outer case cabinet and check for micro
wave leakage around the door with an approved micro
wave survey meter. (Referto Microwave Measurement
Procedure.)
Door Sensing
Switch
Latch Hook Left
Latch Hook Right
Monitor Switch
Secondary
Interlock
Switch
3rd Door
Switch
BOTTOM PLATE ASSEMBLY REMOvAL
Before the control unit, noise filter, inverter unit, fan motor
and magnetron are replaced, removal of the bottom plate is
required.
1. Disconnect the power supply cord, and then remove the
outer case and the back plate assembly.
2. Open the door and block it open.
3. Wait for 60 seconds to discharge the high voltage ca
pacitors of the inverter unit.
4. Disconnect the high voltage wire from the magnetron
terminal with insulated pliers.
5. Make the terminal (metal part) of the high voltage wire
contact to the magnetron body with insulated pliers.
6. Now, the capacitors of the inverter unit are discharged.
WARNiNG:
Use the pliers that the portions of their handles
are insulated completely to avoid an electric
shock.
7. Pull the the water tank out of the oven.
8. Remove the dew tray and drain accumulated water from
the tray.
9. Disconnect the wire leads from the convection motor
and the thermal cut-out (convection).
10.In order to remove the bottom plate assembly, remove
the Back Plate refering to “BACK PLATE REMOVAL”,
then turn over the unit.
NOTE:
When turning over the unit, first place its
left or right side down and then the top side down
(otherwise, the convection motor and/or convection
duct will be damaged).


