8
C. Configuring the PB-3-IP Network Settings
Step 1.
Open the “Viking IP Programming” software on a windows PC that is connected to the same LAN as the
PB-3-IP
phone
to be programmed.
Step 2.
The window in the upper left corner of the menu will show you each
PB-3-IP
phone that is connected to that LAN.
Select the unit with the same MAC address shown on the label located on the top of the Ethernet connector on the
PB-3-IP
phone.
Step 3.
Click the “Connect” button. If a pop up window appears, enter the unit’s security code (factory set to
845464
) then click “OK”.
Step 4.
The program will then read and display the
PB-3-IP
phone’s IP and programming settings.
Step 5.
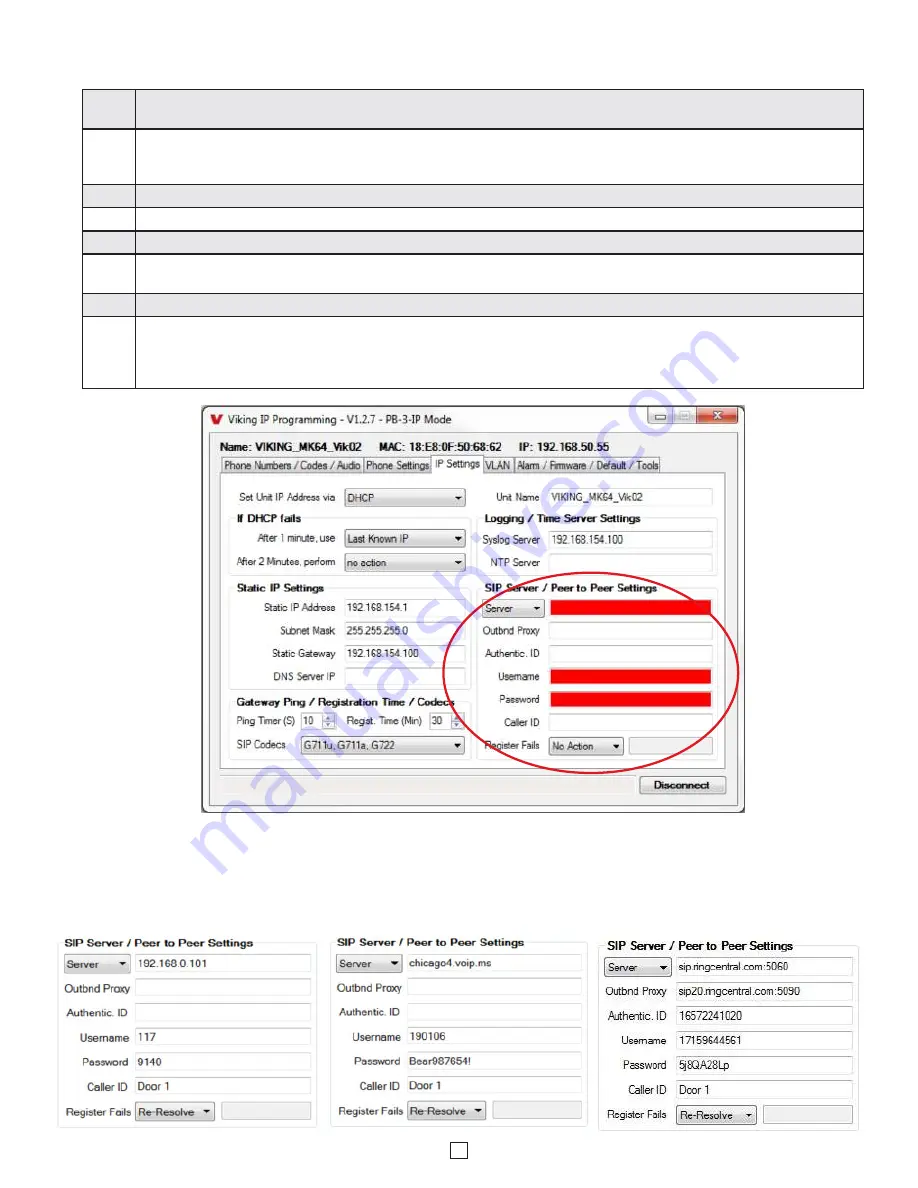
Click on the “IP Settings” tab.
Step 6.
Select the appropriate value Static IP Settings or DHCP for “Set Unit IP Address via”. Note: changing the IP address will
cause you to have to reconnect to the unit. Enter the values for the fields in “if DHCP fails” or “Static IP Settings” as needed.
Step 7.
Set the “Unit Name”, “Logging / Time Server Settings” as needed.
Step 8.
Select Peer-Peer in the “SIP Server / Peer to Peer Settings” to use the unit in Peer to Peer mode. Select Server to register
with a SIP registrar server and fill in the “Outbnd Proxy” (SIP Outbound Proxy Server Address, “ip:port”), “Authentic. ID”
(SIP Authentication ID), “Username” (SIP Username, <string>), “Password” (SIP Password), and “Caller ID” (SIP Caller
ID) with values from your VoIP provider.
Example 2: Cloud Based
Service Provider
(
Voip.ms
)
Example 3: Cloud Based
Service Provider requiring
Outbound Proxy and
Authentication ID
(
Ring Central
)
Example 1: On-Premise SIP
Phone System
(Panasonic TDE 100/200)


