background image

4

ViewSonic

P70f

Quick Installation

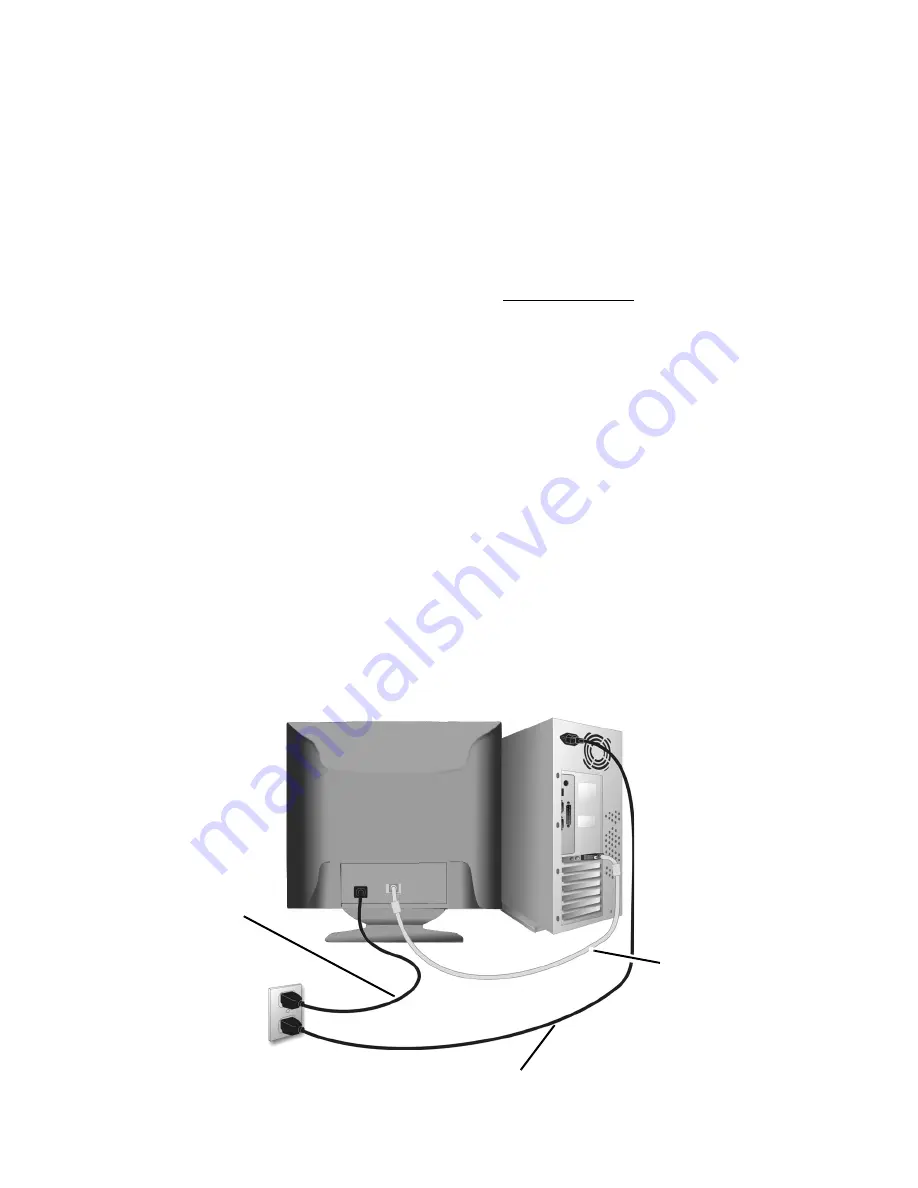
1 Connect power cord

Connect the power cord to a properly 
grounded AC outlet. 

2 Connect video cable

Make sure both the monitor and computer 
are turned OFF. 

Connect the video cable to the computer.

Macintosh

®

 users:

 Models older than G3 

require a Macintosh adapter. Attach the 
adapter to the computer and plug the video 
cable into the adapter. 

To order a ViewSonic

®

 Macintosh adapter, 

contact ViewSonic. See “Customer Support” 
on page 13.

3 Turn ON monitor and computer 

Turn ON the monitor, then turn ON the 
computer. This sequence (monitor before 
computer) is very important.

NOTE: 

At this point Windows


users may 

receive a message asking them to install the  
INF file.

4 Install Display Optimization files 

(INF and ICM files)

(1) Insert the ViewSonic Wizard CD-ROM 
into your computer’s CD-ROM drive.

NOTE:

 If your computer does not have a 

CD-ROM drive, see “Cutomer Support” on 
page 13.

(Continued)

(2) Wait for the CD-ROM to auto-start.

NOTE:

 If the CD-ROM does not auto-start: 

double-click on the CD-ROM icon in 
Windows Explorer, then double-click on 

viewsonic.exe

.

(3) Follow the on-screen instructions.

5 Windows users: Set the Timing

Mode (resolution and refresh rate) 

Example: 

1024 X 768 @ 75 Hz.

For instructions on changing the resolution 
and refresh rate, see the graphic card’s user 
guide. 

Installation is complete.


Enjoy your new  

ViewSonic color monitor.


To be best prepared for any future customer 
service needs: print this user guide and write 
the serial number in “

For Your Records

” on 

page 2. (See back of monitor.)


To register 

your product go online to 

www.viewsonic.com

.

The ViewSonic Wizard CD-ROM also 
provides an opportunity for you to print the 
registration form which you may mail or fax 
to ViewSonic.

Power 
cord to 
monitor

Power cord to computer

Video cable 
from monitor 
to computer

Summary of Contents for P70f

Page 1: ...ilisateur Bedienungsanleitung Gu a del usuario Guida dell utente Guia do usu rio Anv ndarhandbok K ytt opas Jmdh h kl h ihevah Zl_ey QVWUXNFMD REV XJL With PerfectFlat Technology 17 16 0 Diagonal View...

Page 2: ...ion 4 Using the Monitor Setting the Timing Mode 5 OSD Lock Settings 5 Adjusting the Screen Image 6 Main Menu Controls 8 Other Information Specifications 11 Troubleshooting 12 Customer Support 13 Clean...

Page 3: ...this mate rial or the performance or use of this product In the interest of continuing product improvement ViewSonic Corporation reserves the right to change product specifications without notice Info...

Page 4: ...ns For best viewing conditions sit at least 18 from the monitor AVOID TOUCHING THE SCREEN WITH YOUR FINGERS Oils from the skin are difficult to remove NEVER REMOVE THE REAR COVER The monitor contains...

Page 5: ...puter s CD ROM drive NOTE If your computer does not have a CD ROM drive see Cutomer Support on page 13 Continued 2 Wait for the CD ROM to auto start NOTE If the CD ROM does not auto start double click...

Page 6: ...z To set the Resolution 1 Right click on the Windows desktop 2 Click Properties on the drop down menu 3 Click the Settings tab 4 Move the slider pointer which displays in the Desktop area or Screen ar...

Page 7: ...Controls on page 8 Main Menu With OnView controls Front Control Panel Displays Main Menu also saves changes exits Main Menu Scroll through menu options and adjust the displayed control Power On Off P...

Page 8: ...gh the choices When the control you want is highlighted press button 2 NOTE Some controls on the Main Menu are listed in pairs such as Contrast Brightness Display control screen sample shown in step 3...

Page 9: ...lack level of the screen image H Size Horizontal Size adjusts width of the screen image H Position Horizontal Position moves the screen image left or right V Size Vertical Size adjusts the height of t...

Page 10: ...t 20 minutes before selecting this control again ViewMatch Color provides provides several color options three preset color temperatures and User Color The factory setting for this product is 9300K 93...

Page 11: ...ral languages for the menus and control screens English French German Italian and Spanish Memory Recall returns adjustments to the original factory settings if the display is operating in a factory pr...

Page 12: ...00 x 1200 75 Hz VESA 1280 x 1024 75 85 Hz VESA 1024 x 768 75 85 Hz VESA 800 x 600 85 Hz VESA 640 x 480 60 85 Hz VESA 640 x 400 70 Hz VGA 832 x 624 75 Hz Mac 1024 x 768 74 9 Hz Mac 640 x 480 66 7 Hz Ma...

Page 13: ...l frequency is 75 Hz or higher See Specifications on page 11 Remove any devices from the area around the monitor that emit magnetic fields such as radios surge protectors unshielded speakers fluoresce...

Page 14: ...oniceurope com T 0800 833 648 F 01293 643910 service eu viewsoniceurope com Europe Middle East Baltic countries and North Africa viewsoniceurope com Contact your reseller service eu viewsoniceurope co...

Page 15: ...soft lint free cloth and wipe the screen To clean the case 1 Use a soft dry cloth 2 If still not clean apply a small amount of a non ammonia non alcohol based mild non abrasive detergent onto a clean...

Page 16: ...You will need to provide your product s serial number 2 To obtain service under warranty you will be required to provide a the original dated sales slip b your name c your address d a description of...

Page 17: ...rs AC PLUG CORD PRECAUTIONS FOR THE UNITED KINGDOM FOR YOUR SAFETY PLEASE READ THE FOLLOWING TEXT CAREFULLY IF THE FITTED MOULDED PLUG IS UNSUITABLE FOR THE SOCKET OUTLET THEN THE PLUG SHOULD BE CUT O...

Page 18: ...uipment into an outlet on a circuit different from that to which the receiver is connected Consult the dealer or an experienced radio TV technician for help FCC Warning To assure continued FCC complia...

Page 19: ...18 ViewSonic P70f NOTES...

Page 20: ...ViewSonic Corporation...

Reviews: