Operation
7
ViewSonic
PJ1060
E
N
G
L
I
S
H
VIDEO
STANDBY/ON
RGB
POSITION
LASER
MENU
RESET
MAGNIFY
FREEZE
OFF
VOLUME
P in P
MUTE
AUTO
BLANK
TIMER
FOCUS
ZOOM
FREEZE
displays a
still picture, stopping
audio and moving
video image
TEMP indicator
becomes lit when
temperature inside
projector is too high
LAMP indicator
becomes lit when
lamp cannot light
RESET button
resets selected
menu option to
factory setting
MENU buttons
used
to display on-screen
menus and to adjust
the selected option.
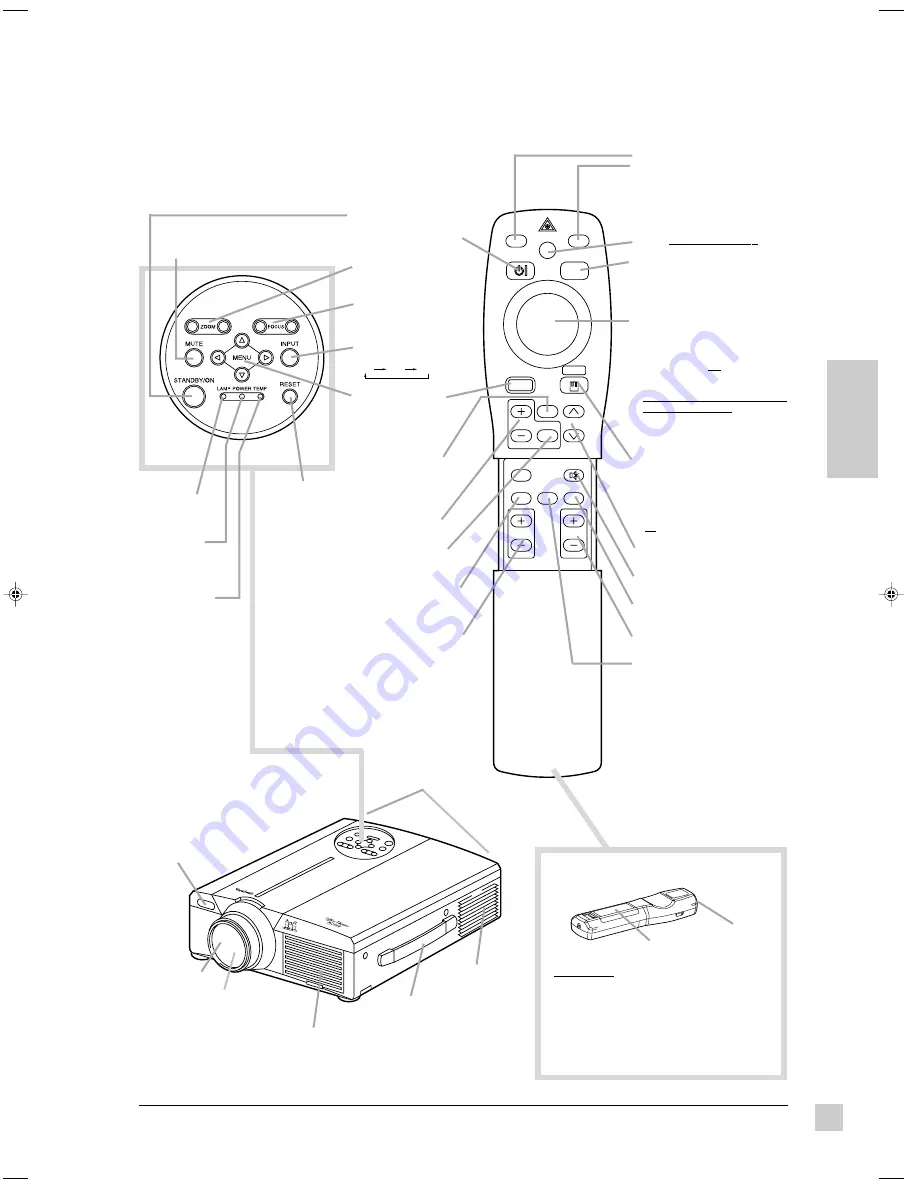
Remote Control Unit
Speakers
Handle
Remote control
sensor (rear)
Lens
Cooling fan
(exhaust)
Lens cap
Controls and Indicators
MUTE button
silences
audio output temporarily
FOCUS button
adjusts the sharpness
of the projected picture.
AUTO button
automatically adjusts
Vertical Position, Horizontal
Position, Horizontal Phase, and
Horizontal Size.
BLANK button
displays
blank screen (white, blue,
or black). See page 10.
DISK PAD
• When a menu screen is
displayed, use DISK PAD to
select or adjust a menu item.
• When menu is not displayed, and
mouse cables are connected, the
DISK PAD functions as a mouse.
Press center of DISKPAD for left-
click mouse function.
• After pressing POSITION button,
DISK PAD moves entire screen
image.
TIMER button
activates on-screen
countdown timer
Projector Control Panel
OFF button
turns OFF the
MAGNIFY function (+/-)
INPUT button
selects input source:
RGB1
RGB2
VIDEO
ON indicator
blinks in Standby
mode; remains lit
in Operation mode
RESET / "RIGHT " MOUSE button
(two functions)
•
RESET button:
when a menu is
displayed, returns selected
menu option to factory setting.
•
"RIGHT" MOUSE button:
when
no menu is displayed
Laser
Aperture
CAUTION
To prevent possible eye damage:
•
DO NOT
look directly at the laser light
emitted from the Laser Aperture of the
Remote Control Unit (see above).
•
DO NOT
point the laser light at any
person's eyes.
Back View of Remote Control Unit
STANDBY/ON button
powers ON/OFF button.
OFF activates Standby
Mode
VIDEO button
and
RGB button
These two buttons are used to
select either Video or RGB
(computer) as the input source.
NOTE: Same function as INPUT
button on Projector Control Panel
LASER button
toggles laser-pointer
On/Off. See CAUTION below.
Cooling fan
(intake)
POSITION button
After
pressing this button, move
the DISK PAD (up/down,
left/right) to move screen
image (only for RGB signal)
MUTE button
silences
audio output temporarily
VOLUME buttons
adjust loudness
of audio output
MAGNIFY buttons
magnify part of
projected picture
ZOOM buttons
are used to adjust
the size of the screen image
Battery
Compartment
ZOOM button
adjusts the size of the
projected picture.
FOCUS button
adjusts the sharpness
of the projected picture.
E2a-PJ1060.p65
01/05/01, 21:29
7