background image

ViewSonic

                                                                                                       N2230w

9

ENGLISH

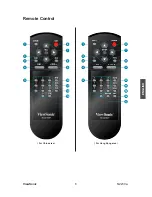
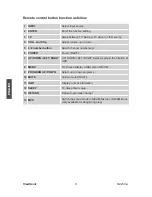
1 INPUT

Select input source

2 ENTER

Enter the function setting

3 TV      

Swap between TV. Swap to TV when in other source

4 VOL+ and VOL-

Adjust volume up or down

5 0~9 number button

Switch channel number keys

6 POWER

Power ON/OFF

7 UP/ DOWN /LEFT/ RIGHT

UP/ DOWN/ LEFT/ RIGHT: Select or adjust the function of 

OSD 

8 MENU

On Screen Display (OSD) menu ON/OFF

9 PROGRAM UP/ DOWN

Select up or down programs

10 MUTE

Volume mute ON/OFF

11 INFO

Display current information

12 SLEEP

TV Sleep timer setup

13 RETURN

Return to previous channel

14 MPX

Switch the sound mode in NICAM-Stereo or NICAM-Dual. 

(only available for Hong Kong area)

Remote control button function as follow

Summary of Contents for LCD TV VS12198-1G

Page 1: ...ViewSonic ViewSonic N2230w LCD TV Model No VS12198 1G 使用手册 使用手冊 User Guide ...

Page 2: ...rted Package Contents 4 Mounting ViewSonic LCD TV to the wall 4 Front View of the Product 6 Rear View of the product 7 Remote Control 8 Installation 10 Basic Operation 14 OSD Functions Picture Menu 16 Sound Menu 17 Setup Menu 17 Channel Menu 18 PC Menu 19 Other Information Specifications 21 Troubleshooting 22 Customer Support 24 Declaration of RoHS Compliance 24 Limited Warranty 25 ...

Page 3: ...d the third prong are provided for your safety If the plug does not fit into your outlet consult an electrician for replacement of the outlet 10 Protect the power cord from being tread upon or pinched particularly at the plug and the point where if emerges from the equipment Be sure that the power outlet is located near the equipment so that it is easily accessible 11 Only use attachments accessor...

Page 4: ...oduced or transmitted by any means for any purpose without prior written permission from ViewSonic Corporation Product Registration To meet your future needs and to receive any additional product information as it becomes available please register your product on the Internet at www viewsonic com For Your Records Product Name Model Number Document Number Serial Number Purchase Date N2230w ViewSoni...

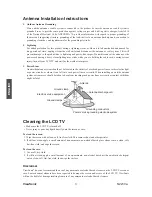
Page 5: ...cated in the vicinity of overhead power lines or other electric light or power circuits or where it can fall into such power lines or circuits When installing an outside antenna system extreme care should be taken to keep from touching such power lines or circuits as contact with them might be fatal Cleaning the LCD TV Make sure the LCD TV is turned off Never spray or pour any liquid directly onto...

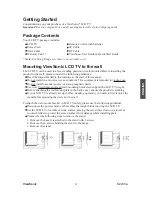
Page 6: ...ll near heat source or strong magnetic fields Use only ViewSonic approved wall mounting brackets to support the LCD TV weight Before attaching the wall mount plate to the back cover ensure the product is working If your LCD TV is already set up for free standing operation you need to first remove the stand before mounting the device to the wall To attach the wall mount bracket to LCD TV safely ple...

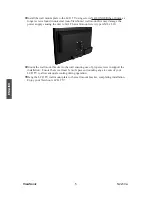
Page 7: ... causing the unit to fail The wall mount screw type is M4 x L10 Mount the wall mount bracket to the wall ensuring use of proper screws to support the installation Ensure there is at least 3cm of space surrounding any air vents of your LCD TV to allow adequate cooling during operation Hang the LCD TV wall mount plate to the wall mount bracket completing installation Enjoy your ViewSonic LCD TV ...

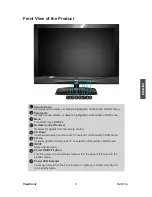
Page 8: ...r Receives IR signals from the remote control CH Down Channel down when source is at TV or select a control while in OSD menu CH Up Channel up when source is at TV or select a control while in OSD menu INPUT Select input source Power ON OFF button Turn the power on from standby mode or turn the power off to return to the standby mode Power LED Indicator Lights up in blue when the TV is turned on L...

Page 9: ...ideo devices with component output to these jacks S Video input Connect other devices such as DVD or VCD to this port Composite Video input Connect other devices such as DVD or VCD to this port RF Antenna Cable TV Input Connect to the antenna or cable service PC Audio input Connect this port to PC audio output jack Audio Input for YPbPr Components left right Connect external audio to this port lef...

Page 10: ...ViewSonic N2230w ENGLISH Remote Control For Hong Kong area For China area ...

Page 11: ...ower ON OFF 7 UP DOWN LEFT RIGHT UP DOWN LEFT RIGHT Select or adjust the function of OSD 8 MENU On Screen Display OSD menu ON OFF 9 PROGRAM UP DOWN Select up or down programs 10 MUTE Volume mute ON OFF 11 INFO Display current information 12 SLEEP TV Sleep timer setup 13 RETURN Return to previous channel 14 MPX Switch the sound mode in NICAM Stereo or NICAM Dual only available for Hong Kong area Re...

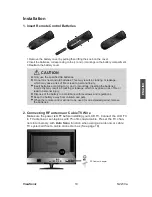
Page 12: ...an nels into memory with Auto Scan function when using an antenna or cable TV system without a cable connecter box See page 18 Only use the specified AA batteries Do not mix new and old batteries This may result in cracking or leakage which may pose a risk of fire or lead to personal injury Insert batteries according to and markings Inserting the batteries incorrectly may result in cracking or lea...

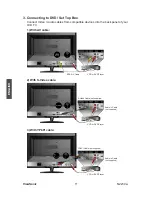
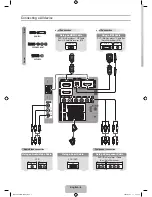
Page 13: ...patible devices into the back panel of your LCD TV 1 With AV cable RCA A V Cable 2 With S Video cable Audio in Cable not supplied S Video Cable not supplied VCD or DVD Player 3 With YPbPr cable YPbPr Cable not supplied Audio in Cable not supplied VCD or DVD Player VCD or DVD Player RCA A V Cable ...

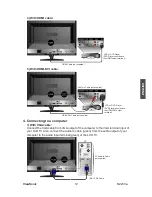
Page 14: ...le not supplied PC VGA 15 Pin Cable 4 Connecting to a computer Connect the VGA cable from VGA output of the computer to the VGA terminal input of your LCD TV Also connect the Audio In cable green from the audio output of your computer to the audio input terminal green of the LCD TV 1 With VGA cable PC Audio In Cable not supplied VCD or DVD Player DVD Player should have the HDMI DVI output terminal...

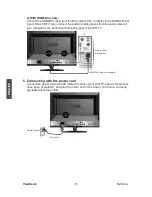
Page 15: ... your computer to the audio input terminal green of the LCD TV 2 With HDMI DVI cable Audio in Cable not supplied HDMI DVI Cable not supplied PC AC wall socket 5 Connecting with the power cord Connect the power cord to the AC inlet at the back of your LCD TV after all connections have been completed and plug the other end of the power cord into a correctly grounded electrical outlet Power Cord ...

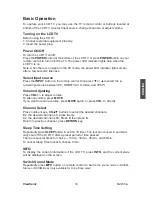
Page 16: ... source between PC HDMI TV AV S Video and YPbPr Volume Adjusting Press VOL to adjust volume To silence volume press MUTE If you want to restore volume press MUTE again or press VOL directly Channel Select Press number keys CH buttons to select the desired channels Ex the desired channel is 8 press 8 only Ex the desired channel is 80 Press 8 then press 0 Return to previous channel press RETURN key ...

Page 17: ...uttons on the front panel of the LCD TV The basic operation is as following t Press MENU to display OSD menu t Press to cycle through the menus t Press ENTER or to enter the menu you select t Use to appoint your desired optional item t Press to adjust the settings t Press MENU to finish adjustment and press MENU again to exit the OSD menu ...

Page 18: ...ul for 1 78 1 DVDs program it can to mini mizes letterbox effect although some letterboxing is still required for movies shot at the 1 85 1 or 2 35 1 ratio When viewing 1 85 1 or 2 35 1 DVDs movie scale mode will still show more wide black bands at the top and bottom of the screen Zoom2 The scaling size is the same with Zoom1 but the image will be shift upwards This mode is useful for letterbox DV...

Page 19: ...D after a preset period of time passed Use to preset the time from 15 to 60 seconds To keep the OSD on select OFF Memory Recall Press to restore the default settings Setup Menu To set up OSD window When input source is TV When input source is AV S Video YPbPr HDMI or PC Bass To adjust the bass Treble To adjust the treble Balance To adjust left and right audio balance AVC To select automatic volume...

Page 20: ...d use to move the cursor to enter next letter After the desired name is entered press 1 to confirm To Erase Add channels Use to select the desired channel Press 3 to erase the channel or press 2 to add it When using CH key the channels you erased will be passed over You may press 2 to add the erased channels or use Auto Scan function to re present them 1 2 Manual Search The function is to give a m...

Page 21: ...ideo Brightness To adjust background luminance of video Colour Mode To adjust colour temperature To exchange one channel with another Press 4 to enter the function of Sort and the following screen will show 3 If you want to exchange channel 1 with channel 2 1 Move your cursor to channel 1 and press 1 Select A to select channel 1 2 Move your cursor to channel 2 and press 2 Select B to select channe...

Page 22: ... green and blue H Position To adjust horizontal position of video V Position To adjust vertical position of video Clock To adjust delay time of clock in order to reduce the noise of picture Phase To adjust delay time of phase in order to reduce the noise of picture Note When input source is HDMI PC the Auto Adjust H Position V Position Clock and Phase is not available 1 2 3 ...

Page 23: ...ge 100 240 VAC 50 60 Hz auto switch Display area Full Scan 464 94 mm H x 290 5875 mm V 18 3 H x 11 4 V Operating conditions Temperature Humanity Altitude 32 F to 104 F 0 C to 40 C 20 to 70 no condensation To 10 000 feet 3 000m Storage condition Temperature Humanity Altitude 4 F to 140 F 20 C to 60 C 20 to 90 no condensation To 40 000 feet 12 000m Dimensions Physical 518 4mm W x 422 6mm H x 156 0mm...

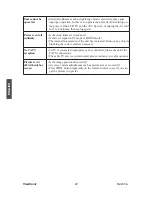
Page 24: ...ture may appear dim in a brightly lit room Adjust brightness contrast saturation color and tint referring to the user guide Check the input signal setting No sound Check your audio connections are properly connected referring to the user guide The MUTE button may have been pressed try pressing this button again Check your audio settings your TV audio may be set to minimum Press the Volume Up butto...

Page 25: ...Is there no signal in PC mode or HDMI mode The internal temperature of the unit has increased Remove any objects blocking the vent or clean as necessary No CATV reception CATV is connected improperly or not connected please check all the CATV connections The cable TV service is interrupted please contact your cable operator Picture is cut off with sidebar screen Is the image positioned correctly A...

Page 26: ... diphenyl ethers PBDE Outer Casing Circuit Board Power Cord Adaptor External Signal Cable LCD Panel Remote Control battery included The circuit board components include printed circuit board and other parts such as resisters capacitors IC and connectors etc To indicate the amount of toxic and hazardous substance in all homogenous materials of the component does not exceed what indicated in The Lim...

Page 27: ...service 1 For information about receiving service under warranty contact ViewSonic Customer Support You will need to provide your product s serial number 2 To obtain warranted service you will be required to provide a the original dated sales slip b your name c your address d a description of the problem and e the serial number of the product 3 Take or ship the product freight prepaid in the origi...

Page 28: ...ViewSonic ...

Reviews: