background image

18

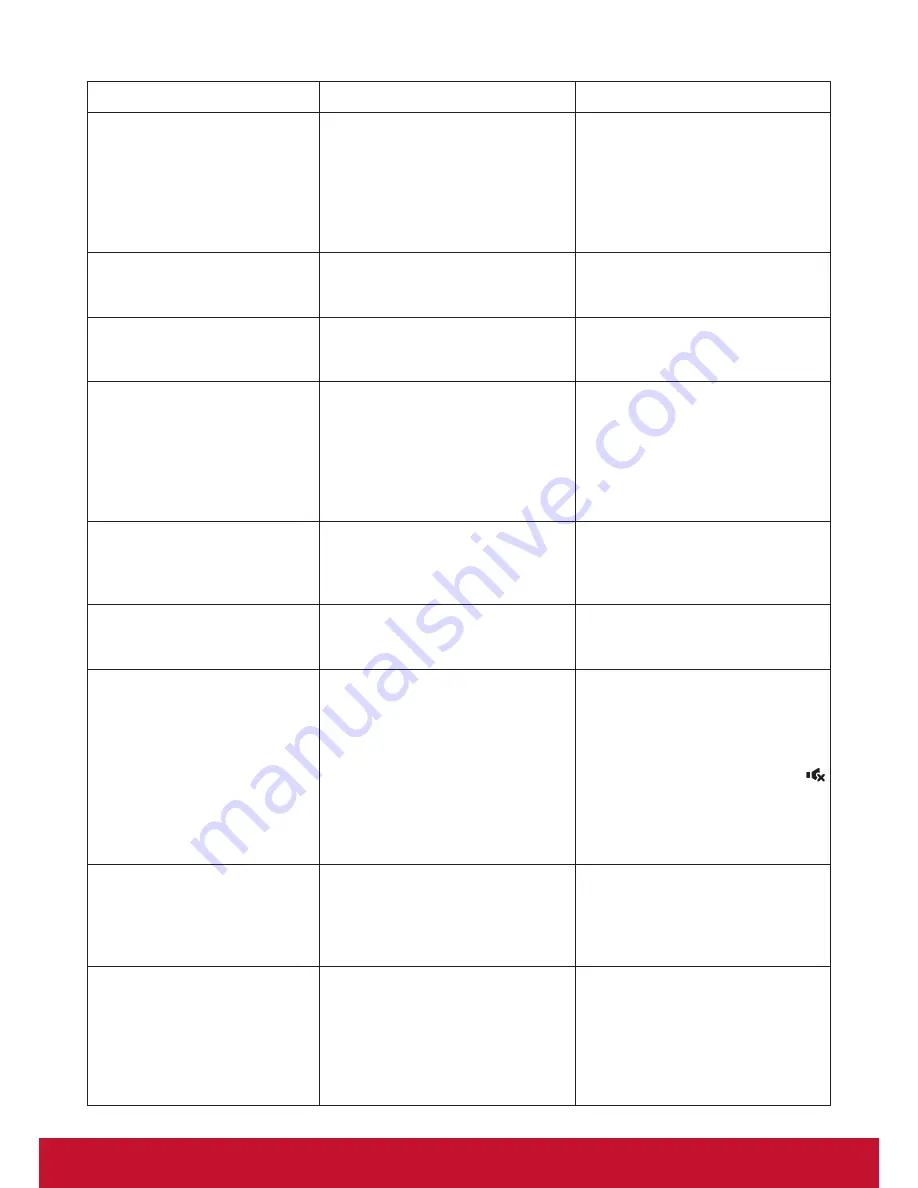
7.2.  Troubleshooting

Symptom

Possible Cause

Remedy

No picture is displayed

1.  The power cord is disconnected.

2.  The main power switch on 

the back of the display is not 

switched on.

3.  The selected input has no 

connection.

4.  The display is in standby mode.

1.  Plug in the power cord.
2.  Make sure the power switch is 

switched on.

3.  Connect a signal connection to 

the display.

Interference displayed on the 

display or audible noise is 

heard

Caused by surrounding electrical 

appliances or fluorescent lights.

Move the display to another location 

to see is the interference is reduced.

Color is abnormal

The signal cable is not connected 

properly.

Make sure that the signal cable is 

attached firmly to the back of the 

display.

Picture is distorted with 

abnormal patterns 

1.  The signal cable is not connected 

properly.

2.  The input signal is beyond the 

capabilities of the display.

1.  Make sure that the signal cable 

is attached firmly.

2.  Check the video signal source 

to see if it is beyond the range 

of the display. Please verify its 

specifications with this display’s 

specification section.

Display image doesn’t fill up 

the full size of the screen

Zoom mode is not correctly set.

Use the Zoom mode or Custom 

zoom function in the Screen menu 

to fine tune display geometry and 

time frequency parameter.

Can hear sound, but no 

picture

Improperly connected source signal 

cable.

Make sure that both video inputs 

and sound inputs are correctly 

connected.

Can see picture but no sound 

is heard

1.  Improperly connected source 

signal cable.

2.  Volume is turned all the way 

down.

3.  [

MUTE

] is turned on.

4.  No external speaker connected.

1.  Make sure that both video inputs 

and sound inputs are correctly 

connected.

2.  Press [

VOL DOWN

] or [

VOL UP

button to hear sound.

3.  Switch MUTE off by using the 


[

MUTE

] button.

4.  Connect external speakers and 

adjust the volume to a suitable 

level.

Some picture elements do not 

light up

Some pixels of the display may not 

turn on.

This display is manufactured using 

an extremely high level of precision 

technology: however, sometimes 

some pixels of the display may not 

display. This is not a malfunction.

After-Images can still be 

seen on the display after 

the display is powered off. 

(Examples of still pictures 

include logos, video games, 

computer images, and images 

displayed in 4:3 normal mode)

A still picture is displayed for an 

over extended period of time

Do not allow a still image to be 

displayed for an extended period of 

time as this can cause a permanent 

after-image to remain on the 

display.

Summary of Contents for CDE4600-L

Page 1: ...gistering your product for future service Warranty information contained in this User Guide will describe your limited coverage from ViewSonic Corporation which is also found on our web site at http w...

Page 2: ...he instructions may cause harmful interference to radio communications Operation of this equipment in a residential area is likely to cause harmful interference in which case the user will be required...

Page 3: ...S 210 To prevent radio interference to the licensed service this device is intended to be operated indoors and away from windows to provide maximum shielding Equipment or its transmitting antenna that...

Page 4: ...r the Annex III of the RoHS2 Directives as noted below Examples of exempted components are 1 Mercury in cold cathode fluorescent lamps and external electrode fluorescent lamps CCFL and EEFL for specia...

Page 5: ...n the LCD monitor contains mercury Please follow the laws or rules of your municipality to dispose of the tube properly Do not bend power cord Do not use monitor in high temperature humid dusty or oil...

Page 6: ...nk often Position the monitor at a 90 angle to windows and other light sources to minimize glare and reflections Clean the LCD monitor surface with a lint free nonabrasive cloth Avoid using any cleani...

Page 7: ...2 3 Remote Control 5 2 3 1 General functions 5 2 3 2 Inserting batteries in the remote control 6 2 3 3 Handling the remote control 6 2 3 4 Operating range of the remote control 6 3 Connection 7 3 1 Co...

Page 8: ...of this document may be copied reproduced or transmitted by any means for any purpose without prior written permission from ViewSonic Corporation Product Registration To meet your future needs and to...

Page 9: ...DISPLAY AUTO ADJUST VOL UP VOL DOWN EXIT MENU SET AUDIO SOURCE OPTION Quick Start Guide NOTES For all other regions apply a power cord that conforms to the AC voltage of the power socket and has been...

Page 10: ...anty does not cover damage caused by improper installation 4 For the wall mounting kit use mounting screws and tighten them securely Model VESA Size mm Mounting Screws X Thickness of wall mount plate...

Page 11: ...menu is on 6 button Press to move the highlight bar up or increase the adjustment while OSD menu is on or to increase the audio output level while OSD menu is off 7 button Press to move the highlight...

Page 12: ...t from external AV device 9 AUDIO OUT RCA Audio signal output to connect your external AV device 10 AUDIO IN 3 5mm Audio input from your PC 11 SPDIF OUT Digital audio signal output to connect your ext...

Page 13: ...ptions picture and sound menus Press to run the Auto Adjust function CDE4600 L CDE5500 L Not Support NOTE This button is functional for VGA input only 9 MUTE button Press to turn the mute function on...

Page 14: ...to use the remote control for a long period remove the batteries 2 3 3 Handling the remote control Do not subject to strong shock Do not allow water or other liquid to splash the remote control If the...

Page 15: ...ly 3 1 Connecting External Equipments DVD VCR VCD PC STEREO AMPLIFIER AUDIO OUT USB RS232C IN OUT IR IN OUT AUDIO IN PC LINE IN COMPONENT OUT YPbPr SPDIF HDMI IN DVI IN RJ 45 VGA IN COMPONENT IN PC LI...

Page 16: ...RT VIDEO SOURCE PIP INPUT ON OFF CHANGE BRIGHTNESS CONTRAST DISPLAY AUTO ADJUST VOL UP VOL DOWN EXIT MENU SET AUDIO SOURCE OPTION NOTE This display s remote control sensor will stop working if the IR...

Page 17: ...ERNET To setup the network 1 Switch on the router and switch on its DHCP setting 2 Connect the router to this display with an Ethernet cable 3 Press MENU button to display the OSD menu 4 Press or butt...

Page 18: ...tional A LAN cable that connects your display to your network A media server running on your computer Appropriate settings on your computer firewall to allow you to run the media server Set up the net...

Page 19: ...USB port If you connect a USB storage device that consumes more than 500mA power make sure that it is connected to its own external power supply 4 4 Play options 4 4 1 Playing music files 1 Select Mu...

Page 20: ...ent from a media server you can select another media server Shuffle On Shuffle Off Enable or disable random play of video files NOTE To view information about a video for example played position durat...

Page 21: ...settings Picture style Select a predefined picture setting Restore style Restore the last selected predefined picture setting Backlight Adjust the brightness of this display s backlight Contrast Adju...

Page 22: ...changes Speaker Turn on or off the internal speakers Clear sound Enhance sound quality Audio out format Select the type of audio output through the digital audio output connector Audio out delay Autom...

Page 23: ...isable all keyboard functions except the POWER button RC lock Choose to enable or disable the button function of the remote control Unlock Enable button functions Lock all Lock all button functions Lo...

Page 24: ...MHz 4 3 Modified NTSC Standard 480p 59 94 Hz 27 MHz 576i 720 480 25 Hz 13 5 MHz 4 3 Modified PAL Standard 576p 50 Hz 27 MHz HDTV Resolution Standard Resolution Active Resolution Refresh Rate Pixel Rat...

Page 25: ...cloth If the surface becomes dirty soak a soft lint free cloth in a mild detergent solution Wring the cloth to remove excess liquid Wipe the surface of the display to remove dirt Then use a dry cloth...

Page 26: ...is not correctly set Use the Zoom mode or Custom zoom function in the Screen menu to fine tune display geometry and time frequency parameter Can hear sound but no picture Improperly connected source s...

Page 27: ...1 Type A 19 pin Digital RGB TMDS Video Audio MAX Video 720p 1080p 1920 1080 60 Hz WUXGA Audio 48 KHz 2 Channel L R Supports LPCM only DVI D Input DVI D jack Digital RGB TMDS Video VGA Input D Sub Jack...

Page 28: ...ental Condition Item Specifications Temperature Operational 5 40 C Storage 20 60 C Humidity Operational 20 80 RH No condensation Storage 10 90 RH No condensation Altitude Operational 0 2 000 m Storage...

Page 29: ...Digital RGB TMDS Video Audio MAX Video 720p 1080p 1920 1080 60 Hz WUXGA Audio 48 KHz 2 Channel L R Supports LPCM only DVI D Input DVI D jack Digital RGB TMDS Video VGA Input D Sub Jack 1 15 pin Analo...

Page 30: ...ental Condition Item Specifications Temperature Operational 5 40 C Storage 20 60 C Humidity Operational 20 80 RH No condensation Storage 10 90 RH No condensation Altitude Operational 0 2 000 m Storage...

Page 31: ...or Standby Input Select 8 s 22 000 TV 001 AV 002 S Video 003 YPbPr 004 HDMI 014 HDMI2 024 HDMI3 005 DVI 006 VGA1 PC 016 VGA2 007 OPS 008 Internal Mem 009 DP 1 No need for USB 2 For the case of two mo...

Page 32: ...ommand Value Range Comments Code ASCII Code Hex Three ASCII bytes Get Contrast 8 g a 61 000 100 Gets Contrast value Get Brightness 8 g b 62 000 100 Gets Brightness value Get Sharpness 8 g c 63 000 100...

Page 33: ...com Latin America Columbia www viewsonic com la C http www viewsonic com la soporte servicio tecnico soporte viewsonic com Latin America Mexico www viewsonic com la C http www viewsonic com la soporte...

Page 34: ...uct d Causes external to the product such as electrical power fluctuations or failure e Use of supplies or parts not meeting ViewSonic s specifications f Normal wear and tear g Any other cause which d...

Page 35: ...er by any other party 4 Repair or attempted repair by anyone not authorized by ViewSonic Effect of state law This warranty gives you specific legal rights and you may also have other rights which vary...

Page 36: ...s serial number so please record the product information in the space provided below on your purchase for your future use Please retain your receipt of proof of purchase to support your warranty claim...

Page 37: ...com Cuernavaca Compusupport de Cuernavaca SA de CV Francisco Leyva 178 Col Miguel Hidalgo C P 62040 Cuernavaca Morelos Tel 01 777 3180579 01 777 3124014 E Mail aquevedo compusupportcva com Distrito F...

Page 38: ......

Reviews: